|
以下是我在 Ubuntu18.04 中配置 shadowsocks(ss)和 privoxy 的全过程,这样就可以试试利用官方源同步最新代码,因为要是想把 android 系统源码同步下来直接用官方源是无法同步成功的,但是可以考虑使用清华大学的源。
更新软件源 $ sudo apt update
安装 python-pip $ sudo apt install python-pip 由于之前我已经安装过了,所以这里提示已经是最新版本
安装 shadowsocks $ sudo pip install shadowsocks 看到 Successfully installed shadowsocks-2.8.2 则代表安装成功
配置 shadowsocks 运行:$ sudo gedit /etc/shadowsocks.json 在 shadowsocks.json 文件中写入: { "server":"代理服务器ip”, "server_port":代理服务器端口, "password":"代理服务器访问密码”, "local_address":"127.0.0.1”, "local_port":1080, "timeout":600, "method":"aes-256-cfb" // 代理服务器访问数据加密方式,根据自己配置ss 服务端时的配置自行填写 }
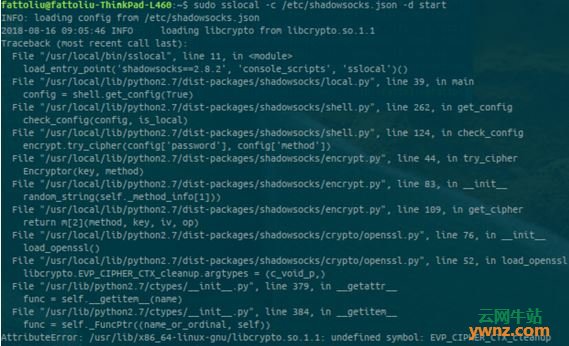
启动 shadowsocks $ sudo sslocal -c /etc/shadowsocks.json -d -start 然后并不是一路顺利,在这里报错了
这个问题是由于在openssl1.1.0版本中,废弃了EVP_CIPHER_CTX_cleanup函数,如官网中所说: EVP_CIPHER_CTX was made opaque in OpenSSL 1.1.0. As a result, EVP_CIPHER_CTX_reset() appeared and EVP_CIPHER_CTX_cleanup() disappeared. EVP_CIPHER_CTX_init() remains as an alias for EVP_CIPHER_CTX_reset(). 解决方法: 找到 /usr/local/lib/python2.7/dist-packages/shadowsocks/crypto/openssl.py 文件进行修改, 用vim 或 gedit 命令行都行: 此处以 shadowsocks-2.8.2的版本为例,其他版本自行在文件中搜索 1、将第52行 libcrypto.EVP_CIPHER_CTX_cleanup.argtypes = (c_void_p,) 改为 libcrypto.EVP_CIPHER_CTX_reset.argtypes = (c_void_p,) 2、将第111行 libcrypto.EVP_CIPHER_CTX_cleanup(self._ctx) 改为 libcrypto.EVP_CIPHER_CTX_reset(self._ctx) 修改完之后保存退出即可,然后再次执行: $ sudo sslocal -c /etc/shadowsocks.json -d -start 这次应该就能启动成功了!
至此,shadowssocks 已经配置完成,但还没完哦,接着往下看:配置系统全局代理。
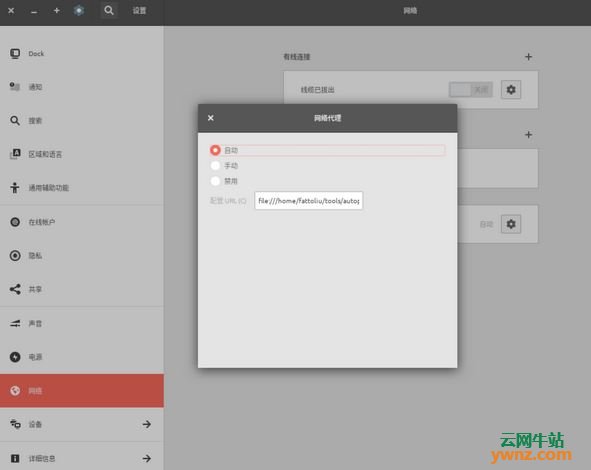
安装GenPAC $ sudo pip install genpac $ pip install —-upgrade genpac 完成之后,下载gfwlist $ genpac --pac-proxy "SOCKS5 127.0.0.1:1080" --gfwlist-proxy="SOCKS5 127.0.0.1:1080" --gfwlist-url=https://raw.githubusercontent.com/gfwlist/gfwlist/master/gfwlist.txt --output="autoproxy.pac” 找到下载下来的 autoproxy.pac文件,然后进入:设置—网络—网络代理,选择手动,URL 指向该文件路径即可,url 格式为: file:///home/{user}/autoproxy.pac ({user}替换成自己的用户)
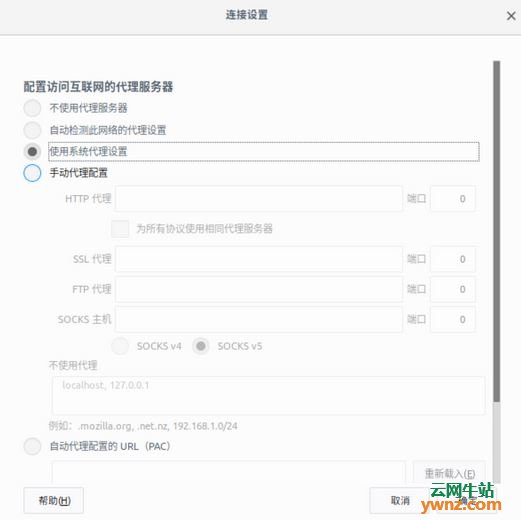
配置浏览器 此处以火狐为例:首选项——网络代理—— 设置,选择 “使用系统代理设置” 即可
这样,浏览器就能正常使用代理了。
我是为了下载 android 源码才装的 Ubuntu,所以还没完,你会发现这个时候终端中的 curl 之类的指令并不能使用代理,所以接着往下看。(当然,可以根据自身需求决定是否往下看了。)
安装并配置 privoxy 之安装 privoxy $ sudo apt install privoxy
配置privoxy $ sudo gedit /etc/privoxy/config 打开文件找到4.1节 listen-address,找到#listen-address 127.0.0.1:8118,取消注释
找到5.2节forward-socks4, forward-socks4a, forward-socks5 and forward-socks5t, 找到#forward-socks5t / 127.0.0.1:9050 .(后面的.很重要,不能舍弃,端口值可能和我的不一样,改成1080即可)。
修改完之后,重启 privoxy: $ sudo /etc/init.d/privoxy restart
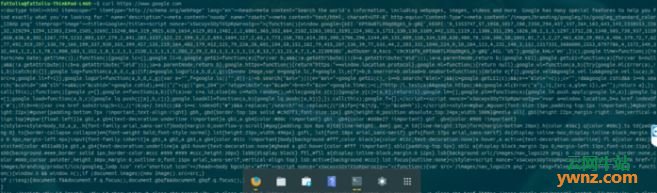
再修改~/.bashrc $ sudo gedit ~/.bashrc 打开文件后,加入: export http_proxy="127.0.0.1:8118" export https_proxy="127.0.0.1:8118" export ftp_proxy="127.0.0.1:8118" 保存退出后,终端也就可以使用代理了,我们来试一下 curl:
有返回,则说明配置成功。
为 Git 配置代理 最后,我还要配置一项:为 git 配置代理,否则 google / android 源码是同步不下来的,可以找份代码先验证一下: $ git clone https://chromium.googlesource.com/external/webrtc 会报错: 正克隆到 'webrtc'… fatal: unable to access 'https://chromium.googlesource.com/external/webrtc/': Failed to connect to chromium.googlesource.com port 443: 连接超时 所以需先为 git 配置代理: $ git config --global http.proxy 'socks5://127.0.0.1:1080' $ git config --global https.proxy 'socks5://127.0.0.1:1080' 配置好就能 正常clone了:
如果要关闭代理可使用一下命令: $ git config --global --unset http.proxy $ git config --global --unset https.proxy
配置 Shadowsocks privoxy 自启动 每次重启之后,都需要手动启动 ss 和 privoxy 比较麻烦,所以可以添加自启动。 由于ubuntu18.04不再使用initd管理系统,改用systemd。 systemd 默认读取 /etc/systemd/system 下的配置文件,该目录下的文件会链接/lib/systemd/system/下的文件。 rc-local.service就是我们需要配置的文件,先创建软连接: ln -fs /lib/systemd/system/rc-local.service /etc/systemd/system/rc-local.service 该脚本内容为: # SPDX-License-Identifier: LGPL-2.1+ # # This file is part of systemd. # # systemd is free software; you can redistribute it and/or modify it # under the terms of the GNU Lesser General Public License as published by # the Free Software Foundation; either version 2.1 of the License, or # (at your option) any later version. # This unit gets pulled automatically into multi-user.target by # systemd-rc-local-generator if /etc/rc.local is executable. [Unit] Description=/etc/rc.local Compatibility Documentation=man:systemd-rc-local-generator(8) ConditionFileIsExecutable=/etc/rc.local After=network.target [Service] Type=forking ExecStart=/etc/rc.local start TimeoutSec=0 RemainAfterExit=yes GuessMainPID=no 一般正常的启动文件主要分成三部分: 1.[Unit] 段: 启动顺序与依赖关系 2.[Service] 段: 启动行为,如何启动,启动类型 3.[Install] 段: 定义如何安装这个配置文件,即怎样做到开机启动 很明显上面的脚本中少了 Install段,也就没有定义如何做到开机启动,配置无法生效。所以在该文件中加上: [Install] WantedBy=multi-user.target Alias=rc-local.service 然后创建/etc/rc.local文件: touch /etc/rc.local chmod 755 /etc/rc.local 然后编辑该文件,加入以下脚本: #!/bin/bash sudo sslocal -c /etc/shadowsocks.json -d start sudo /etc/init.d/privoxy start 保存退出,执行reboot重启系统。
至此,在Ubuntu18.04中安装shadowsocks和privoxy整个全局代理的配置也就完成了。
相关主题 |