|
在Ubuntu 18.04操作系统中使用GeForce RTX 2080Ti显卡,但是系统内置的驱动与PPA安装都不行,需要安装NVidia官方的驱动才能运行起来,下面是实现的方法。
1、先禁用Ubuntu 18.04系统默认显卡驱动 打开系统名单,运行以下命令: sudo gedit /etc/modprobe.d/blacklist.conf 将下列代码增加到blacklist.conf文件的末尾: # for nvidia display device install blacklist vga16fb blacklist nouveau blacklist rivafb blacklist rivatv blacklist nvidiafb 保存,然后在命令行中更新initramfs,运行: sudo update-initramfs -u 重新启动计算机,运行重启命令: sudo reboot 查看是否禁用成功,无输出则禁用成功,运行以下命令: lsmod | grep nouveau
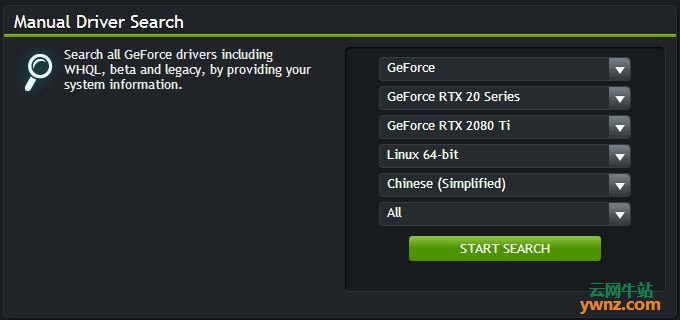
2、在Ubuntu 18.04系统中安装GeForce RTX 2080Ti显卡驱动 NVidia网站,驱动下载网址:https://www.geforce.com/drivers
或者,在命令行中直接下载410.78版本: wget -c http://cn.download.nvidia.com/XFree86/Linux-x86_64/410.78/NVIDIA-Linux-x86_64-410.78.run 进入命令行终端执行以下命令: sudo chmod +x NVIDIA-Linux-x86_64-410.78.run sudo ./NVIDIA-Linux-x86_64-410.78.run 注:如果原来安装过,需要先卸载: sudo apt-get --purge remove nvidia-* 或者: sudo ./NVIDIA-Linux-x86_64-410.57.run -uninstall 然后更新内核,重新启动计算机: sudo update-initramfs -u sudo reboot now 注意: 1].采用这种方法安装的驱动,每次Linux内核更新后,都要按照上面的方法操作一遍才能启用新的驱动。如果Linux内核没更新就不会有任何问题,维持现状。 2].原来的方法通过添加PPA,可以自动更新,但是没有最新的驱动程序版本(Ubuntu 18.04上最高390,Ubuntu 16.04上为396),目前还不能支持2080Ti显卡。 3].Ubuntu 16.04安装NVidia的384版本的驱动: sudo apt install nvidia-384 注:如果安装396版本驱动,如下(Titan V测试可用): sudo add-apt-repository ppa:graphics-drivers/ppa sudo apt update sudo apt install nvidia-396 开发使用: sudo apt install nvidia-396-dev
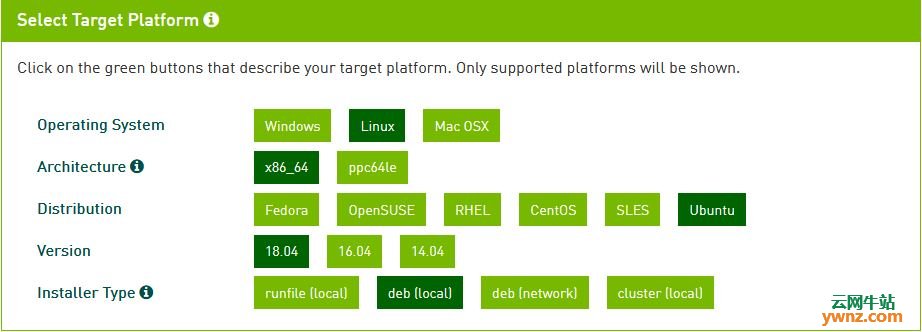
3、安装Cuda支持库 下载页面及参考:https://ywnz.com/linuxjc/2488.html
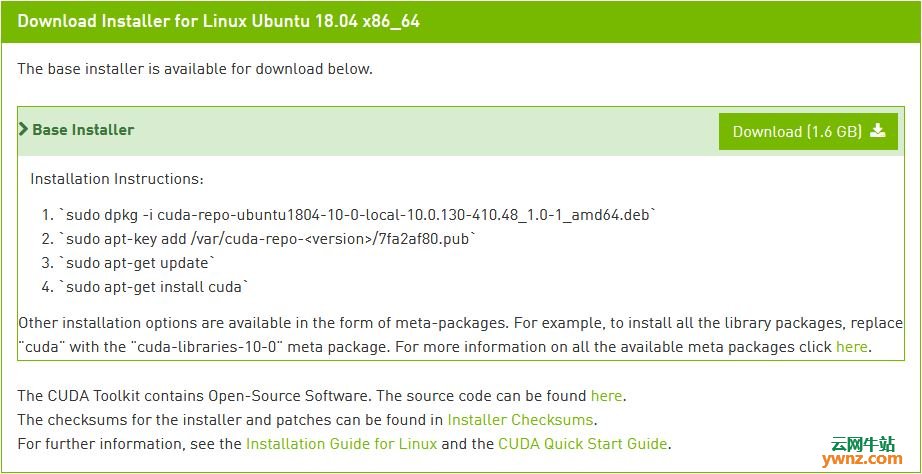
下载地址: https://developer.nvidia.com/compute/cuda/10.0/Prod/local_installers/cuda-repo-ubuntu1804-10-0-local-10.0.130-410.48_1.0-1_amd64 安装命令如下: sudo dpkg -i cuda-repo-ubuntu1804-10-0-local-10.0.130-410.48_1.0-1_amd64.deb sudo apt-key add /var/cuda-repo-<version>/7fa2af80.pub sudo apt-get update sudo apt-get install cuda 装完后还需要一些设置,才可以使用,比如提示如下: Summary Driver: Not Selected Toolkit: Installed in /usr/local/cuda-10.0 Samples: Installed in /home/openthings, but missing recommended libraries Please make sure that - PATH includes /usr/local/cuda-10.0/bin - LD_LIBRARY_PATH includes /usr/local/cuda-10.0/lib64, or, add /usr/local/cuda-10.0/lib64 to /etc/ld.so.conf and run ldconfig as root To uninstall the CUDA Toolkit, run the uninstall script in /usr/local/cuda-10.0/bin Please see CUDA_Installation_Guide_Linux.pdf in /usr/local/cuda-10.0/doc/pdf for detailed information on setting up CUDA. ***WARNING: Incomplete installation! This installation did not install the CUDA Driver. A driver of version at least 384.00 is required for CUDA 10.0 functionality to work. To install the driver using this installer, run the following command, replacing <CudaInstaller> with the name of this run file: sudo <CudaInstaller>.run -silent -driver
相关主题 |