|
本文介绍在Ubuntu 18.04/Debian 9系统上安装Telegraf的方法。
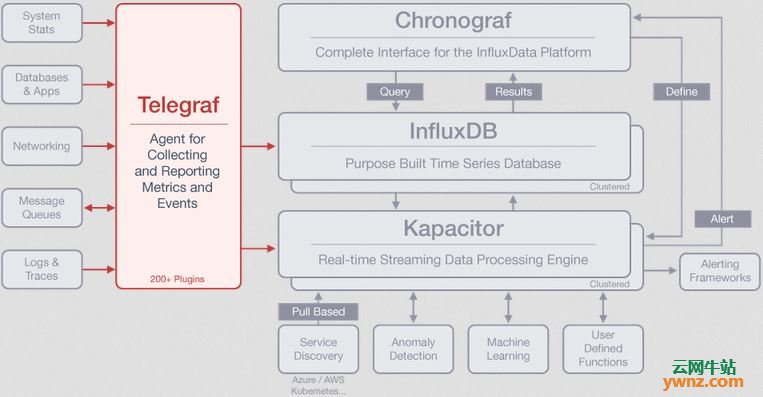
基本使用流程 Telegraf代理程序安装在服务器上-它被配置为收集你想要的指标-收集的指标被推送到InfluxDB-然后将InfluxDB数据源添加到Grafana-创建Grafana图以从Influxdb数据源获取数据。
一、在Ubuntu 18.04上安装Telegraf的方法 1、在Ubuntu 18.04上安装telegraf是从Influxdata存储库完成的,添加repo后,可以使用apt包管理器安装包,将InfluxData存储库添加到文件/etc/apt/sources.list.d/influxdata.list中: $ cat /etc/apt/sources.list.d/influxdata.list deb https://repos.influxdata.com/ubuntu bionic stable 2、导入apt key: $ sudo curl -sL https://repos.influxdata.com/influxdb.key | sudo apt-key add - 3、更新apt索引并安装telegraf: $ sudo apt-get update 4、开始安装telegraf: $ sudo apt-get install telegraf Reading package lists... Done Building dependency tree Reading state information... Done The following NEW packages will be installed: telegraf 0 upgraded, 1 newly installed, 0 to remove and 0 not upgraded. Need to get 9669 kB of archives. After this operation, 29.2 MB of additional disk space will be used. Get:1 https://repos.influxdata.com/ubuntu bionic/stable amd64 telegraf amd64 1.6.4-1 [9669 kB] Fetched 9669 kB in 0s (35.4 MB/s) Selecting previously unselected package telegraf. (Reading database ... 67631 files and directories currently installed.) Preparing to unpack .../telegraf_1.6.4-1_amd64.deb ... Unpacking telegraf (1.6.4-1) ... Setting up telegraf (1.6.4-1) ... Created symlink /etc/systemd/system/multi-user.target.wants/telegraf.service → /lib/systemd/system/telegraf.service 5、启动并启用服务以在启动时启动: $ sudo systemctl start telegraf $ sudo systemctl enable telegraf $ sudo systemctl is-enabled telegraf enabled 6、检查服务状态: $ systemctl status telegraf telegraf.service - The plugin-driven server agent for reporting metrics into InfluxDB Loaded: loaded (/lib/systemd/system/telegraf.service; enabled; vendor preset: enabled) Active: active (running) since Mon 2019-01-14 10:07:22 UTC; 2min 11s ago Docs: https://github.com/influxdata/telegraf Main PID: 31175 (telegraf) Tasks: 10 (limit: 4704) CGroup: /system.slice/telegraf.service └─31175 /usr/bin/telegraf -config /etc/telegraf/telegraf.conf -config-directory /etc/telegraf/telegraf.dInstall InfluxDB on Debian 9
二、在Debian 9上安装Telegraf的方法 1、使用以下命令添加Influxdata存储库: $ cat /etc/apt/sources.list.d/influxdata.list deb https://repos.influxdata.com/debian stretch stable 2、导入repo gpg密钥以安装签名包: $ sudo curl -sL https://repos.influxdata.com/influxdb.key | sudo apt-key add - 3、更新apt索引并安装telegraf包: $ sudo apt-get update $ sudo apt-get install telegraf 4、启动telegraf服务: $ sudo systemctl start telegraf $ sudo systemctl enable telegraf 5、可以检查状态以确认是否正在运行: $ sudo systemctl status telegraf
相关主题 |