|
要在Fedora Linux 33系统中安装Buildah非常的简单,可连同Podman一起安装。
安装命令 其实在大多数Fedora Linux系统中预装了Podman和Buildah,如果您没有安装Podman或Buildah,请运行以下命令进行安装: $ sudo dnf install -y podman buildah 参考:安装和使用Buildah构建OCI和Docker容器映像。 注:安装了Podman 3.1.0和Buildah 1.2.0,当然,到您安装的时候,可能要比现在的版本高一级。
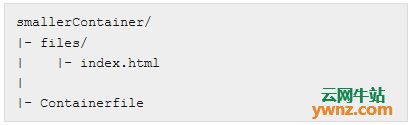
附1:设置 首先,创建一个项目目录,该目录将包含您的网站和容器文件: $ mkdir smallerContainer $ cd smallerContainer $ mkdir files $ touch files/index.html 制作一个简单的登录页面。对于此演示,您可以将以下HTML复制到index.html文件中: <!doctype html> <html lang="de"> <head> <title>Container Page</title> </head> <body> <header> <h1>Container Page</h1> </header> <main> <h2>Fedora</h2> <ul> <li><a href="https://getfedora.org">Fedora Project</a></li> <li><a href="https://docs.fedoraproject.org/">Fedora Documentation</a></li> <li><a href="https://fedoramagazine.org">Fedora Magazine</a></li> <li><a href="https://communityblog.fedoraproject.org/">Fedora Community Blog</a></li> </ul> <h2>Podman</h2> <ul> <li><a href="https://podman.io">Podman</a></li> <li><a href="https://docs.podman.io/">Podman Documentation</a></li> <li><a href="https://github.com/containers/podman">Podman Code</a></li> <li><a href="https://podman.io/blogs/">Podman Blog</a></li> </ul> <h2>Buildah</h2> <ul> <li><a href="https://buildah.io">Buildah</a></li> <li><a href="https://github.com/containers/buildah">Buildah Code</a></li> <li><a href="https://buildah.io/blogs/">Buildah Blog</a></li> </ul> <h2>Skopeo</h2> <ul> <li><a href="https://github.com/containers/skopeo">skopeo Code</a></li> </ul> <h2>CRI-O</h2> <ul> <li><a href="https://cri-o.io/">CRI-O</a></li> <li><a href="https://github.com/cri-o/cri-o">CRI-O Code</a></li> <li><a href="https://medium.com/cri-o">CRI-O Blog</a></li> </ul> </main> </body> </html> (可选)在浏览器中测试上述index.html文件: $ firefox files/index.html 最后,创建一个容器文件。该文件可以命名为Dockerfile或Containerfile: $ touch Containerfile 现在,您应该拥有一个项目目录,该目录的文件系统布局类似于下图所示:
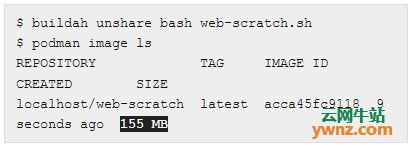
附2:从头开始构建容器 当使用了容器文件和Podman来构建新映像后,还可以使用Buildah从头开始构建容器。Podman使用与Buildah相同的库来构建容器,但是Buildah被认为是纯粹的构建工具,Podman旨在替代Docker。 使用Buildah从头开始构建时,容器是空的,里面没有东西。必须从容器外部安装或复制所需的所有内容。幸运的是,使用Buildah相当容易。下面提供了一个小的Bash脚本,它将从头开始构建映像。您可以在终端中分别运行脚本中的每个命令,而不是运行脚本,以更好地了解正在执行的操作: #!/usr/bin/env bash set -o errexit # Create a container CONTAINER=$(buildah from scratch) # Mount the container filesystem MOUNTPOINT=$(buildah mount $CONTAINER) # Install a basic filesystem and minimal set of packages, and httpd dnf install -y --installroot $MOUNTPOINT --releasever 33 glibc-minimal-langpack httpd --nodocs --setopt install_weak_deps=False dnf clean all -y --installroot $MOUNTPOINT --releasever 33 # Cleanup buildah unmount $CONTAINER # Copy the website buildah copy $CONTAINER 'files/*' '/var/www/html/' # Expose Port 80/tcp buildah config --port 80 $CONTAINER # Start httpd buildah config --cmd "httpd -DFOREGROUND" $CONTAINER # Save the container to an image buildah commit --squash $CONTAINER web-scratch 或者,可以通过将上面的脚本传递给Buildah来构建映像。请注意,不需要root用户特权: $ buildah unshare bash web-scratch.sh $ podman image ls
如上图所示,最终image只有155MB。
相关主题 |