|
本文将介绍在Linux系统上安装及使用Restic的方法,包括创建Restic备份存储库、使用Restic备份数据。
简介 Restic是用Go编写的,它是一个快速、安全、高效的备份程序,适用于Linux、macOS、Windows和BSD系统,包括FreeBSD和OpenBSD,易于配置和使用,它使用加密技术来保证数据的机密性和完整性。
相关链接
安装Restic的方法 在Debian/Ubuntu上安装Restic: sudo apt-get -y install restic 在Fedora上安装Restic: sudo dnf -y install restic 在FreeBSD上安装Restic: sudo pkg install restic 在RHEL和CentOS上安装Restic: sudo yum -y install yum-plugin-copr sudo yum copr enable copart/restic sudo yum -y install restic 在Arch Linux上安装Restic: $ sudo pacman -S restic 在Windows上安装Restic: 可以使用Scoop安装restic: scoop install restic 你可以使用以下方法检查已安装的Restic版本: $ restic version restic 0.9.4 compiled with go1.11.4 on linux/amd64 可以使用restic self-update命令完成更新: $ restic self-update writing restic to /usr/bin/restic find latest release of restic at GitHub restic is up to date 配置Restic自动完成: $ sudo restic generate --bash-completion /etc/bash_completion.d/restic writing bash completion file to /etc/bash_completion.d/restic $ source /etc/bash_completion.d/restic 对于Zsh(在Fedora系统中安装设置zsh的方法): $ mkdir ~/.zsh $ restic generate --zsh-completion ~/.zsh/restic.zsh writing zsh completion file to /home/jmutai/.zsh/restic.zsh $ echo "source ~/.zsh/restic.zsh" | tee -a ~/.zshrc $ source ~/.zshrc
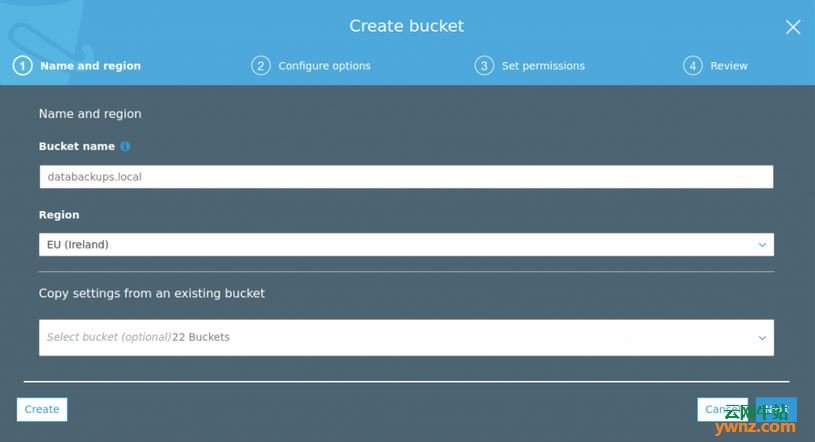
创建Restic备份存储库 备份保存在存储库中,Restic原生支持以下后端: 本地目录 sftp服务器(通过SSH) HTTP REST服务器(协议休息服务器) AWS S3(来自Amazon或使用Minio服务器) OpenStack Swift BackBlaze B2 Microsoft Azure Blob存储 Google云端存储 下面来配置AWS S3后端,使用安装和使用AWS CLI的文章安装和配置AWS CLI,参考在Linux系统上安装和使用AWS CLI的方法。 操作后,创建s3 bucket以保存文件: $ aws s3 mb s3://databackups.local make_bucket: databackups.local 将databackups.local替换为要创建的bucket的名称,也可以从AWS控制台创建S3 bucket:
如果没有~/.aws/credentials中的AWS凭证,请导出它们: $ export AWS_ACCESS_KEY_ID=<MY_ACCESS_KEY> $ export AWS_SECRET_ACCESS_KEY=<MY_SECRET_ACCESS_KEY> 初始化使用Amazon S3作为后端的存储库: $ restic --repo s3:s3.amazonaws.com/databackups.local init enter password for new repository: <SetPassword> enter password again: <ConfirmPassword> created restic repository c564d0cd66 at s3:s3.amazonaws.com/databackups.local Please note that knowledge of your password is required to access the repository. Losing your password means that your data is irrecoverably lost.
使用Restic备份数据 现在我们已经初始化了存储库,让我们开始备份我们的数据,特定时间点的目录内容在restic中称为snapshot: $ restic --repo s3:s3.amazonaws.com/databackups.local backup sitemap.xml open repository enter password for repository: repository c564d0cd opened successfully, password is correct created new cache in /home/jmutai/.cache/restic Files: 1 new, 0 changed, 0 unmodified Dirs: 0 new, 0 changed, 0 unmodified Added to the repo: 13.719 KiB processed 1 files, 13.340 KiB in 0:02 snapshot ca04a741 saved 这会将sitemap.xml文件上传到我们之前创建的Restic repository s3:s3.amazonaws.com/databackups.local,你将在上传后收到快照ID,在我们的示例中为ca04a741。 要上传包含多个文件的目录,只需将sitemap.xml替换为目录名称即可。 下面列出存储库中的文件。 使用restic list列出存储库中的对象: $ restic --repo s3:s3.amazonaws.com/databackups.local list index enter password for repository: repository c564d0cd opened successfully, password is correct 6589e05e67933146677712caecd88719be2e 6cd779cb7adf737d3f77856ba49b864d887a $ restic --repo s3:s3.amazonaws.com/databackups.local list snapshots enter password for repository: repository c564d0cd opened successfully, password is correct 005c3d29e4771bd82b522dd3756fe4250bbe ca04a741482b8a38ebd4b4a0015476031a30 使用ls选项列出快照中的文件,传递Snapshot ID的前8个字符: $ restic -r s3:s3.amazonaws.com/databackups.local ls ca04a741 enter password for repository: repository c564d0cd opened successfully, password is correct snapshot ca04a741 of [/home/jmutai/sitemap.xml] filtered by [] at 2019-03-07 09:20:14.108746307 +0300 EAT): /sitemap.xml 你还可以从列表中备份文件,并从列表中排除文件: $ find /path | grep 'PATTERN1' > /tmp/files_to_backup $ find /path | grep 'PATTERN2' > /tmp/excludes.txt $ restic -r /srv/restic-repo backup ~/work --exclude="*.c" --exclude-file=excludes.txt $ restic -r /restic-repo backup --files-from /tmp/files_to_backup \ --exclude-file=/tmp/excludes.txt /otherfiles 至此,备份数据完成。
相关主题 |