|
本文我们将介绍如何在Linux操作系统上使用Vagrant和Libvirt,要完成本文需要先安装Vagrant,然后安装Libvirt和QEMU-KVM及为Vagrant安装libvirt插件。
参考文章 1、在Linux上安装Vagrant请参考: 在Ubuntu 18.04/Debian 9/Kali Linux上安装Vagrant的方法 在Fedora 29/Fedora 28中安装Vagrant和Virtualbox 2、在Linux上安装KVM请参考:
为Vagrant安装Vagrant插件 安装Vagrant和KVM后,你应该已准备好安装libvirt插件,以便可以使用Vagrant开始管理KVM虚拟机: $ vagrant plugin install vagrant-libvirt Installing the 'vagrant-libvirt' plugin. This can take a few minutes... Building native extensions. This could take a while... Building native extensions. This could take a while... Installed the plugin 'vagrant-libvirt (0.0.43)'! 如果遇到如下错误: ERROR: Failed to build gem native extension. current directory: /home/jmutai/.vagrant.d/gems/2.5.1/gems/nokogiri-1.8.4/ext/nokogiri /usr/bin/ruby -r ./siteconf20190225-25314-14hvlbq.rb extconf.rb checking if the C compiler accepts ... yes Building nokogiri using system libraries. pkg-config could not be used to find libxml-2.0 Please install either `pkg-config` or the pkg-config gem per gem install pkg-config -v "~> 1.1" 然后运行: $ gem install nokogiri $ vagrant plugin install pkg-config 然后重试安装插件: $ vagrant plugin install vagrant-libvirt Installing the 'vagrant-libvirt' plugin. This can take a few minutes... Fetching: excon-0.62.0.gem (100%) Fetching: formatador-0.2.5.gem (100%) Fetching: fog-core-1.43.0.gem (100%) Fetching: fog-json-1.2.0.gem (100%) Fetching: mini_portile2-2.3.0.gem (100%) Building native extensions. This could take a while... Fetching: fog-xml-0.1.3.gem (100%) Fetching: ruby-libvirt-0.7.1.gem (100%) Building native extensions. This could take a while... Fetching: fog-libvirt-0.5.0.gem (100%) Fetching: vagrant-libvirt-0.0.43.gem (100%) Installed the plugin 'vagrant-libvirt (0.0.43)'! 安装完成后,可以使用以下命令确认已安装插件: $ vagrant plugin list vagrant-libvirt (0.0.43) 正在下载Vagrant boxes: Libvirt的Vagrant box是一个包含3个文件的tar存档:基础VagrantFile、metadata.json文件、QCOW2图片。 在这个例子中,我们将使用一个准备好的模板,让我们添加CentOS 7和CentOS 6 boxes: $ vagrant box add centos/7 --provider=libvirt ==> box: Loading metadata for box 'centos/7' box: URL: https://vagrantcloud.com/centos/7 ==> box: Adding box 'centos/7' (v1803.01) for provider: libvirt $ vagrant box add centos/6 --provider=libvirt 检查本地boxes presents: $ vagrant box list centos/6 (libvirt, 1803.01) centos/7 (libvirt, 1803.01) generic/ubuntu1604 (libvirt, 1.5.0)
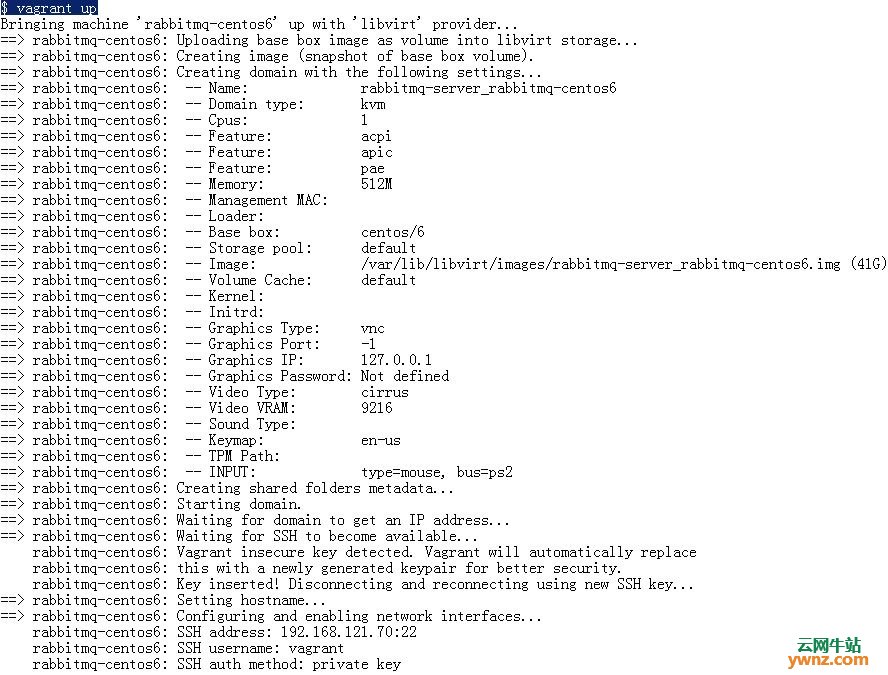
创建VM Vagrantfile Vagrant需要配置文件来获取要创建的VM的详细信息和设置,让我们创建一个VM Vagrantfile: $ mkdir ~/vagrant-vms $ cd ~/vagrant-vms 创建一个内容类似于以下内容的Vagrantfile: # -*- mode: ruby -*- # vi: set ft=ruby : ENV['VAGRANT_DEFAULT_PROVIDER'] = 'libvirt' # Check required plugins REQUIRED_PLUGINS_LIBVIRT = %w(vagrant-libvirt) exit unless REQUIRED_PLUGINS_LIBVIRT.all? do |plugin| Vagrant.has_plugin?(plugin) || ( puts "The #{plugin} plugin is required. Please install it with:" puts "$ vagrant plugin install #{plugin}" false ) end Vagrant.configure("2") do |config| # Rabbitmq VM config.vm.define "rabbitmq-centos6" do |node| node.vm.hostname = "rabbitmq-server-01" node.vm.box = "centos/6" node.vm.box_check_update = false #node.vm.synced_folder '.', '/vagrant', :disabled => true node.vm.network "private_network", ip: "192.168.18.15" node.vm.provider :libvirt do |domain| domain.memory = 512 domain.nested = true end end end 要启动VM,请运行: $ vagrant up
运行virsh列表以查看是否会获得VM列表: $ virsh list
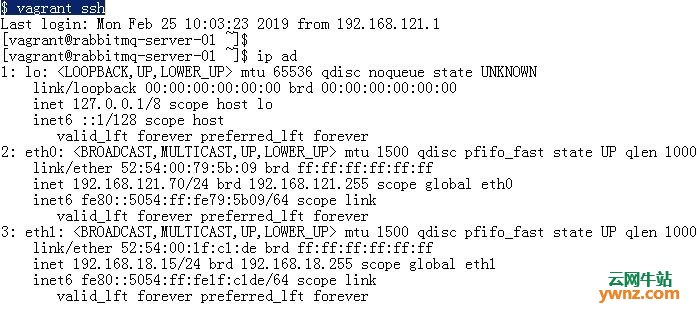
如Vagrantfile中所定义,将创建一个新桥,其中定义了子网的.1 IP地址,默认掩码为/24: $ ip ad show dev virbr3 6: virbr3: <BROADCAST,MULTICAST,UP,LOWER_UP> mtu 1500 qdisc noqueue state UP group default qlen 1000 link/ether 52:54:00:a6:63:05 brd ff:ff:ff:ff:ff:ff inet 192.168.18.1/24 brd 192.168.18.255 scope global virbr3 valid_lft forever preferred_lft forever 你也可以使用brctl命令查看网桥: $ brctl show
要ssh到VM,请使用vagrant ssh命令:
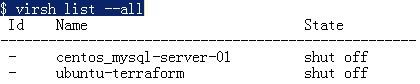
要输出.ssh/config有效语法以通过ssh连接到此环境,请运行ssh-config命令,需要将~/.ssh/config目录下提供的输出放到ssh中: $ vagrant ssh-config Host rabbitmq-server-01 HostName 192.168.121.122 User vagrant Port 22 UserKnownHostsFile /dev/null StrictHostKeyChecking no PasswordAuthentication no IdentityFile /home/jmutai/hacks/vagrant/labs/rabbitmq-server/.vagrant/machines/rabbitmq-server-01/libvirt/private_key IdentitiesOnly yes LogLevel FATAL 然后使用ssh命令以上面配置的名称登录: $ ssh rabbitmq-server-01 Last login: Mon Feb 25 10:03:23 2019 from 192.168.121.1 [vagrant@rabbitmq-server-01 ~]$ 要关闭VM,请运行: $ vagrant halt ==> rabbitmq-centos6: Halting domain... $ virsh list --all - centos_mysql-server-01 shut off - rabbitmq-server_rabbitmq-centos6 shut off - ubuntu-terraform shut off 要通过清除所有数据将VM设置为其初始状态,请使用vagrant destroy: $ vagrant destroy rabbitmq-centos6: Are you sure you want to destroy the 'rabbitmq-centos6' VM? [y/N] y ==> rabbitmq-centos6: Removing domain... $ virsh list --all
建立自己的Vagrant box 你需要安装packer才能工作: $ wget https://releases.hashicorp.com/packer/1.3.4/packer_1.3.4_linux_amd64.zip $ unzip packer_1.3.4_linux_amd64.zip Archive: packer_1.3.4_linux_amd64.zip inflating: packer $ sudo cp packer /usr/local/bin $ type packer packer is /usr/local/bin/packer 然后clone bento Github repo: $ cd ~/ $ git clone https://github.com/chef/bento $ cd bento $ cd centos $ packer build -only qemu -var "headless=true" centos-7.5-x86_64.json ==> qemu: Gracefully halting virtual machine... ==> qemu: Converting hard drive... ==> qemu: Running post-processor: vagrant ==> qemu (vagrant): Creating Vagrant box for 'libvirt' provider qemu (vagrant): Copying from artifact: ../builds/packer-centos-7.5-x86_64-qemu/centos-7.5-x86_64 qemu (vagrant): Compressing: Vagrantfile qemu (vagrant): Compressing: box.img qemu (vagrant): Compressing: metadata.json Build 'qemu' finished. ==> Builds finished. The artifacts of successful builds are: --> qemu: 'libvirt' provider box: ../builds/centos-7.5.libvirt.box 如果构建成功,则准备导入框文件将位于存储库根目录的builds目录中: $ vagrant box add builds/centos-7.5.libvirt.box --name "centos-7.5" ==> box: Box file was not detected as metadata. Adding it directly... ==> box: Adding box 'centos-7.5' (v0) for provider: box: Unpacking necessary files from: file:///home/jmutai/hacks/vagrant/labs/packer/bento/builds/centos-7.5.libvirt.box ==> box: Successfully added box 'centos-7.5' (v0) for 'libvirt'! 确认已安装box: $ vagrant box list centos-7.5 (libvirt, 0) centos/6 (libvirt, 1803.01) centos/7 (libvirt, 1803.01)
相关主题 |