|
本文介绍在CentOS 7服务器上安装Gitea自托管Git服务,并采用Nginx代理处理对Gitea的所有请求。
注意 请先参考在Ubuntu 18.04/Ubuntu 16.04上安装Gitea托管Git服务一文,本文的方法有一些地方和该文章里的内容是一样的,到时将可以参考。 Gitea下载页面:https://ywnz.com/linuxrj/2620.html
第1步:更新CentOS 7系统并安装git 更新CentOS 7系统软件包并通过运行以下命令安装git: sudo yum -y update sudo yum -y install git wget vim sudo reboot
第2步:添加git系统用户并创建目录 添加将由Gitea使用的git用户帐户: sudo useradd \ --system \ --shell /bin/bash \ --comment 'Git Version Control' \ --create-home \ --home-dir /home/git \ git 创建所需的目录结构: sudo mkdir -p /etc/gitea /var/lib/gitea/{custom,data,indexers,public,log} sudo chown git:git /var/lib/gitea/{data,indexers,log} sudo chmod 750 /var/lib/gitea/{data,indexers,log} sudo chown root:git /etc/gitea sudo chmod 770 /etc/gitea
第3步:安装MariaDB数据库 我们将使用MariaDB存储Gitea数据,参考在CentOS 7服务器中安装MariaDB 10.4的方法,接下来的步骤参考Ubuntu 18.04安装Gitea的文章。
第4步:安装和配置Gitea的说明 要安装的版本是gitea 1.6.3,和在Ubuntu 18.04/Ubuntu 16.04上安装Gitea托管Git服务一样的方法,请参考该文章即可。 简要讲一下,先在终端中下载gitea 1.6.3: wget https://github.com/go-gitea/gitea/releases/download/v1.6.3/gitea-1.6.3-linux-amd64 下载完成后把下载的文件转移到/use/local/bindirectory中: chmod +x gitea-1.6.3-linux-amd64 sudo mv gitea-1.6.3-linux-amd64 /usr/local/bin/gitea 这样就有成功安装gitea 1.6.3了。 关于help页面: # gitea --help NAME: Gitea - A painless self-hosted Git service USAGE: gitea [global options] command [command options] [arguments...] VERSION: 1.6.3 built with: bindata, sqlite DESCRIPTION: By default, gitea will start serving using the webserver with no arguments - which can alternatively be run by running the subcommand web. COMMANDS: web:Start Gitea web server serv:This command should only be called by SSH shell hook:Delegate commands to corresponding Git hooks dump:Dump Gitea files and database cert:Generate self-signed certificate admin:Command line interface to perform common administrative operations generate:Command line interface for running generators help, h:Shows a list of commands or help for one command GLOBAL OPTIONS: --help, -h:show help --version, -v:print the version
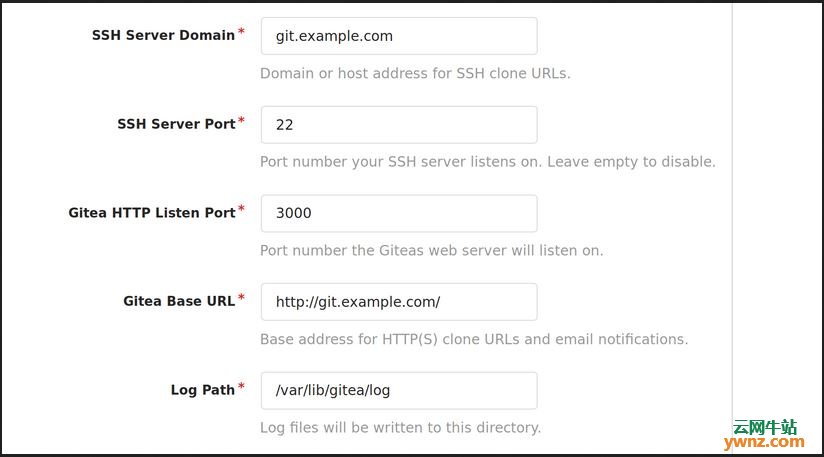
第5步:配置Nginx反向代理 如果想使用没有端口的域名访问Gitea UI,则需要配置Apache或NGINX反向代理: sudo yum install nginx 创建VirtualHost反向代理配置文件: sudo vim /etc/nginx/conf.d/gitea.conf 增加以下内容在文件中: server { listen 80; server_name git.example.com; location / { proxy_pass http://localhost:3000; } } 如果使用SSL并希望将http发送到https重定向,请使用: server { listen 80; server_name git.example.com; location / { rewrite ^ https://git.example.com$request_uri? permanent; } } server { listen 443 ssl; ssl_certificate /etc/letsencrypt/live/git.example.com/fullchain.pem; ssl_certificate_key /etc/letsencrypt/live/git.example.com/privkey.pem; server_name git.example.com; location / { proxy_pass http://localhost:3000; } } 注:请将上面提到的git.example.com替换为实际域名即可。 然后通过http://domain-name/install安装,注意替换成自己的地址。
最后 往下的设置数据库认证、设置应用程序常规设置、禁用用户自行注册及登录Gitea管理控制台请参考在Ubuntu 18.04/Ubuntu 16.04上安装Gitea托管Git服务,方法是一样的。
相关主题 |