|
本文介绍在Ubuntu 20.04 LTS服务器上安装和配置Rocket.Chat的方法,完成本文介绍的内容需要:Ubuntu 20.04 LTS服务器、Node.js、MongoDB、Nginx Web服务器、Let’s Encrypt SSL、域名。
步骤1、更新Ubuntu系统 更新您的Ubuntu 20.04系统,运行以下命令: sudo apt-get -y update
步骤2、安装必需的程序包依赖项 添加MongoDB GPG签名密钥: wget -qO - https://www.mongodb.org/static/pgp/server-4.4.asc | sudo apt-key add - 添加MongoDB存储库: echo "deb [ arch=amd64,arm64 ] https://repo.mongodb.org/apt/ubuntu focal/mongodb-org/4.4 multiverse" | sudo tee /etc/apt/sources.list.d/mongodb-org-4.4.list 参考:现在可在Ubuntu 20.04系统下安装MongoDB 4.4版本。 配置要通过Ubuntu 20.04软件包管理器安装的Node.js: sudo apt-get -y update && sudo apt-get install -y curl && curl -sL https://deb.nodesource.com/setup_12.x | sudo bash - 参考:在Ubuntu 20.04/18.04和Debian 10/9上安装Node.js 14版本。 安装Node.js、MongoDB、构建工具和graphicsmagick: sudo apt-get install -y build-essential mongodb-org nodejs graphicsmagick 您只能安装与基本版本相同的版本,或创建指向基本版本的符号链接,否则可能会导致与Ubuntu 20.04中的Rocket.Chat冲突,要检查安装的版本: $ node --version 安装inherits和n: sudo npm install -g inherits n 为节点二进制文件创建符号链接: sudo ln -s /usr/bin/node /usr/local/bin/node
步骤3、在Ubuntu 20.04上安装Rocket.Chat 下载带有以下内容的最新版本的Rocket.Chat: curl -L https://releases.rocket.chat/latest/download -o /tmp/rocket.chat.tgz 将下载的文件解压缩到/tmp文件夹: tar -xzf /tmp/rocket.chat.tgz -C /tmp 将Rocket.Chat安装到您选择的目录中,在本文中,我们将其安装在/opt目录中: cd /tmp/bundle/programs/server && npm install sudo mv /tmp/bundle /opt/Rocket.Chat 注:安装完Rocket.Chat后就可以对它进行基本的配置了。
步骤4、创建Rocketchat系统用户 创建一个rocketchat用户,并将所有权分配给Rocket.Chat文件夹: sudo useradd -M rocketchat && sudo usermod -L rocketchat sudo chown -R rocketchat:rocketchat /opt/Rocket.Chat 创建用户后,即可继续创建服务。
步骤5、创建Rocket.Chat服务 创建Rocket.Chat服务单元文件: cat << EOF |sudo tee /etc/systemd/system/rocketchat.service [Unit] Description=The Rocket.Chat server After=network.target remote-fs.target nss-lookup.target nginx.target mongod.target [Service] ExecStart=/usr/local/bin/node /opt/Rocket.Chat/main.js StandardOutput=syslog StandardError=syslog SyslogIdentifier=rocketchat User=rocketchat Environment=MONGO_URL=mongodb://localhost:27017/rocketchat?replicaSet=rs01 MONGO_OPLOG_URL=mongodb://localhost:27017/local?replicaSet=rs01 ROOT_URL=http://localhost:3000/ PORT=3000 [Install] WantedBy=multi-user.target EOF 为MongoDB配置存储引擎和复制,然后启动MongoDB服务: sudo sed -i "s/^# engine:/ engine: mmapv1/" /etc/mongod.conf sudo sed -i "s/^#replication:/replication:\n replSetName: rs01/" /etc/mongod.conf 启动并启用MongoDB服务: sudo systemctl enable mongod && sudo systemctl start mongod 测试: mongo --eval "printjson(rs.initiate())" 启动Rocket.Chat服务: sudo systemctl enable rocketchat && sudo systemctl start rocketchat 检查服务是否正在运行: $ systemctl status rocketchat
步骤6、配置Nginx反向代理 配置Nginx充当反向代理,我们还将在同一配置文件中设置“加密”。 安装Nginx Web服务器: sudo apt install nginx 在设置SSL之前,请使用以下配置进行反向代理设置: sudo nano /etc/nginx/conf.d/rocketchat.conf 该文件将具有类似于以下内容: upstream rocket_backend { server 127.0.0.1:3000; } server { listen 80; server_name chat.hirebestengineers.com; access_log /var/log/nginx/rocketchat-access.log; error_log /var/log/nginx/rocketchat-error.log; location / { proxy_pass http://rocket_backend/; proxy_http_version 1.1; proxy_set_header Upgrade $http_upgrade; proxy_set_header Connection "upgrade"; proxy_set_header Host $http_host; proxy_set_header X-Real-IP $remote_addr; proxy_set_header X-Forward-For $proxy_add_x_forwarded_for; proxy_set_header X-Forward-Proto http; proxy_set_header X-Nginx-Proxy true; proxy_redirect off; } } 注:请自行替换自身的域名。 检查Nginx配置是否正确: $ sudo nginx -t nginx: the configuration file /etc/nginx/nginx.conf syntax is ok nginx: configuration file /etc/nginx/nginx.conf test is successful 重新启动并启用Nginx服务: sudo systemctl restart nginx sudo systemctl enable nginx
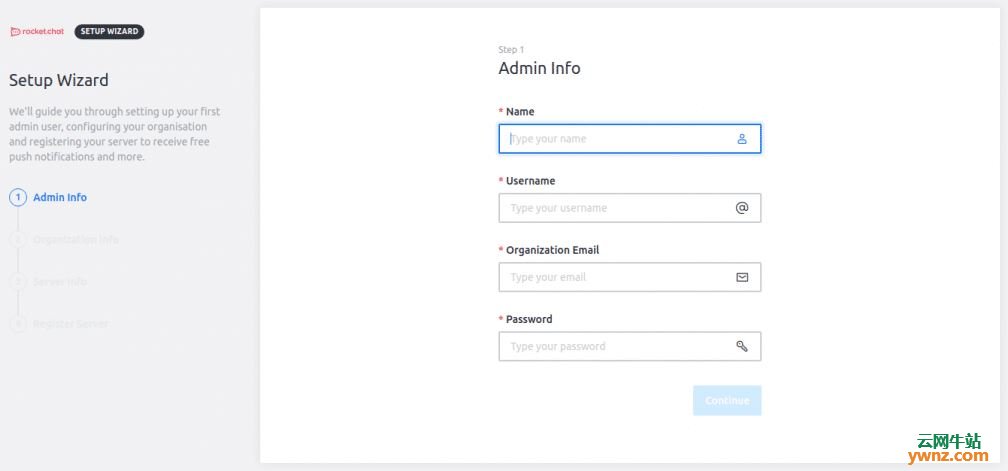
步骤7、设置让我们加密SSL 下载并设置“加密SSL证书”: sudo apt install certbot python3-certbot-nginx 然后运行certbot获取SSL证书: $ certbot --nginx SSL之后的最终Nginx配置应如下所示: upstream rocket_backend { server 127.0.0.1:3000; } server { server_name chat.hirebestengineers.com; access_log /var/log/nginx/rocketchat-access.log; error_log /var/log/nginx/rocketchat-error.log; location / { proxy_pass http://rocket_backend/; proxy_http_version 1.1; proxy_set_header Upgrade $http_upgrade; proxy_set_header Connection "upgrade"; proxy_set_header Host $http_host; proxy_set_header X-Real-IP $remote_addr; proxy_set_header X-Forward-For $proxy_add_x_forwarded_for; proxy_set_header X-Forward-Proto http; proxy_set_header X-Nginx-Proxy true; proxy_redirect off; } listen 443 ssl; # managed by Certbot ssl_certificate /etc/letsencrypt/live/chat.hirebestengineers.com/fullchain.pem; # managed by Certbot ssl_certificate_key /etc/letsencrypt/live/chat.hirebestengineers.com/privkey.pem; # managed by Certbot include /etc/letsencrypt/options-ssl-nginx.conf; # managed by Certbot ssl_dhparam /etc/letsencrypt/ssl-dhparams.pem; # managed by Certbot } server { if ($host = chat.hirebestengineers.com) { return 301 https://$host$request_uri; } # managed by Certbot listen 80; server_name chat.hirebestengineers.com; return 404; # managed by Certbot } 检查Nginx配置是否正确: $ sudo nginx -t nginx: the configuration file /etc/nginx/nginx.conf syntax is ok nginx: configuration file /etc/nginx/nginx.conf test is successful 重新启动并启用Nginx服务: sudo systemctl restart nginx 现在应该可以通过FQDN并使用https访问聊天服务器。 使用安装向导配置服务器:
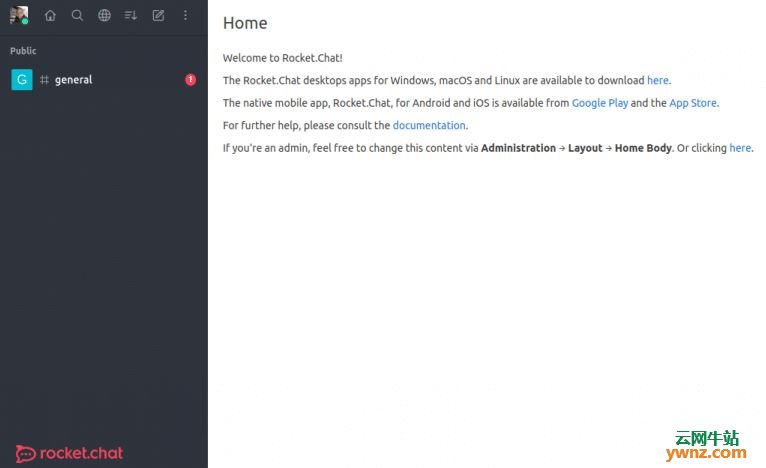
成功配置服务器后,现在可以使用在上一步中创建的管理员帐户访问该站点:
至此,到这一步,我们已经在Ubuntu 20.04服务器上成功安装了Rocket.Chat,并对其进行了配置。
相关主题 |