|
Bloonix是一个基于插件的监控系统,本文介绍在Centos 7系统中使用MariaDB和Letsencrypt安装Bloonix的详细步骤。
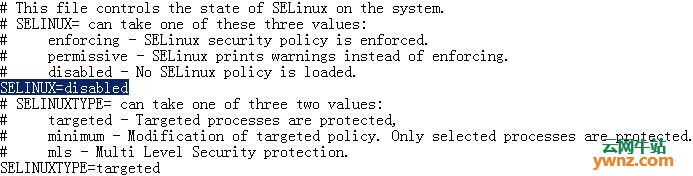
SELinux设置 为你的服务器创建主机名并禁用SELinux: [tech@nix ~]$ sudo hostnamectl set-hostname nix.example.com 打开/etc/selinux/config并将SELINUX=enforcing更改编辑为SELINUX=Disabled,如下所示:
第一步、安装EPEL(企业Linux的额外软件包)版本以获取所需的软件包 [tech@nix ~]$ sudo yum install epel-release Loaded plugins: fastestmirror Loading mirror speeds from cached hostfile * base: mirror.aptus.co.tz * epel: mirror.netweaver.uk * extras: mirror.liquidtelecom.com * updates: mirror.aptus.co.tz
第二步、为了从他们的存储库中获取Bloonix软件包,请将Bloonix的存储库安装到Centos框中 除此之外,bloonix使用Elasticsearch,这是一个基于Apache Lucene(amazon.com)构建的开源,RESTful,分布式搜索和分析引擎。 1、Bloonix Repo [tech@nix ~]$ sudo rpm -ivh https://download.bloonix.de/repos/centos/7/noarch/bloonix-release-0.7-1.noarch.rpm Retrieving https://download.bloonix.de/repos/centos/7/noarch/bloonix-release-0.7-1.noarch.rpm Preparing... ################# [100%] 2、Elasticsearch repo [tech@nix ~]$ sudo rpm --import https://packages.elastic.co/GPG-KEY-elasticsearch 运行sudo vim /etc/yum.repos.d/elasticsearch.repo并将以下内容粘贴到文件中: [elasticsearch-2.x] name=Elasticsearch repository for 2.x packages baseurl=https://packages.elastic.co/elasticsearch/2.x/centos gpgcheck=1 gpgkey=https://packages.elastic.co/GPG-KEY-elasticsearch enabled=1
第三步、安装Bloonix和Elasticsearch包 sudo yum install elasticsearch nginx mariadb-server java-1.7.0-openjdk bloonix-server bloonix-agent bloonix-webgui bloonix-plugins-basic bloonix-plugins-linux Loaded plugins: fastestmirror Loading mirror speeds from cached hostfile * base: mirror.aptus.co.tz * epel: mirrors.ircam.fr * extras: mirror.liquidtelecom.com * updates: mirror.aptus.co.tz elasticsearch-2.x | 2.9 kB 00:00:00 elasticsearch-2.x/primary_db | 9.3 kB 00:00:02 Resolving Dependencies --> Running transaction check ---> Package bloonix-agent.noarch 0:0.80-1.el7.centos will be installed --> Processing Dependency: bloonix-core >= 0.29 for package: bloonix-agent-0.80-1.el7.centos.noarch --> Processing Dependency: perl(JSON) for package: bloonix-agent-0.80-1.el7.centos.noarch --> Processing Dependency: perl(Params::Validate) for package: bloonix-agent-0.80-1.el7.centos.noarch --> Processing Dependency: perl(Term::ReadKey) for package: bloonix-agent-0.80-1.el7.centos.noarch --> Processing Dependency: mtr for package: bloonix-agent-0.80-1.el7.centos.noarch --> Processing Dependency: perl(Log::Handler) for package: bloonix-agent-0.80-1.el7.centos.noarch ---> Package bloonix-plugins-basic.noarch 0:0.68-1.el7.centos will be installed --> Processing Dependency: perl(Authen::SASL) for package: bloonix-plugins-basic-0.68-1.el7.centos.noarch ---> Package bloonix-plugins-linux.noarch 0:0.69-1.el7.centos will be installed ---> Package bloonix-server.noarch 0:0.66-1.el7.centos will be installed --> Processing Dependency: bloonix-dbi >= 0.13 for package: bloonix-server-0.66-1.el7.centos.noarch --> Processing Dependency: perl(DBI) for package: bloonix-server-0.66-1.el7.centos.noarch --> Processing Dependency: perl(MIME::Lite) for package: bloonix-server-0.66-1.el7.centos.noarch --> Processing Dependency: perl(Net::OpenSSH) for package: bloonix-server-0.66-1.el7.centos.noarch --> Processing Dependency: perl(URI::Escape) for package: bloonix-server-0.66-1.el7.centos.noarch --> Processing Dependency: perl(DBD::Pg) for package: bloonix-server-0.66-1.el7.centos.noarch --> Processing Dependency: perl(Time::ParseDate) for package: bloonix-server-0.66-1.el7.centos.noarch --> Processing Dependency: perl-JSON-XS for package: bloonix-server-0.66-1.el7.centos.noarch ---> Package bloonix-webgui.noarch 0:0.134-1.el7.centos will be installed --> Processing Dependency: bloonix-webgui-core >= 0.16 for package: bloonix-webgui-0.134-1.el7.centos.noarch ---> Package elasticsearch.noarch 0:2.4.6-1 will be installed
第四步、程序包安装完成后,启动MariaDB并通过完成基本配置 例如添加root密码和删除其测试表来启动它: [tech@nix ~]$ mysql_secure_installation Securing the MySQL server deployment. Enter password for user root: Re-enter new password: Estimated strength of the password: 100 Do you wish to continue with the password provided?: Yes Remove anonymous users?: Yes Success. Disallow root login remotely? : Yes Success. Remove test database and access to it? : Yes - Dropping test database... Success. - Removing privileges on test database... Success. Reload privilege tables now? (Press y|Y for Yes) : Yes Success. All done!
第五步、配置nginx Bloonix-WebGUI作为外部FastCGI应用程序运行,需要Nginx作为其反向代理,安装bloonix-webgui后,将在/etc/bloonix/webgui/nginx.conf中为Nginx创建配置文件,为了让它由Nginx提供服务,请将文件作为新的Nginx配置文件包含以下内容,创建一个文件,例如/etc/nginx/conf.d/001_bloonix.conf,并在其中包含bloonix创建的文件。 首先,打开文件并按如下所示进行编辑: server { listen 443; #Add your fqdn for the server here as shown server_name nix.example.com; access_log /var/log/nginx/bloonix-webgui.access.log; error_log /var/log/nginx/bloonix-webgui.error.log; location ~ /public { root /srv/bloonix/webgui; } location /favicon.ico { root /srv/bloonix/webgui/public/img; } location / { expires off; include /etc/nginx/fastcgi_params; root /srv/bloonix/webgui/public; fastcgi_pass 127.0.0.1:9000; } ssl on; ssl_certificate /etc/bloonix/webgui/pki/server.cert; ssl_certificate_key /etc/bloonix/webgui/pki/server.key; } 编辑后,创建新文件并在其中包含以下行: [tech@nix ~]$ sudo vim /etc/nginx/conf.d/001_bloonix.conf 添加行包括/etc/bloonix/webgui/nginx.conf到文件并重新启动nginx(运行:sudo systemctl restart nginx)。
第六步、添加MySQL模式和Elasticsearch模板 调用以下命令以创建MySQL模式: [tech@nix ~]$ /srv/bloonix/webgui/schema/init-database --mysql 之后,通过调用以下内容创建Elaticsearch模板: [tech@nix ~]$ /srv/bloonix/webgui/schema/init-elasticsearch localhost:9200
第七步、允许firewalld上的服务和端口运行 此时,服务和软件包应该全部安装并准备就绪,在这一步中,我们将允许firewalld上的服务和端口能顺利运行(CentOS 7下使用FirewallD构建动态防火墙): [tech@nix ~]$ sudo firewall-cmd --zone public --permanent --add-port=443/tcp [tech@nix ~]$ sudo firewall-cmd --zone=public --permanent --add-service=http [tech@nix ~]$ sudo firewall-cmd --zone=public --permanent --add-service=https [tech@nix ~]$ sudo firewall-cmd --reload 你可以尝试通过输入fqdn(例如https://nix.example.com)从浏览器访问该工具。
第八步、配置Letsencrypt 安装Certbot,最着名的Letsencrypt客户端: [tech@nix ~]$ sudo yum install certbot-nginx 由于我们已将主机名添加到服务器{}部分中的/etc/bloonix/webgui/nginx.conf文件中,因此我们可以继续获取证书: [tech@nix ~]$ sudo certbot --nginx -d nix.example.com 输出信息如下: Please choose whether HTTPS access is required or optional. 1: Easy - Allow both HTTP and HTTPS access to these sites 2: Secure - Make all requests redirect to secure HTTPS access Select the appropriate number [1-2] then [enter] (press 'c' to cancel): 在选择最适合你的套件后,按Enter键,消息如下所示: IMPORTANT NOTES: - Congratulations! Your certificate and chain have been saved at /etc/letsencrypt/live/nix.example.com/fullchain.pem. Your cert will expire on 2020-01-24. To obtain a new or tweaked version of this certificate in the future, simply run certbot again with the "certonly" option. To non-interactively renew *all* of your certificates, run "certbot renew" 请重新检查你的/etc/bloonix/webgui/nginx.conf文件并确认ssl设置已更新如下: [tech@nix ~]$ sudo cat /etc/bloonix/webgui/nginx.conf server { listen 443 default_server; server_name nix.example.com; access_log /var/log/nginx/bloonix-webgui.access.log; error_log /var/log/nginx/bloonix-webgui.error.log; location ~ /public { root /srv/bloonix/webgui; } location /favicon.ico { root /srv/bloonix/webgui/public/img; } location / { expires off; include /etc/nginx/fastcgi_params; root /srv/bloonix/webgui/public; fastcgi_pass 127.0.0.1:9000; } ssl on; ssl_certificate /etc/letsencrypt/live/nix.example.com/fullchain.pem; # managed by Certbot ssl_certificate_key /etc/letsencrypt/live/nix.example.com/privkey.pem; # managed by Certbot } 在此之后,你的部署应该准备好添加用于监视的主机和设备。
相关主题 |