|
以下是在Ubuntu 18.04系统上安装osTicket的详细步骤,采用LEMP且Nginx作为Web服务器、MySQL/MariaDB作为数据库和PHP 7.2。
第1步:更新系统 首先将系统上的软件包更新到最新版本: $ sudo apt-get update $ sudo apt-get upgrade 还可以设置服务器主机名(可选步骤),如: $ sudo hostnamectl set-hostname osticket.computingforgeeks.com
第2步:安装和配置MySQL/MariaDB数据库 在安装过程中,你将需要一个具有有效用户,密码和主机名的MySQL数据库,MySQL用户指定需要对创建的数据库具有FULL权限,如果你还没有安装数据库,请参考在Ubuntu 18.04系统上安装MariaDB 10.4的步骤。 安装MariaDB/MySQL后,继续为osTicket创建数据库,以root用户身份登录数据库并为osTicket创建数据库: $ mysql -u root -p Enter password: Welcome to the MariaDB monitor. Commands end with ; or \g. Your MariaDB connection id is 19258 Server version: 10.3.7-MariaDB-1:10.3.7+maria~bionic-log mariadb.org binary distribution MariaDB [(none)]> create database osticket_db; MariaDB [(none)]> grant all privileges on osticket_db.* to osticket_user identified by "strongpassword"; Query OK, 0 rows affected (0.000 sec) MariaDB [(none)]> flush privileges; Query OK, 0 rows affected (0.001 sec) 数据库准备就绪后,继续安装nginx Web服务器。
第3步:在Ubuntu 18.04上安装Nginx及PHP、PHP-FPM 在Ubuntu上,你可以从官方apt存储库安装nginx: $ sudo apt-get install nginx 要手动启动服务,请运行: $ sudo systemctl start nginx 虽然默认情况下启用服务启动服务,但手动允许它必须运行: $ sudo systemctl enable nginx 下一步是安装php和php-fpm,与Apache Web服务器不同,Nginx不包含本机PHP相关组件,为此,我们必须使用以下命令安装PHP-FPM(FastCGI Process Manager): $ sudo apt-get install php \ php-{fpm,pear,imap,apcu,intl,cgi,common,mbstring,net-socket,gd,xml-util,mysql,gettext,bcmath} 将从此安装的php版本是v7.2,要这安装7.3版本请参考在Ubuntu 18.04或CentOS 7系统上安装PHP 7.3,Php套接字位于/var/run/php/目录中,对于php的7.2版本,位于/var/run/php/php7.2-fpm.sock可以确认这个文件,/etc/php/7.2/fpm/pool.d/www.conf该服务将默认启动,其名称为php7.2-fpm.service。
第4步:下载并安装osTicket 你可以到osticket网站下载osTicket,然后解压,比如下载的是osTicket-v1.10.1.zip或是osTicket-v1.10.4.zip就使用unzip osTicket-v1.10.1.zip或unzip osTicket-v1.10.4.zip解压。 提取后你将获得两个目录,脚本和上传: $ ls -1 scripts upload 为osTicket创建web目录并将这些目录安装到它: $ sudo mkdir /srv/osticket $ sudo mv scripts upload /srv/os-ticket 接下来创建一个osTicket配置文件: $ sudo su - # cd /srv/osticket/upload/include # cp ost-sampleconfig.php ost-config.php 将osTicket Web目录的所有权更改为user-data和group: $ sudo chown -R www-data:www-data /srv/osticket/
第5步:配置nginx 在nginx配置目录中为osTicket创建VirtualHost配置文件: # vim /etc/nginx/conf.d/osticket.conf 添加内容: server { listen 80; server_name osticket.computingforgeeks.com; root /srv/osticket/upload; access_log /var/log/nginx/access.log; error_log /var/log/nginx/error.log; index index.php index.html index.htm; # Enable gzip gzip on; gzip_min_length 1000; gzip_types text/plain application/x-javascript text/xml text/css application/xml; set $path_info ""; location ~ /include { deny all; return 403; } if ($request_uri ~ "^/api(/[^\?]+)") { set $path_info $1; } location ~ ^/api/(?:tickets|tasks).*$ { try_files $uri $uri/ /api/http.php?$query_string; } if ($request_uri ~ "^/scp/.*\.php(/[^\?]+)") { set $path_info $1; } location ~ ^/scp/ajax.php/.*$ { try_files $uri $uri/ /scp/ajax.php?$query_string; } location / { try_files $uri $uri/ index.php; } location ~ \.php$ { fastcgi_param SCRIPT_FILENAME $document_root$fastcgi_script_name; include fastcgi_params; include snippets/fastcgi-php.conf; fastcgi_pass unix:/run/php/php7.2-fpm.sock; } } 用你的域名替换osticket.computingforgeeks.com即可。 确认配置syntax: # nginx -t nginx: the configuration file /etc/nginx/nginx.conf syntax is ok nginx: configuration file /etc/nginx/nginx.conf test is successful 重启nginx: $ sudo systemctl restart nginx
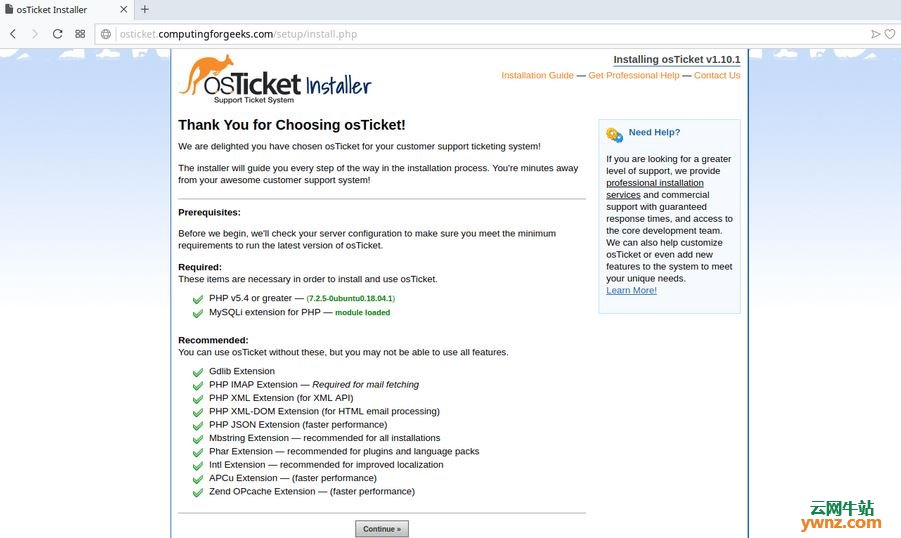
第6步:安装和配置osTicket 现在一切都已设置好,让我们通过从UI设置osTicket来完成安装,在浏览器中打开你配置的域名,第一页如下所示:
确认满足所有要求,然后单击继续:
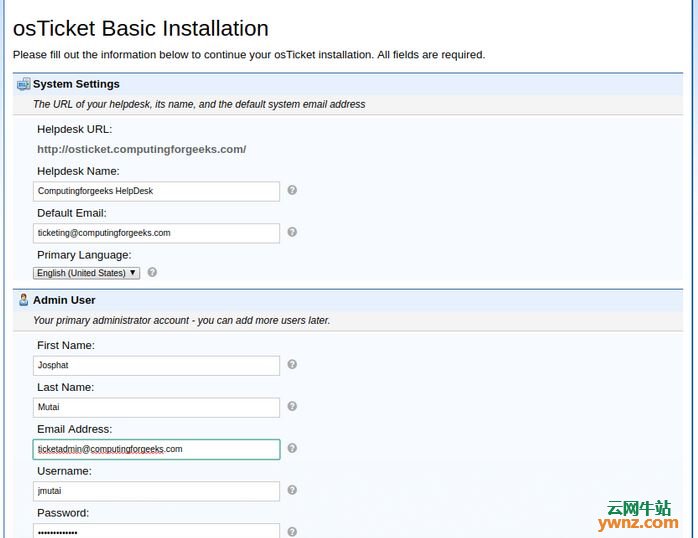
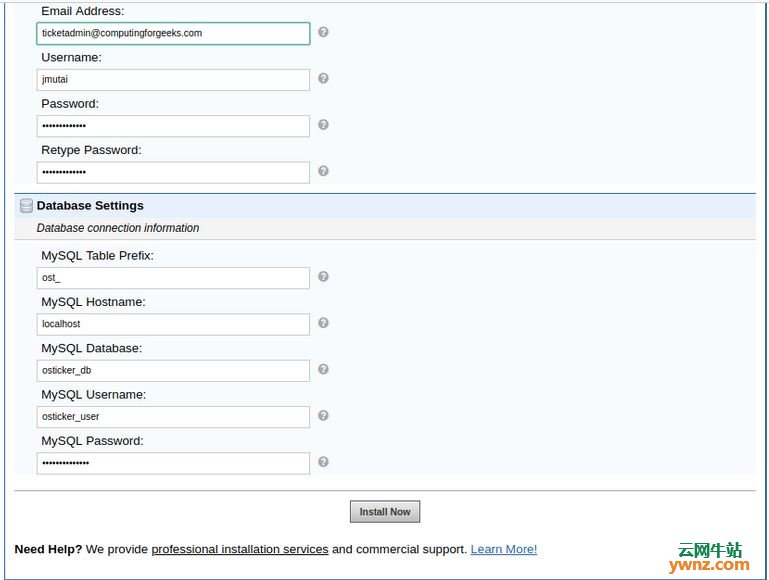
填写所有必填信息,然后单击“立即安装”按钮:
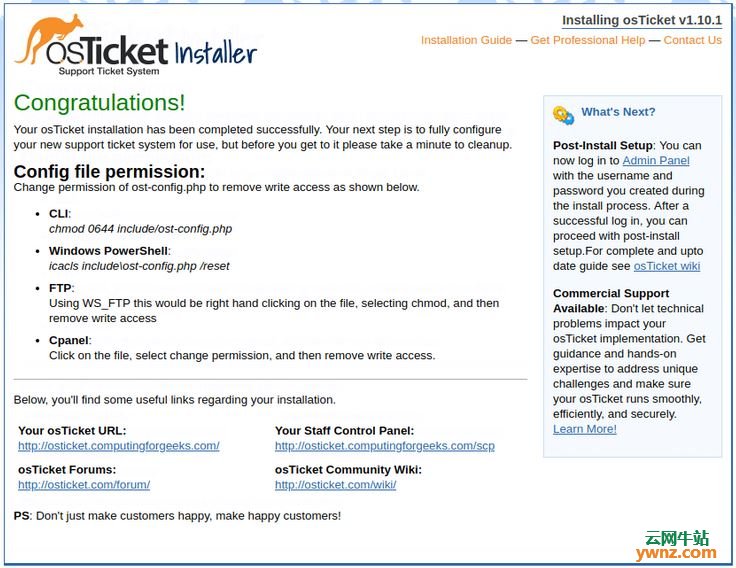
成功安装后,你将进入以下页面:
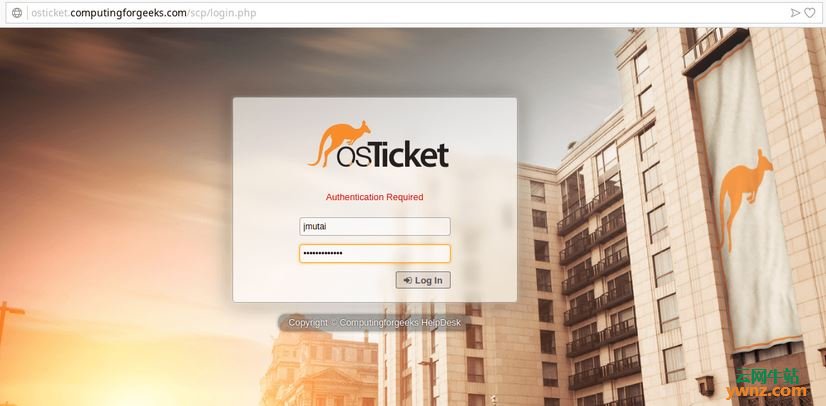
现在更改ost-config.php的权限以删除写访问权限,如下所示: # cd /srv/osticket/upload/ # chmod 0644 include/ost-config.php 另外,删除安装目录: cd /srv/osticket/upload rm -rf setup/ 要登录后端系统(osTicket控制面板),请使用域名/scp地址访问即可:
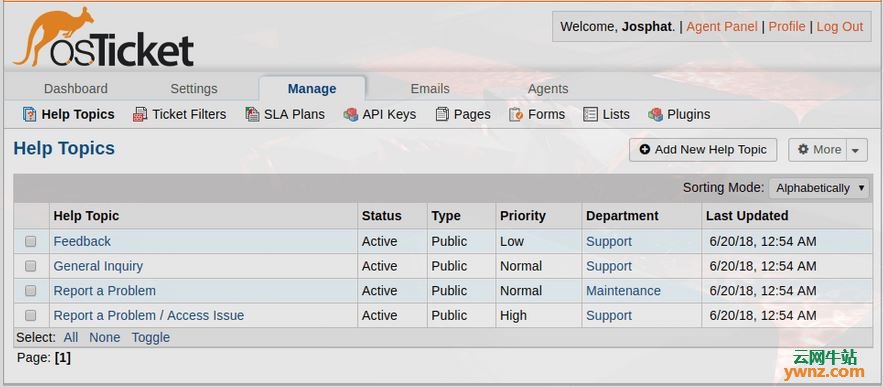
附,如果出现错误Valid CSRF Token Required,请编辑: include/class.ostsession.php 寻找: catch (DoesNotExist $e) { $this->data = new SessionData(['session_id' => $id]); } 然后添加: $this->data->session_data = ""; 即: catch (DoesNotExist $e) { $this->data = new SessionData(['session_id' => $id]); $this->data->session_data = ""; } 然后再去访问osTicket控制面板,如下图:
至此,osTicket安装配置完成。
相关主题 |