|
本文介绍在CentOS 7操作系统上安装netdata的方法。
简介 Netdata用于分布式系统的实时性能和健康监控,支持Linux、FreeBSD和MacOS。Netdata是最好的实时监控工具之一,可与虚拟机、物理服务器、容器和物联网设备配合使用,它利用现代互动网络仪表板。 netdata的一些好的功能: 自动缩放图表单位。 用于过滤对netdata的访问的IP访问列表。 增强的VM和容器监控。 仪表板所有图表中突出显示的时间范围。 仪表板快照,用于加载/保存选定的时间范围。 仪表板上的时区转换允许将图表与服务器日志进行比较。 零维护,配置和依赖性。 它易于定制,可扩展和嵌入。 缩放到无穷大。 支持时间序列后端 - 它可以以相同或更低的细节将其指标存档在graphite、opentsdb、Prometheus、JSON文档DB上。
在CentOS 7上安装Netdata 首先,首先安装netdata所需的缺少的依赖项,运行以下命令: # yum -y install curl git # curl -Ss 'https://raw.githubusercontent.com/firehol/netdata-demo-site/master/install-required-packages.sh' 然后执行下载的脚本: # bash install-required-packages.sh 这将下载netdata所需的一些软件包,完成后,你可以继续从Github克隆netdata源代码: # git clone https://github.com/firehol/netdata.git --depth=1 Cloning into 'netdata'... remote: Counting objects: 736, done. remote: Compressing objects: 100% (676/676), done. remote: Total 736 (delta 99), reused 265 (delta 43), pack-reused 0 Receiving objects: 100% (736/736), 2.54 MiB | 149.00 KiB/s, done. Resolving deltas: 100% (99/99), done. 然后通过执行netdata-installer.sh脚本启动netdata安装: # cd netdata/ # ./netdata-installer.sh You are about to build and install netdata to your system. It will be installed at these locations: - the daemon at /usr/sbin/netdata - config files in /etc/netdata - web files in /usr/share/netdata - plugins in /usr/libexec/netdata - cache files in /var/cache/netdata - db files in /var/lib/netdata - log files in /var/log/netdata - pid file at /var/run/netdata.pid - logrotate file at /etc/logrotate.d/netdata This installer allows you to change the installation path. Press Control-C and run the same command with --help for help. Press ENTER to build and install netdata to your system > 要开始安装过程,请按<ENTER>。 安装成功后,你将收到如下消息: ..... Uninstall script generated: ./netdata-uninstaller.sh Update script generated : ./netdata-updater.sh netdata-updater.sh can work from cron. It will trigger an email from cron only if it fails (it does not print anything when it can update netdata). Run this to automatically check and install netdata updates once per day: sudo ln -s /root/netdata/netdata-updater.sh /etc/cron.daily/netdata-updater --- We are done! --- netdata. is installed and running now! enjoy real-time performance and health monitoring...
配置内存重复数据删除 如果你有可用的内核内存减少(称为内核同页合并或KSM),但它当前未启用,应该通过运行命令启用它: echo 1 >/sys/kernel/mm/ksm/run echo 1000 >/sys/kernel/mm/ksm/sleep_millisecs 它将净数据内存利用率降低40-60%。 要启动netdata运行: # systemctl start netdata # systemctl status netdata
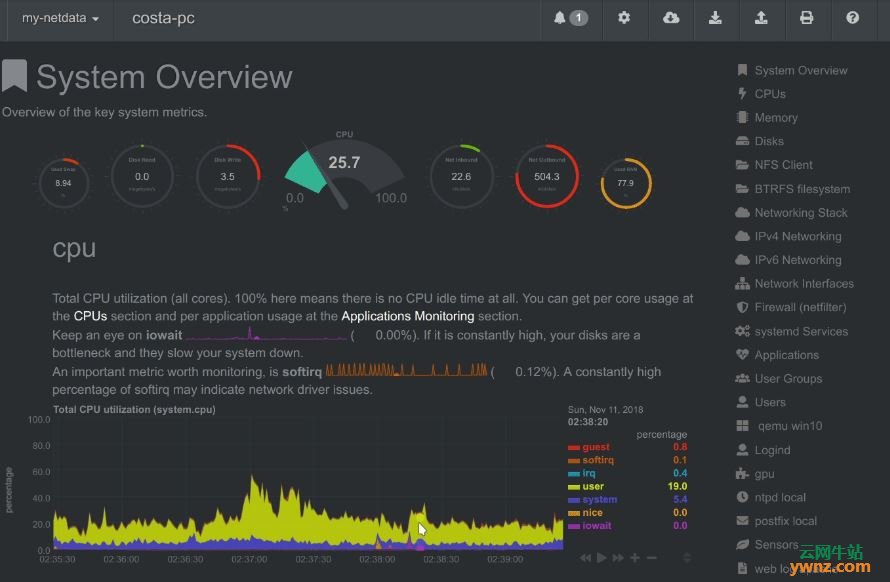
在firewalld上打开netdata端口及配置SELinux 现在我们已确认netdata服务正在运行,请在防火墙上打开其服务端口,以便你可以在外部访问它,使用命令: # firewall-cmd --add-port=19999/tcp --permanent # firewall-cmd --reload 然后配置SELinux,参考在RHEL 8/CentOS 8系统中禁用SELinux的方法。 你可以选择禁用SELinux,将其置于许可模式或配置端口19999以使用SELinux,要将SELinux置于许可模式,请运行: # setenforce 0 # sestatus SELinux status: enabled SELinuxfs mount: /sys/fs/selinux SELinux root directory: /etc/selinux Loaded policy name: targeted Current mode: permissive Mode from config file: permissive Policy MLS status: enabled Policy deny_unknown status: allowed Max kernel policy version: 28 # cat /etc/selinux/config | grep -v ^# | grep SELINUX= SELINUX=permissive 要禁用SELinux,请将线路更改为SELINUX=disabled并重新启动服务器。 如果SELinux设置为强制执行,你可能需要为此安装semanage工具: # yum -y install policycoreutils-python 现在你可以使用semanage命令行工具标记netdata端口: # semanage port -a -t ssh_port_t -p tcp 19999 # systemctl restart netdata # systemctl status netdata netdata.service - Real time performance monitoring Loaded: loaded (/etc/systemd/system/netdata.service; enabled; vendor preset: disabled) Active: active (running) since Sat 2019-03-02 10:00:43; 3h 43min ago Process: 8600 ExecStartPre=/bin/chown -R netdata:netdata /var/cache/netdata (code=exited, status=0/SUCCESS) Process: 8598 ExecStartPre=/bin/mkdir -p /var/cache/netdata (code=exited, status=0/SUCCESS) Main PID: 8603 (netdata) CGroup: /system.slice/netdata.service ├─ 8603 /usr/sbin/netdata -P /run/netdata/netdata.pid -D ├─ 8639 /usr/bin/python /usr/libexec/netdata/plugins.d/python.d.pl... ├─ 8640 /usr/libexec/netdata/plugins.d/apps.plugin 1 └─23394 bash /usr/libexec/netdata/plugins.d/tc-qos-helper.sh 1 访问你的服务器IP地址和端口19999,即http://server.ip:1999/,现在运行netdata,画面类似如下图:
相关主题 |