|
本文介绍在Ubuntu/Debian操作系统上安装和设置Semaphore Ansible Web UI的方法,Semaphore是Ansible Tower的开源替代品,它允许从Web界面启动和管理Ansible Tasks。所需要的依赖条件是:MySQL >= 5.6.4/MariaDB >= 5.3、ansible、git >= 2.x。
在Ubuntu/Debian上安装Semaphore的方法 以下是在Ubuntu/Debian系统上安装Semaphore的详细步骤。 第1步:更新系统并安装git 安装git并进行更新系统: sudo apt-get update sudo apt-get -y install git curl wget 确认安装的Git版本是= 2.x: 1]、Ubuntu 18.04平台: $ git --version git version 2.17.1 2]、Debian 9平台: $ git --version git version 2.11.0 第2步:安装Ansible 添加Ansible PPA存储库并安装Ansible。 1]、对于Ubuntu平台: sudo apt-add-repository ppa:ansible/ansible sudo apt-get update sudo apt-get install ansible -y 如果出现“apt-add-repository: command not found”之类的错误,请参考Ubuntu 18.04/16.04/Debian 9上安装add-apt-repository的方法。 2]、对于Debian 9平台: echo "deb http://ppa.launchpad.net/ansible/ansible/ubuntu trusty main" | sudo tee /etc/apt/sources.list.d/ansible.list sudo apt-key adv --keyserver keyserver.ubuntu.com --recv-keys 93C4A3FD7BB9C367 sudo apt update sudo apt-get install ansible -y 确认已安装Ansible版本: $ ansible --version ansible 2.7.9 config file = /etc/ansible/ansible.cfg configured module search path = [u'/root/.ansible/plugins/modules', u'/usr/share/ansible/plugins/modules'] ansible python module location = /usr/lib/python2.7/dist-packages/ansible executable location = /usr/bin/ansible python version = 2.7.15rc1 (default, Nov 12 2018, 14:31:15) [GCC 7.3.0] 第3步:安装MariaDB/MySQL数据库 可以选择MySQL或MariaDB数据库,我们选择MariaDB,参考在Ubuntu 18.04/18.10系统上安装MariaDB 10.3.13稳定版本: sudo apt-get -y install mariadb-server 出现提示时设置root密码。 第4步:下载并安装Semaphore 可以到Semaphore下载地址下载最新的版本,下面下载的是2.5.1版本: wget https://github.com/ansible-semaphore/semaphore/releases/download/v2.5.1/semaphore_2.5.1_linux_amd64.deb 安装下载的Debian软件包: $ sudo dpkg -i semaphore_2.5.1_linux_amd64.deb Selecting previously unselected package semaphore. (Reading database … 38297 files and directories currently installed.) Preparing to unpack semaphore_2.5.1_linux_amd64.deb … Unpacking semaphore (2.5.1) … Setting up semaphore (2.5.1) … 检查$PATH中是否有semaphore二进制文件: $ which semaphore /usr/bin/semaphore $ semaphore -version v2.5.1 至此,安装Semaphore完成。
设置Semaphore的方法 运行以下命令以在系统中启动Semaphore设置: # semaphore -setup Hello! You will now be guided through a setup to: Set up configuration for a MySQL/MariaDB database Set up a path for your playbooks (auto-created) Run database Migrations Set up initial semaphore user & password DB Hostname (default 127.0.0.1:3306): 127.0.0.1:3306 DB User (default root): root DB Password: <root Password> DB Name (default semaphore): semaphore Playbook path (default /tmp/semaphore): /opt/semaphore Web root URL (optional, example http://localhost:8010/): http://localhost:8010/ Enable email alerts (y/n, default n): n Enable telegram alerts (y/n, default n): n Enable LDAP authentication (y/n, default n): n 如果选择打开电子邮件/电报警报或LDAP身份验证,请设置适当的值。 确认生成的配置并同意开始安装: Generated configuration: { "mysql": { "host": "127.0.0.1:3306", "user": "root", "pass": "password", "name": "semaphore" }, "port": "", "tmp_path": "/opt/semaphore", "cookie_hash": "0Jpz8DrxGg02+Bx7P3lDPa+Tdu0nOEw6HwKMu22Oo60=", "cookie_encryption": "I3hI3Fgitr5OMOOWmnaR59hxLUP6FlnAPdL/WJbSlO0=", "email_sender": "", "email_host": "", "email_port": "", "web_host": "http://localhost:8010/", "ldap_binddn": "", "ldap_bindpassword": "", "ldap_server": "", "ldap_searchdn": "", "ldap_searchfilter": "", "ldap_mappings": { "dn": "", "mail": "", "uid": "", "cn": "" }, "telegram_chat": "", "telegram_token": "", "concurrency_mode": "", "max_parallel_tasks": 0, "email_alert": false, "telegram_alert": false, "ldap_enable": false, "ldap_needtls": false } 确认这些值是否正确以启动设置: Is this correct? (yes/no): yes Config output directory (default /root): WARN[0037] An input error occured:unexpected newline Running: mkdir -p /root.. Configuration written to /root/config.json.. Pinging db.. Running DB Migrations.. Checking DB migrations Creating migrations table ...... Migrations Finished 设置用户名: Username: computingforgeeks Email: computingforgeeks@example.com WARN[0268] sql: no rows in result set level=Warn Your name: computingforgeeks Password: StrongPassword You are all setup computingforgeeks! Re-launch this program pointing to the configuration file ./semaphore -config /root/config.json To run as daemon: nohup ./semaphore -config /root/config.json & You can login with computingforgeeks@example.com or computingforgeeks. 你可以在文件/root/config.json上设置其他配置值。
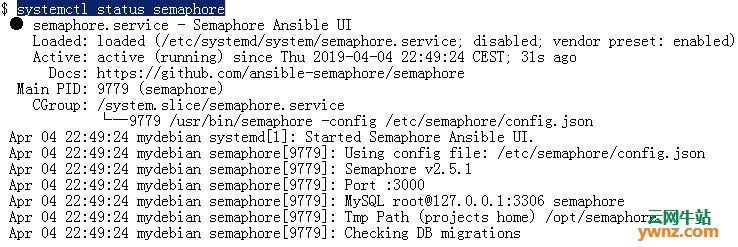
启动Semaphore服务和配置Systemd 1、启动Semaphore服务 现在我们已经完成了Semaphore的设置,运行: semaphore -config /root/config.json & 2、配置Systemd 现在让我们配置Semaphore Ansible UI由systemd管理。 创建systemd服务单元文件: sudo vim /etc/systemd/system/semaphore.service 增加: [Unit] Description=Semaphore Ansible UI Documentation=https://github.com/ansible-semaphore/semaphore Wants=network-online.target After=network-online.target [Service] Type=simple ExecReload=/bin/kill -HUP $MAINPID ExecStart=/usr/bin/semaphore -config /etc/semaphore/config.json SyslogIdentifier=semaphore Restart=always [Install] WantedBy=multi-user.target 创建Semaphore配置目录: sudo mkdir /etc/semaphore 将配置文件复制到创建的目录: sudo ln -s /root/config.json /etc/semaphore/config.json 停止运行Semaphore的实例: sudo pkill semaphore 确认: ps aux | grep sema 重新加载systemd并启动semaphore服务: sudo systemctl daemon-reload sudo systemctl start semaphore 检查状态以查看是否正在运行,运行systemctl status semaphore命令:
将服务设置为在启动时启动: $ sudo systemctl enable semaphore Created symlink /etc/systemd/system/multi-user.target.wants/semaphore.service → /etc/systemd/system/semaphore.service. 3000端口现在应该是开放的: # ss -tunelp | grep 3000 tcp LISTEN 0 128 :::3000 :::* users:(("semaphore",pid=9779,fd=3)) uid:999 ino:45866 sk:6 v6only:0 <->
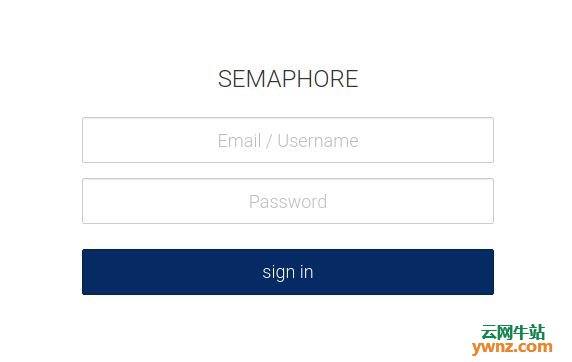
访问Semaphore Web界面的方法 在Web浏览器上,在3000端口上打开semaphore Server IP:
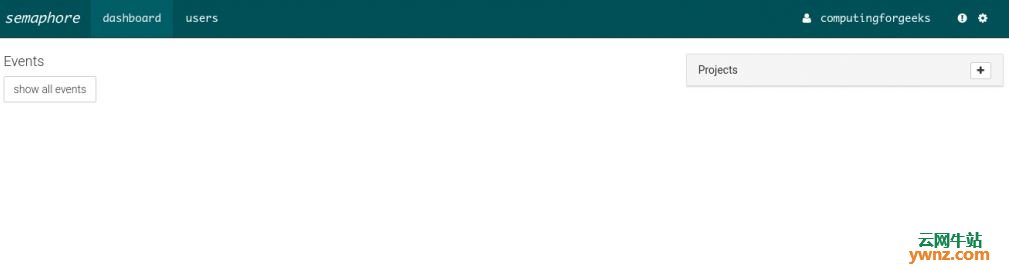
使用先前在安装期间创建的用户名/电子邮件登录,在身份验证后应显示semaphore的Web控制台:
现在已准备好使用Ansible和Web UI管理服务器,如下所示:
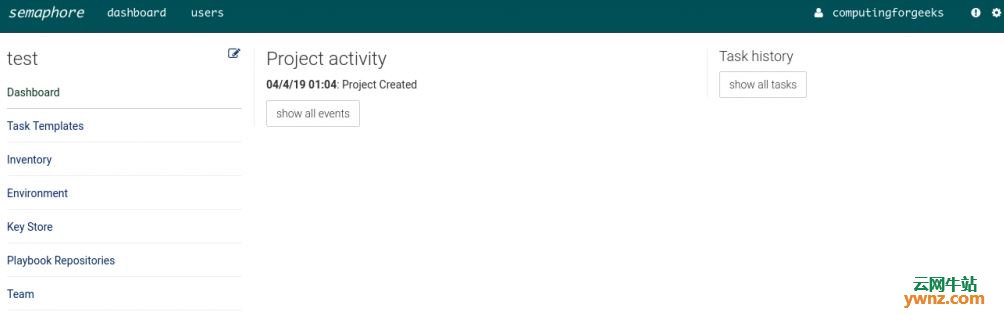
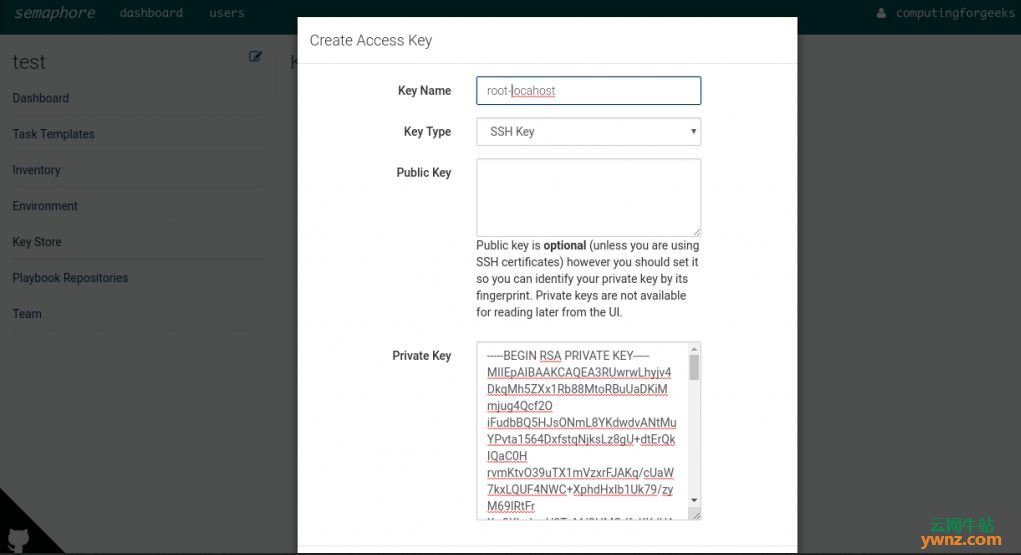
所需的初始步骤是: 1、添加Ansible使用的SSH密钥/API密钥 - 在密钥库>创建密钥下(Key Store > create key):
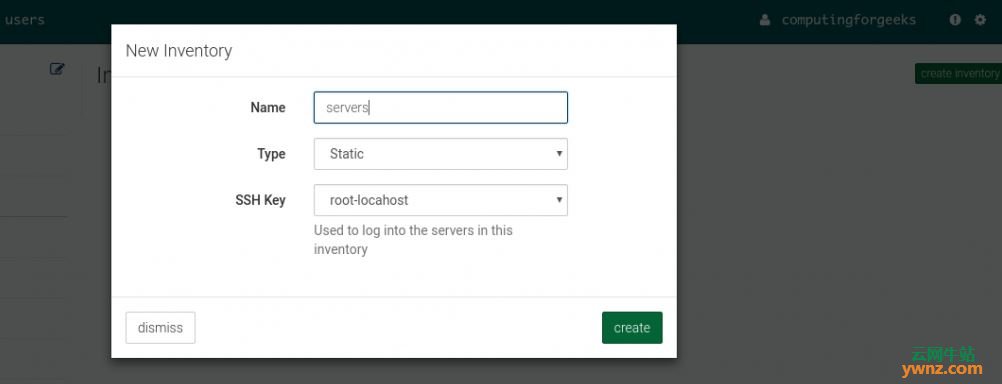
2、使用要管理的服务器创建库存文件 - 在库存>创建库存下(Inventory > create inventory):
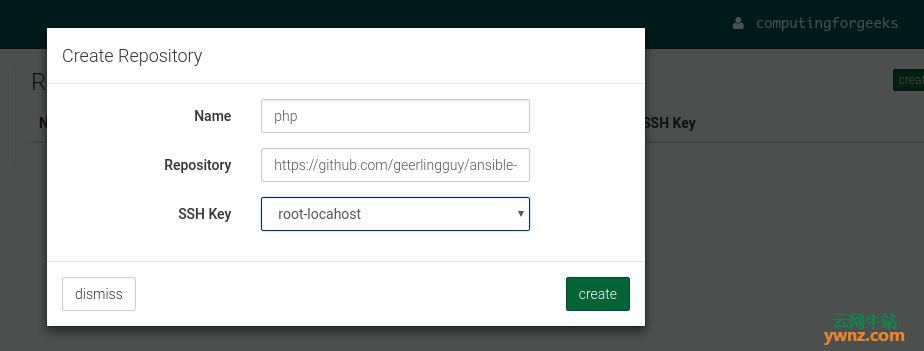
3、创建用户并添加到团队。 4、创建环境. 5、添加Playbook存储库:
6、创建任务模板并执行。 至此,Semaphore Web界面的配置完成了。
相关主题 |