|
本文介绍在Ubuntu 18.04操作系统上安装和设置i-doit的方法。它为你提供基于ITIL指南的专业IT文档解决方案,借助此工具,你可以轻松记录整个IT系统及其变更,定义应急计划,显示重要信息并确保IT网络稳定高效运行。
i-doit系统要求 以下是在Ubuntu 18.04系统上安装i-doit开源CMDB的最低要求: 2个vCPU 2GB RAM 10GB可用磁盘空间 我们将在专用虚拟机上进行安装,在软件端,需要LAMP Stack,该LAMP堆栈包括以下包: Apache Web server 2.4 MariaDB 10.x or MySQL 5.6, 5.7+ PHP 5.6 (deprecated), 7.x PHP extensions: bcmath, ctype, curl, fileinfo, gd, imagick, json, ldap, mbstring, memcached, mysqli, mysqlnd, pgsql, session, soap, xml, zip 接下来的步骤将介绍在Ubuntu 18.04上安装i-doit开源CMDB的完整过程。
一、安装Apache和PHP 安装Apache Web服务器和所需的PHP扩展: sudo apt -y install apache2 libapache2-mod-php sudo apt -y install php-{bcmath,cli,common,curl,gd,json,ldap,mbstring,mysql} sudo apt -y install php-{opcache,pgsql,soap,xml,zip,imagick,memcached} sudo apt -y install memcached unzip moreutils 为i-doit创建新的PHP配置文件: sudo tee /etc/php/7.2/mods-available/i-doit.ini<<EOF allow_url_fopen = Yes file_uploads = On magic_quotes_gpc = Off max_execution_time = 300 max_file_uploads = 42 max_input_time = 60 max_input_vars = 10000 memory_limit = 256M post_max_size = 128M register_argc_argv = On register_globals = Off short_open_tag = On upload_max_filesize = 128M display_errors = Off display_startup_errors = Off error_reporting = E_ALL & ~E_DEPRECATED & ~E_STRICT log_errors = On default_charset = "UTF-8" default_socket_timeout = 60 date.timezone = Asia/Shanghai session.gc_maxlifetime = 604800 session.cookie_lifetime = 0 mysqli.default_socket = /var/run/mysqld/mysqld.sock EOF session.gc_maxlifetime的值(以秒为单位)应该与i-doit的系统设置中的Session Timeout相同或更大。 应将date.timezone参数调整为本地时区。 然后,激活所需的PHP模块并重新启动Apache Web服务器: sudo phpenmod i-doit sudo phpenmod memcached sudo systemctl restart apache2.service 参考:在Ubuntu 18.04/16.04中安装PHP 7.3/7.2/7.1/7.0和PHP 7模块的方法。
二、安装MariaDB数据库 数据库是必不可少的依赖项,使用下面的指南在Ubuntu 18.04上安装和配置MariaDB: 在Ubuntu 18.04/18.10系统上安装MariaDB 10.3.13稳定版本 安装和配置完成后,登录MariaDB控制台,运行以下命令: SET GLOBAL innodb_fast_shutdown = 0; UPDATE mysql.user SET plugin = 'mysql_native_password' WHERE User = 'root'; FLUSH PRIVILEGES; 调整MariaDB服务器以获得最佳性能: sudo nano /etc/mysql/mariadb.conf.d/99-i-doit.cnf 设置如下: [mysqld] # This is the number 1 setting to look at for any performance optimization # It is where the data and indexes are cached: having it as large as possible will # ensure MySQL uses memory and not disks for most read operations. # # Typical values are 1G (1-2GB RAM), 5-6G (8GB RAM), 20-25G (32GB RAM), 100-120G (128GB RAM). innodb_buffer_pool_size = 1G # Use multiple instances if you have innodb_buffer_pool_size > 10G, 1 every 4GB innodb_buffer_pool_instances = 1 # Redo log file size, the higher the better. # MySQL/MariaDB writes two of these log files in a default installation. innodb_log_file_size = 512M innodb_sort_buffer_size = 64M sort_buffer_size = 262144 # default join_buffer_size = 262144 # default max_allowed_packet = 128M max_heap_table_size = 32M query_cache_min_res_unit = 4096 query_cache_type = 1 query_cache_limit = 5M query_cache_size = 80M tmp_table_size = 32M max_connections = 200 innodb_file_per_table = 1 # Disable this (= 0) if you have only one to two CPU cores, change it to 4 for a quad core. innodb_thread_concurrency = 0 # Disable this (= 0) if you have slow harddisks innodb_flush_log_at_trx_commit = 1 innodb_flush_method = O_DIRECT innodb_lru_scan_depth = 2048 table_definition_cache = 1024 table_open_cache = 2048 # Only if your have MySQL 5.6 or higher, do not use with MariaDB! #table_open_cache_instances = 4 innodb_stats_on_metadata = 0 sql-mode = "" 完成后,重新启动mariadb服务: sudo systemctl restart mysql
三、下载i-doit i-doit的网站:https://www.i-doit.org/,提供有i-doit 1.12.3版本下载: wget https://sourceforge.net/projects/i-doit/files/i-doit/1.12.3/idoit-open-1.12.3.zip sudo unzip idoit-open-1.12.3.zip -d /var/www/html/i-doit 将创建的目录的权限设置为apache用户: cd /var/www/html/i-doit sudo chown www-data:www-data -R . sudo find . -type d -name * -exec chmod 775 {} ; sudo find . -type f -exec chmod 664 {} ; sudo chmod 774 controller *.sh setup/*.sh 为i-doit创建Apache配置文件: sudo tee /etc/apache2/sites-available/i-doit.conf<<EOF <VirtualHost *:80> ServerAdmin admin@example.com DirectoryIndex index.php DocumentRoot /var/www/html/ <Directory /var/www/html/> AllowOverride All Require all granted </Directory> LogLevel warn ErrorLog ${APACHE_LOG_DIR}/error.log CustomLog ${APACHE_LOG_DIR}/access.log combined </VirtualHost> EOF 启用站点和重写模块: sudo chown www-data:www-data -R /var/www/html/ sudo chmod 755 /var/log/apache2 sudo chmod 664 /var/log/apache2/* sudo a2ensite i-doit sudo a2enmod rewrite sudo systemctl restart apache2.service
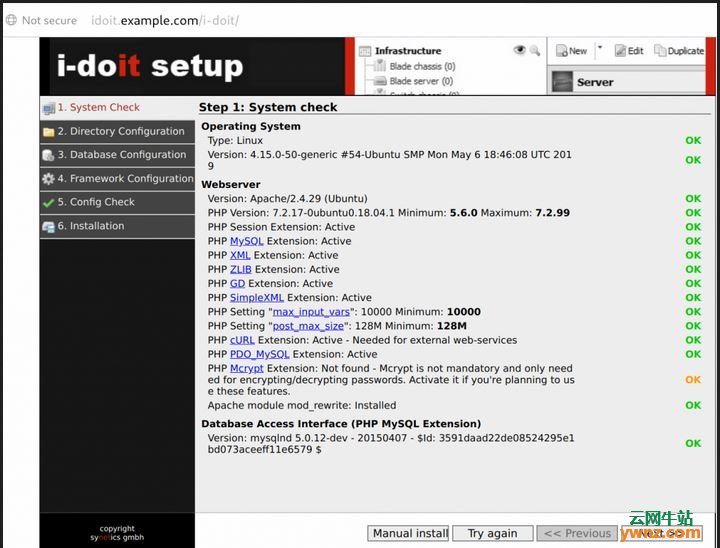
四、运行i-doit安装程序 通过打开服务器URL启动Web GUI设置,例如http://idoit.example.com/i-doit/:
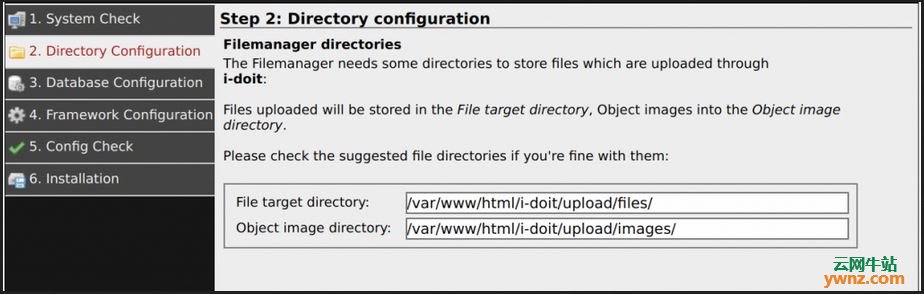
所有系统检查都应显示通过。 1、目录配置 这里将请求存储安装文件或用户特定文件的路径,可以接受建议的选项:
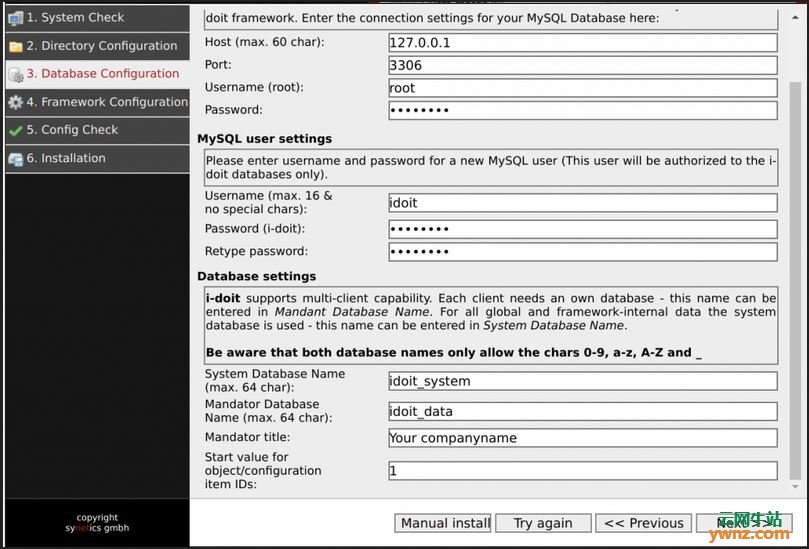
2、数据库配置 需要为数据库连接输入重要的信息和设置,为i-doit创建至少两个数据库和一个特殊用户:
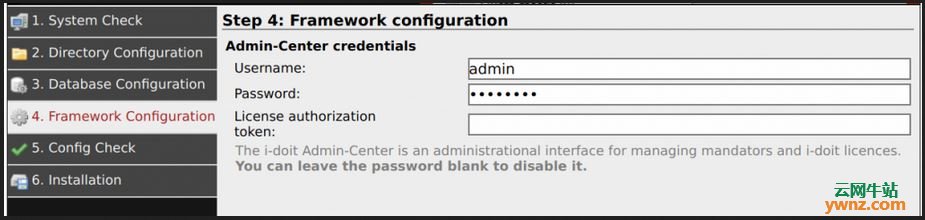
1]、连接设置: 主机:一般是主机本身,所以是localhost或127.0.0.1。 端口:通常是MySQL/MariaDB的默认端口,所以是3306。 用户名:数据库系统用户的用户名,通常为root。 密码:用户的密码。 2]、MySQL用户设置: 用户名:i-doit数据库所有者的用户名,通常是idoit。 密码:用户的密码。 3]、数据库设置 系统数据库名称:系统数据库的名称,通常为idoit_system。 Mandator Database Name:第一个租户的数据库名称,通常为idoit_data。 Mandator title:租户的名称,通常是关注的组织的名称。 对象/配置项ID的起始值:通常为1。 3、框架配置 i-doit中有单独的帐户来访问i-doit管理中心,它们可以在这里指定,我们建议使用此选项:
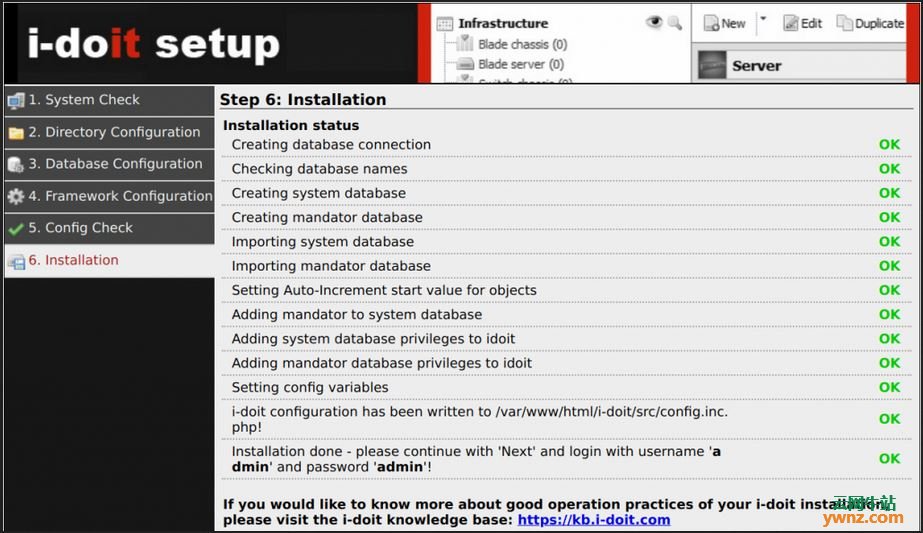
4、配置检查 在此步骤中,将检查并检查所有先前步骤,以查看是否可以进行设置。 5、安装 在该步骤中执行i-doit在系统上的安装:
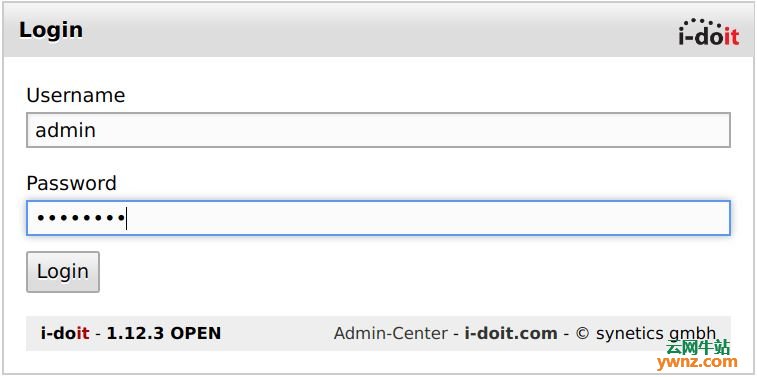
以用户admin身份和管理员密码登录:
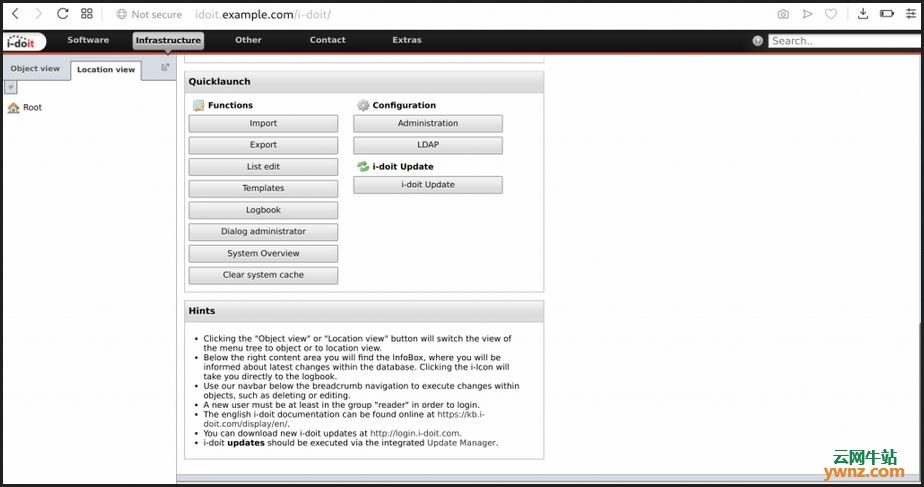
你现在已经在Ubuntu 18.04上安装了i-doit开源CMDB,如下图:
至此,安装i-doit全部完成。
相关主题 |