|
本文介绍如何使用Apache或Nginx Web服务器在Ubuntu 18.04上安装和设置Mautic的方法,Mautic是MailChimp等商业电子邮件服务提供商的免费开源替代品,它可以和第三方SMTP中继服务集成,如Gmail、Mandrill、Sendgrid、Amazon SES。服务器架设请参考在Ubuntu 18.04 Server中安装LAMP的方法[Apache、MariaDB、PHP7.2]或在Ubuntu 18.04 Server中安装LEMP的方法[Nginx、MariaDB、PHP7.2]。
一、将Mautic下载到你的Ubuntu 18.04服务器上 如果去下载Mautic,你需要输入你的姓名和电子邮件地址,当然也有更简单的方法,那就请在服务器上执行以下命令下载稳定版本(目前为2.15.1): wget https://www.mautic.org/download/latest 该文件将保存为最新,使用unzip命令将其解压缩到/var/www/mautic/目录: sudo apt install unzip sudo unzip latest -d /var/www/mautic/ 然后将Web服务器用户(www-data)作为此目录的所有者: sudo chown -R www-data:www-data /var/www/mautic/
二、为Mautic创建MariaDB数据库和用户 现在我们需要登录MariaDB控制台并为Mautic创建数据库和用户,默认情况下,Ubuntu上的MaraiDB包使用unix_socket来验证用户登录,这基本上意味着你可以使用操作系统的用户名和密码登录MariaDB控制台,因此,可以运行以下命令登录而不提供MariaDB root密码: sudo mysql -u root 接下来,使用以下命令为Mautic创建一个新数据库,本文将其命名为mautic,可以使用你喜欢的任何名称来存储数据库: CREATE DATABASE mautic DEFAULT CHARACTER SET utf8 COLLATE utf8_unicode_ci; 以下命令将创建数据库用户和密码,同时将新数据库的所有权限授予新用户,以便稍后Mautic可以写入数据库,用你首选的数据库名称,用户名和密码替换mautic、mauticuser、password: GRANT ALL ON mautic.* TO 'mauticuser'@'localhost' IDENTIFIED BY 'password'; 刷新权限表并退出MariaDB控制台: FLUSH PRIVILEGES; EXIT;
三、安装必需和推荐的PHP模块 运行以下命令以安装Mautic所需或推荐的PHP模块: sudo apt install php-imagick php7.2-common php7.2-gd php7.2-imap php7.2-json php7.2-curl php7.2-zip php7.2-xml php7.2-mbstring php7.2-bz2 php7.2-intl php7.2-gmp 然后重启Apache(如果使用Nginx,则无需重新启动Nginx): sudo systemctl restart apache2
四、为Mautic创建Apache虚拟主机或Nginx配置文件 1、Apache 如果使用Apache Web服务器,请为Mautic创建一个虚拟主机: sudo nano /etc/apache2/sites-available/mautic.conf 将以下文本放入文件中,将mautic.example.com替换为你的真实域名,不要忘记为其设置DNS A记录: <VirtualHost *:80> ServerName mautic.example.com DocumentRoot /var/www/mautic/ ErrorLog ${APACHE_LOG_DIR}/error.log CustomLog ${APACHE_LOG_DIR}/access.log combined <Directory /> Options FollowSymLinks AllowOverride All </Directory> <Directory /var/www/mautic/> Options FollowSymLinks MultiViews AllowOverride All Order allow,deny allow from all </Directory> </VirtualHost> 保存并关闭文件,然后启用此虚拟主机: sudo a2ensite mautic.conf 重新加载Apache以使更改生效: sudo systemctl reload apache2 现在,应该可以在http://mautic.example.com/installer上看到Mautic基于Web的安装向导。 2、Nginx 如果使用Nginx Web服务器,请为Mautic创建一个虚拟主机: sudo nano /etc/nginx/conf.d/mautic.conf 将以下文本放入文件中。将mautic.example.com替换为你的真实域名,不要忘记为其设置DNS A记录: server { listen 80; listen [::]:80; server_name mautic.example.com; root /var/www/mautic; error_log /var/log/nginx/mautic.error; access_log /var/log/nginx/mautic.access; index index.php index.html index.htm index.nginx-debian.html; location / { # try to serve file directly, fallback to app.php try_files $uri /index.php$is_args$args; } # redirect some entire folders rewrite ^/(vendor|translations|build)/.* /index.php break; location ~ \.php$ { include snippets/fastcgi-php.conf; fastcgi_pass unix:/run/php/php7.2-fpm.sock; } location ~* ^/index.php { # try_files $uri =404; fastcgi_split_path_info ^(.+\.php)(/.+)$; # NOTE: You should have "cgi.fix_pathinfo = 0;" in php.ini fastcgi_pass unix:/var/run/php/php7.2-fpm.sock; fastcgi_index index.php; fastcgi_param SCRIPT_FILENAME $document_root$fastcgi_script_name; include fastcgi_params; fastcgi_buffer_size 128k; fastcgi_buffers 256 16k; fastcgi_busy_buffers_size 256k; fastcgi_temp_file_write_size 256k; } # Deny everything else in /app folder except Assets folder in bundles location ~ /app/bundles/.*/Assets/ { allow all; access_log off; } location ~ /app/ { deny all; } # Deny everything else in /addons or /plugins folder except Assets folder in bundles location ~ /(addons|plugins)/.*/Assets/ { allow all; access_log off; } # location ~ /(addons|plugins)/ { deny all; } # Deny all php files in themes folder location ~* ^/themes/(.*)\.php { deny all; } # Don't log favicon location = /favicon.ico { log_not_found off; access_log off; } # Don't log robots location = /robots.txt { access_log off; log_not_found off; } # Deny yml, twig, markdown, init file access location ~* /(.*)\.(?:markdown|md|twig|yaml|yml|ht|htaccess|ini)$ { deny all; access_log off; log_not_found off; } # Deny all attempts to access hidden files/folders such as .htaccess, .htpasswd, .DS_Store (Mac), etc... location ~ /\. { deny all; access_log off; log_not_found off; } # Deny all grunt, composer files location ~* (Gruntfile|package|composer)\.(js|json)$ { deny all; access_log off; log_not_found off; } # Deny access to any files with a .php extension in the uploads directory location ~* /(?:uploads|files)/.*\.php$ { deny all; } # A long browser cache lifetime can speed up repeat visits to your page location ~* \.(jpg|jpeg|gif|png|webp|svg|woff|woff2|ttf|css|js|ico|xml)$ { access_log off; log_not_found off; expires 360d; } } 保存并关闭文件,然后测试Nginx配置: sudo nginx -t 如果测试成功,请重新加载Nginx以使更改生效: sudo systemctl reload nginx 现在,应该可以在http://mautic.example.com/installer上看到Mautic基于Web的安装向导。
五、启用HTTPS参考 参考使用Certbot:在Linux上安装letsencrypt的最简单方法。
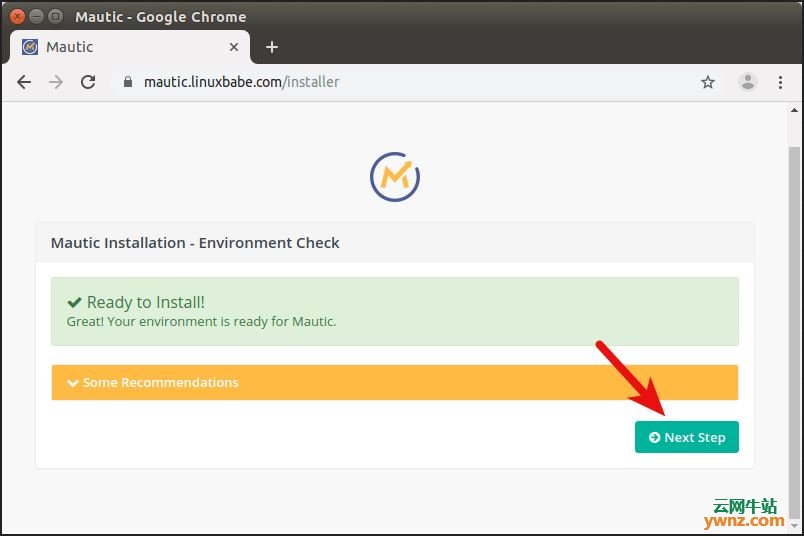
六、在Web浏览器中完成Mautic安装 现在,在你的浏览器地址栏中,输入Mautic的域名以访问Web安装向导: https://mautic.your-domain.com/installer 或者: https://mautic.your-domain.com/index.php/installer 单击下一步:
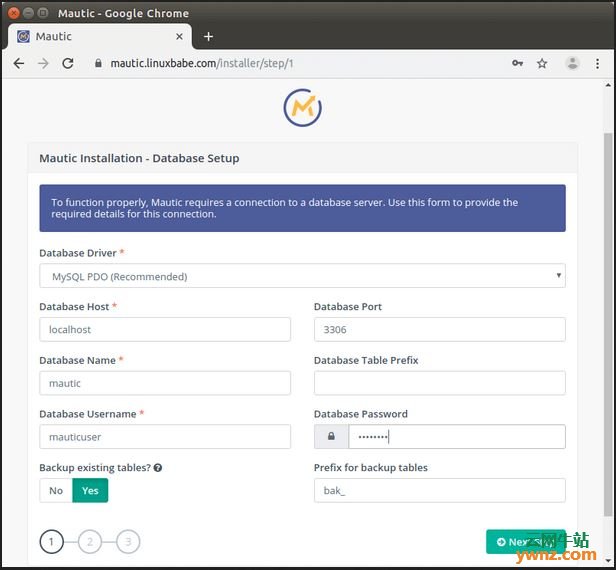
在步骤1中,输入MariaDB/MySQL数据库详细信息:
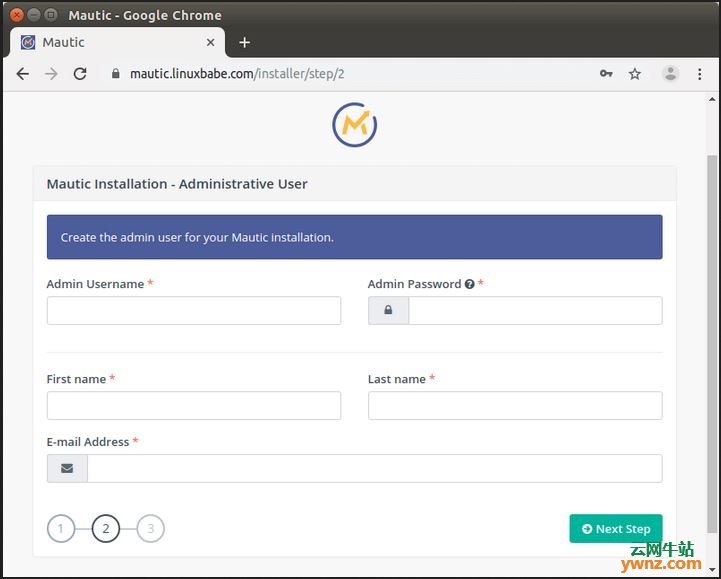
在第2步中,创建一个管理员帐户:
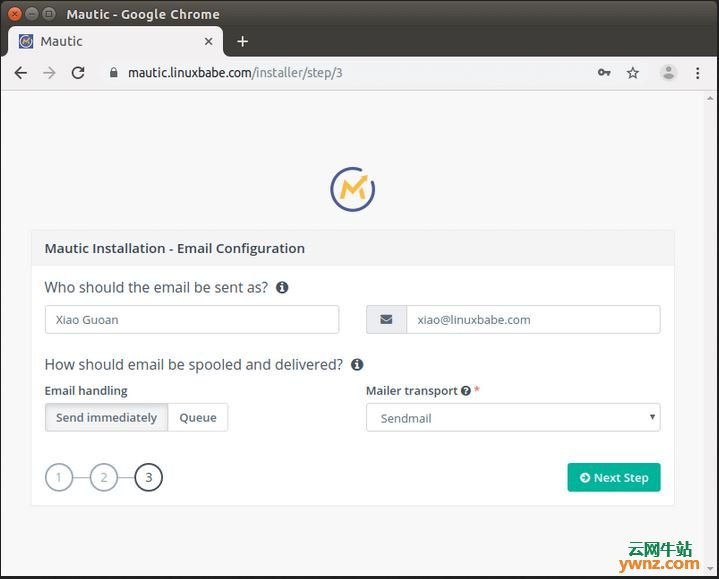
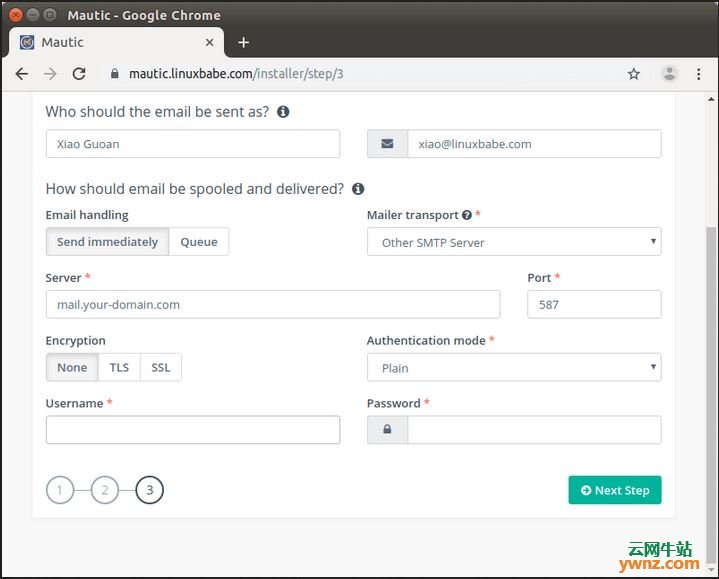
在步骤3中,配置电子邮件设置,请注意,邮件传输中有很多选项,可以使用PHP Mail、sendmail或Gmail,或将Mautic与第三方电子邮件服务(如Mandrill、Sendgrid、Amazon SES)集成,在Mautic配置页面中安装后,可以随时更改这些设置,如果你的邮件服务器上安装了Mautic,那么需要选择Sendmail作为邮件传输,因此Mautic将使用你的邮件服务器发送电子邮件:
如果Mautic和你的邮件服务器在不同的计算机上运行,并且希望Mautic通过你的邮件服务器发送电子邮件,那么需要选择其他SMTP服务器作为邮件传输,输入邮件服务器的主机名,选择587端口并在邮件服务器上输入电子邮件地址的登录帐户:
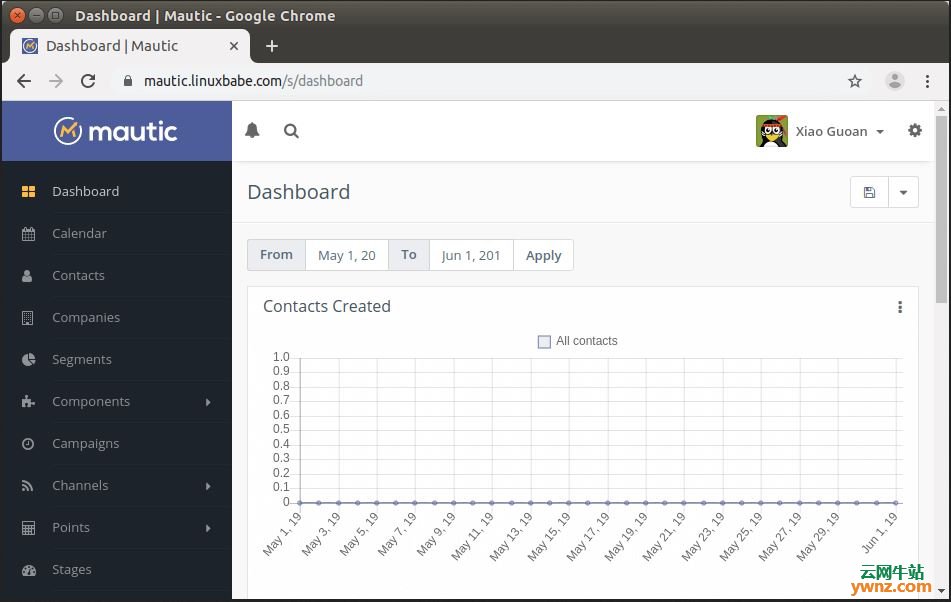
完成第3步后,可以登录Mautic控制面板中:
注意:如果看到500内部服务器错误,请检查Mautic日志,可以在/var/www/mautic/app/logs/目录中找到。 至此,已经在Ubuntu 18.04上安装Mautic并且设置完成。
相关主题 |