|
本文介绍在CentOS 7/8、Ubuntu 18.04/16.04、Debian 10/9操作系统上设置Etcd集群的方法,本文将详细讨论Linux机器上三节点etcd集群的理想设置。
Linux上的Etcd群集设置 此设置应适用于使用systemd服务管理器的所有Linux发行版,适合CentOS 7/8、Ubuntu 18.04/16.04、Debian 10/9、Fedora 30/29系统。 此设置基于以下服务器网络信息和详细信息(左边为短主机名,右边为IP地址): 1]、etcd1:192.168.18.9 2]、etcd2:192.168.18.10 3]、etcd3:192.168.18.11 由于我的所有服务器都使用Systemd服务管理器,因此可以使用命令设置主机名: # Node 1 sudo hostnamectl set-hostname etcd1.mydomain.com --static sudo hostname etcd1.mydomain.com # Node 2 sudo hostnamectl set-hostname etcd2.mydomain.com --static sudo hostname etcd2.mydomain.com # Node 3 sudo hostnamectl set-hostname etcd3.mydomain.com --static sudo hostname etcd3.mydomain.com 将mydomain.com替换为你服务器的域名,比如云网牛站就用ywnz.com,可以将服务器名称映射到本地DNS上的正确IP地址,也可以直接将记录添加到每台服务器上的/etc/hosts文件中: sudo tee -a /etc/hosts<<EOF 192.168.18.9 etcd1.mydomain.com etcd1 192.168.18.10 etcd2.mydomain.com etcd2 192.168.18.11 etcd3.mydomain.com etcd3 EOF
一、下载并安装etcd二进制文件(所有节点) 登录到要使用的每个etcd集群节点并下载etcd二进制文件,这是在所有节点上完成的,可参考在RHEL/CentOS 8上安装和配置etcd 3.3.12的方法。 创建临时目录: mkdir /tmp/etcd && cd /tmp/etcd 安装wget: # RHEL family sudo yum -y install wget # Debian family sudo apt-get -y install wget # Arch/Manjaro sudo pacman -S wget 下载etcd二进制存档: curl -s https://api.github.com/repos/etcd-io/etcd/releases/latest \ | grep browser_download_url \ | grep linux-amd64 \ | cut -d '"' -f 4 \ | wget -qi - 取消归档文件并将二进制文件移动到/usr/local/bin目录: tar xvf *.tar.gz cd etcd-*/ sudo mv etcd* /usr/local/bin/ cd ~ rm -rf /tmp/etcd 检查etcd和etcdctl版本: $ etcd --version etcd Version: 3.3.13 Git SHA: 98d3084 Go Version: go1.10.8 Go OS/Arch: linux/amd64 $ etcdctl --version etcdctl version: 3.3.13 API version: 2 参考:在Ubuntu 18.04/Ubuntu 16.04服务器上安装etcd的方法。
二、创建etcd目录和用户(所有节点) 我们将etcd配置文件存储在/etc/etcd目录中,将数据存储在/var/lib/etcd中,用于管理服务的用户和组称为etcd。 创建一个etcd系统用户/组: sudo groupadd --system etcd sudo useradd -s /sbin/nologin --system -g etcd etcd 然后为etcd创建数据和配置目录: sudo mkdir -p /var/lib/etcd/ sudo mkdir /etc/etcd sudo chown -R etcd:etcd /var/lib/etcd/
三、在所有节点上配置etcd 我们需要在所有三台服务器上填充systemd服务单元文件,但首先,在我们继续之前需要一些环境变量。 在每台服务器上,通过运行以下命令保存这些变量: INT_NAME="eth0" ETCD_HOST_IP=$(ip addr show $INT_NAME | grep "inet\b" | awk '{print $2}' | cut -d/ -f1) ETCD_NAME=$(hostname -s) 注: 1]、INT_NAME是用于群集流量的网络接口的名称,更改它以匹配你的服务器配置。 2]、ETCD_HOST_IP是指定网络接口的内部IP地址,这用于服务客户端请求并与etcd集群对等体通信。 3]、ETCD_NAME,每个etcd成员必须在etcd集群中具有唯一名称,使用的命令将设置etcd名称以匹配当前计算实例的主机名。 设置所有变量后,创建etcd.service systemd单元文件: cat <<EOF | sudo tee /etc/systemd/system/etcd.service [Unit] Description=etcd service Documentation=https://github.com/etcd-io/etcd [Service] Type=notify User=etcd ExecStart=/usr/local/bin/etcd \\ --name ${ETCD_NAME} \\ --data-dir=/var/lib/etcd \\ --initial-advertise-peer-urls http://${ETCD_HOST_IP}:2380 \\ --listen-peer-urls http://${ETCD_HOST_IP}:2380 \\ --listen-client-urls http://${ETCD_HOST_IP}:2379,http://127.0.0.1:2379 \\ --advertise-client-urls http://${ETCD_HOST_IP}:2379 \\ --initial-cluster-token etcd-cluster-0 \\ --initial-cluster etcd1=http://etcd1:2380,etcd2=http://etcd2:2380,etcd3=http://etcd3:2380 \\ --initial-cluster-state new \ [Install] WantedBy=multi-user.target EOF 如果没有将工作名称解析或映射添加到/etc/hosts文件中,则将etcd1、etcd2和etcd3替换为你的节点IP地址。 对于CentOS/RHEL Linux发行版,请将SELinux模式设置为允许: sudo setenforce 0 sudo sed -i 's/^SELINUX=.*/SELINUX=permissive/g' /etc/selinux/config 参考:在RHEL 8/CentOS 8系统中禁用SELinux的方法。 如果有活动的防火墙服务,请允许2379和2380端口: # RHEL / CentOS / Fedora firewalld sudo firewall-cmd --add-port={2379,2380}/tcp --permanent sudo firewall-cmd --reload # Ubuntu/Debian sudo ufw allow proto tcp from any to any port 2379,2380
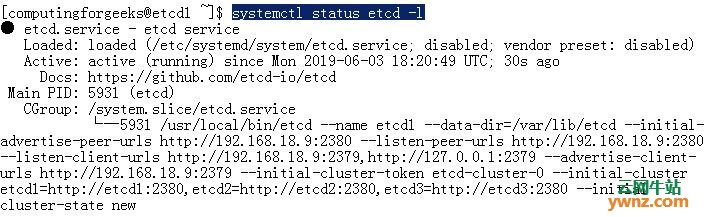
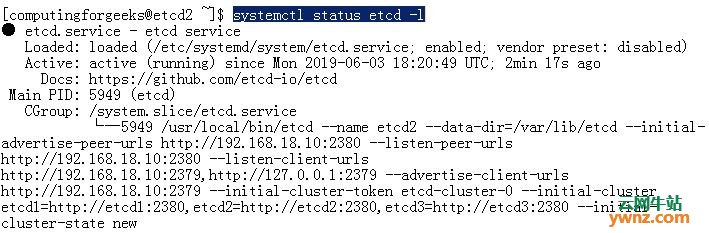
四、启动etcd服务器 通过在每个群集节点上运行以下命令来启动etcd服务: sudo systemctl daemon-reload sudo systemctl enable etcd sudo systemctl start etcd 确认所有节点上都运行了etcd服务,运行systemctl status etcd -l命令,如下图所示:
五、测试Etcd群集安装 通过列出etcd集群成员来测试你的设置: $ etcdctl member list 152d6f8123c6ac97: name=etcd3 peerURLs=http://etcd3:2380 clientURLs=http://192.168.18.11:2379 isLeader=false 332a8a315e569778: name=etcd2 peerURLs=http://etcd2:2380 clientURLs=http://192.168.18.10:2379 isLeader=false aebb404b9385ccd4: name=etcd1 peerURLs=http://etcd1:2380 clientURLs=http://192.168.18.9:2379 isLeader=true 要使用etcd v3,需要明确指定版本: $ ETCDCTL_API=3 etcdctl member list 152d6f8123c6ac97, started, etcd3, http://etcd3:2380, http://192.168.18.11:2379 332a8a315e569778, started, etcd2, http://etcd2:2380, http://192.168.18.10:2379 aebb404b9385ccd4, started, etcd1, http://etcd1:2380, http://192.168.18.9:2379 还可以通过运行以下命令检查集群运行状况: $ etcdctl cluster-health member 152d6f8123c6ac97 is healthy: got healthy result from http://192.168.18.11:2379 member 332a8a315e569778 is healthy: got healthy result from http://192.168.18.10:2379 member aebb404b9385ccd4 is healthy: got healthy result from http://192.168.18.9:2379 cluster is healthy 我们也尝试写入etcd: $ etcdctl set /message "Hello World" Hello World 读取消息的值,它应该适用于所有节点: $ etcdctl get /message Hello World 创建目录: $ etcdctl mkdir /myservice $ etcdctl set /myservice/container1 localhost:8080 localhost:8080 $ etcdctl ls /myservice /myservice/container1
六、关于Test Leader failure
我们当前的Leader是etcd1-节点1: $ etcdctl member list 152d6f8123c6ac97: name=etcd3 peerURLs=http://etcd3:2380 clientURLs=http://192.168.18.11:2379 isLeader=false 332a8a315e569778: name=etcd2 peerURLs=http://etcd2:2380 clientURLs=http://192.168.18.10:2379 isLeader=false aebb404b9385ccd4: name=etcd1 peerURLs=http://etcd1:2380 clientURLs=http://192.168.18.9:2379 isLeader=true 让我们把它拿下来: [comput@etcd1 ~]$ sudo systemctl stop etcd 检查新的Leader-Now etcd2服务器: $ etcdctl member list 152d6f8123c6ac97: name=etcd3 peerURLs=http://etcd3:2380 clientURLs=http://192.168.18.11:2379 isLeader=false 332a8a315e569778: name=etcd2 peerURLs=http://etcd2:2380 clientURLs=http://192.168.18.10:2379 isLeader=true aebb404b9385ccd4: name=etcd1 peerURLs=http://etcd1:2380 clientURLs=http://192.168.18.9:2379 isLeader=false 一旦etcd1服务启动,Leader将保持etcd2,除非它失败。
相关主题 |