|
本文介绍在CentOS/Debian/Ubuntu Linux系统上安装Harbor的方法,Harbor是一个开源云本机注册表,用于存储、签名和扫描容器映像以查找漏洞,如果你正在寻找企业Docker图像注册表,那么Harbor是你的最佳工具,它具有一些仅在Quay等商业注册表产品中可用的最佳功能。Harbor为无法使用公共或基于云的注册表的应用程序和组织填补了空白,你将享受跨所有云平台的一致体验,本文将引导你在任何支持Docker的系统上安装Harbour。
一、安装Docker Engine和Docker Compose参考文章 1、安装Docker Engine 在Debian 10 Linux系统上安装最新稳定版和使用Docker的方法。 在Ubuntu 18.04 Server上安装Docker和Docker Compose的方法。 在Ubuntu/Debian/Fedora/Arch/CentOS上安装Docker CE的方法。 2、安装Docker Compose 我们的下一个安装是docker-compose命令,这在系统存储库中不可用,请参考在Linux系统上安装最新的Docker Compose一文。
二、下载并安装Harbor 下载: curl -s https://api.github.com/repos/goharbor/harbor/releases/latest | grep -o 'https://storage[a-zA-Z.-]*/[a-zA-Z0-9+-]*/[a-zA-Z0-9.+-]*/[a-zA-Z0-9.+-]*' | wget -qi - 你还可以从下载页面中提取最新的Harbor版本,地址是:https://github.com/goharbor/harbor/releases。 解压缩下载的Harbor文件: tar xvzf harbor-offline-installer*.tgz 在文件解包后创建更改为harbor: cd harbor 1、没有SSL的Harbor安装 在第一个设置中,我们将考虑在没有TLS/SSL的情况下进行安装,编辑Harbor配置文件,并设置如下: $ nano harbor.yml .... # The IP address or hostname to access admin UI and registry service. hostname: registry.computingforgeeks.com harbor_admin_password: StrongAdminP@s5W0$d # Harbor DB configuration database: password: StrongdbrootP@s5W0$d 2、使用Let加密SSL进行Harbor安装 如果你的服务器具有公共IP,则可以使用Let's Encrypt免费SSL证书。 首先安装certbot-auto工具: wget https://dl.eff.org/certbot-auto chmod +x certbot-auto sudo mv certbot-auto /usr/local/bin 然后获取SSL证书: export DOMAIN="registry.computingforgeeks.com" export EMAIL="admin@example.com" certbot-auto certonly --standalone -d $DOMAIN --preferred-challenges http --agree-tos -n -m $EMAIL --keep-until-expiring 配置https相关配置: hostname: registry.computingforgeeks.com harbor_admin_password: StrongAdminP@s5W0$d # Harbor DB configuration database: password: StrongdbrootP@s5W0$d http: port: 80 https: port: 443 certificate: /etc/letsencrypt/live/registry.computingforgeeks.com/fullchain.pem private_key: /etc/letsencrypt/live/registry.computingforgeeks.com/privkey.pem 3、安装Harbor Docker图像注册表 配置了harbor.yml和storage后端(可选)后,使用install.sh脚本安装并启动Harbor: $ sudo ./install.sh 参考:在深度deepin系统中运行install.sh文件的方法。 请注意,默认安装不包括Notary或Clair服务,这些服务用于漏洞扫描。 要查看安装程序选项,请运行: $ ./install.sh --help Note: Please set hostname and other necessary attributes in harbor.yml first. DO NOT use localhost or 127.0.0.1 for hostname, because Harbor needs to be accessed by external clients. Please set --with-notary if needs enable Notary in Harbor, and set ui_url_protocol/ssl_cert/ssl_cert_key in harbor.yml bacause notary must run under https. Please set --with-clair if needs enable Clair in Harbor Please set --with-chartmuseum if needs enable Chartmuseum in Harbor 例如,启用Clair和Chartmuseum: $ sudo ./install.sh -with-notary --with-clair --with-chartmuseum 要包括公证服务,你必须在harbor.yml中启用和配置https: [Step 0]: checking installation environment ... Note: docker version: 19.03.1 Note: docker-compose version: 1.24.1 [Step 1]: loading Harbor images ... Loaded image: goharbor/harbor-core:v1.8.1 Loaded image: goharbor/harbor-registryctl:v1.8.1 Loaded image: goharbor/redis-photon:v1.8.1 Loaded image: goharbor/notary-server-photon:v0.6.1-v1.8.1 Loaded image: goharbor/chartmuseum-photon:v0.8.1-v1.8.1 Loaded image: goharbor/harbor-db:v1.8.1 Loaded image: goharbor/harbor-jobservice:v1.8.1 Loaded image: goharbor/nginx-photon:v1.8.1 Loaded image: goharbor/registry-photon:v2.7.1-patch-2819-v1.8.1 Loaded image: goharbor/harbor-migrator:v1.8.1 Loaded image: goharbor/prepare:v1.8.1 Loaded image: goharbor/harbor-portal:v1.8.1 Loaded image: goharbor/harbor-log:v1.8.1 Loaded image: goharbor/notary-signer-photon:v0.6.1-v1.8.1 Loaded image: goharbor/clair-photon:v2.0.8-v1.8.1 [Step 2]: preparing environment ... prepare base dir is set to /root/harbor Generated configuration file: /config/log/logrotate.conf Generated configuration file: /config/nginx/nginx.conf Generated configuration file: /config/core/env Generated configuration file: /config/core/app.conf Generated configuration file: /config/registry/config.yml Generated configuration file: /config/registryctl/env Generated configuration file: /config/db/env Generated configuration file: /config/jobservice/env Generated configuration file: /config/jobservice/config.yml Generated and saved secret to file: /secret/keys/secretkey Generated certificate, key file: /secret/core/private_key.pem, cert file: /secret/registry/root.crt Generated configuration file: /config/clair/postgres_env Generated configuration file: /config/clair/config.yaml Generated configuration file: /config/clair/clair_env Create config folder: /config/chartserver Generated configuration file: /config/chartserver/env Generated configuration file: /compose_location/docker-compose.yml Clean up the input dir [Step 3]: starting Harbor ... ----Harbor has been installed and started successfully.---- Now you should be able to visit the admin portal at http://registry.computingforgeeks.com. For more details, please visit https://github.com/goharbor/harbor . Harbor日志文件存储在目录/var/log/harbor/中: $ ls -1 /var/log/harbor/ chartmuseum.log clair.log core.log jobservice.log portal.log postgresql.log proxy.log redis.log registryctl.log registry.log
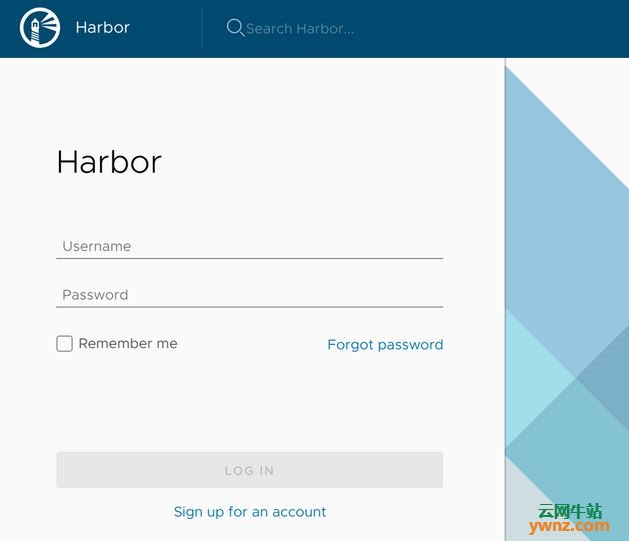
三、进入Harbor 安装成功后,访问https://registry_domain上的Harbor Web控制台:
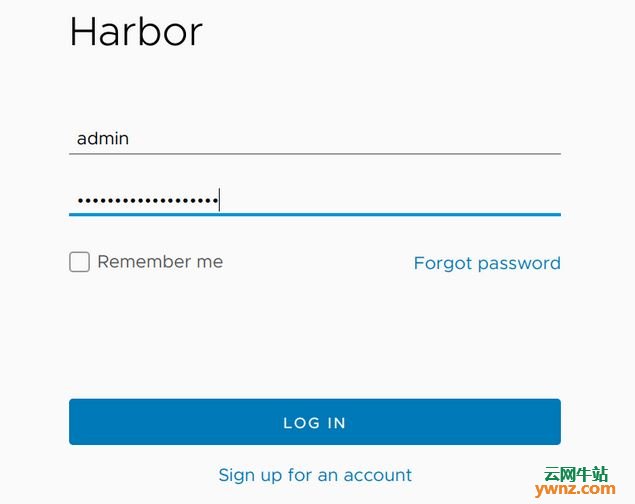
登录: Username: admin Password: Set-in-harbor.yml
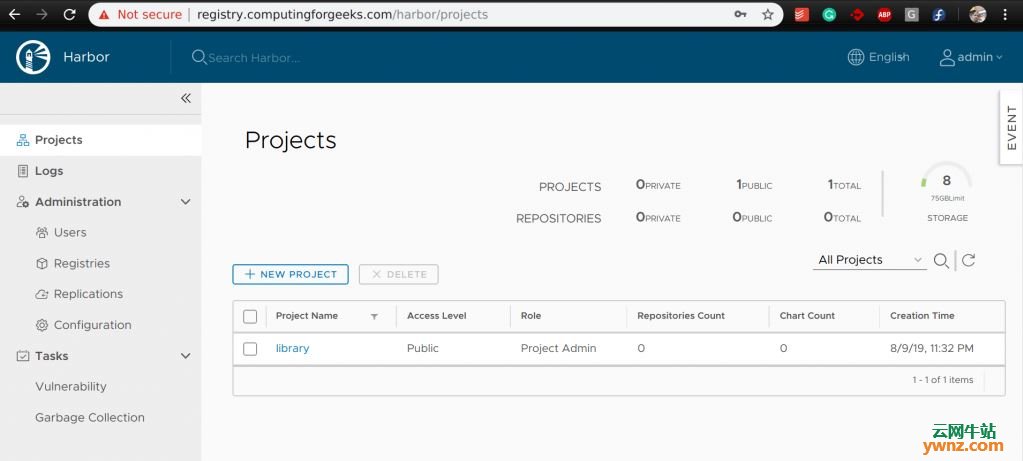
你应该进入Harbor网络控制中心:
使用Let的加密SSL:
四、管理Harbor的生命周期 列出运行Harbor服务容器: $ sudo docker-compose ps
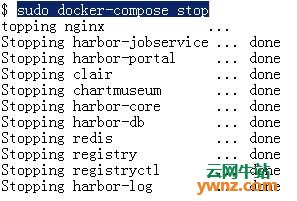
你可以使用docker-compose来管理Harbor的生命周期,见下面的例子。 停止Harbor: $ sudo docker-compose stop
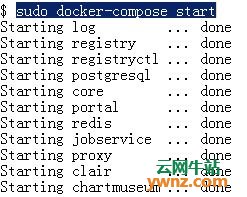
停止后重启Harbor: $ sudo docker-compose start
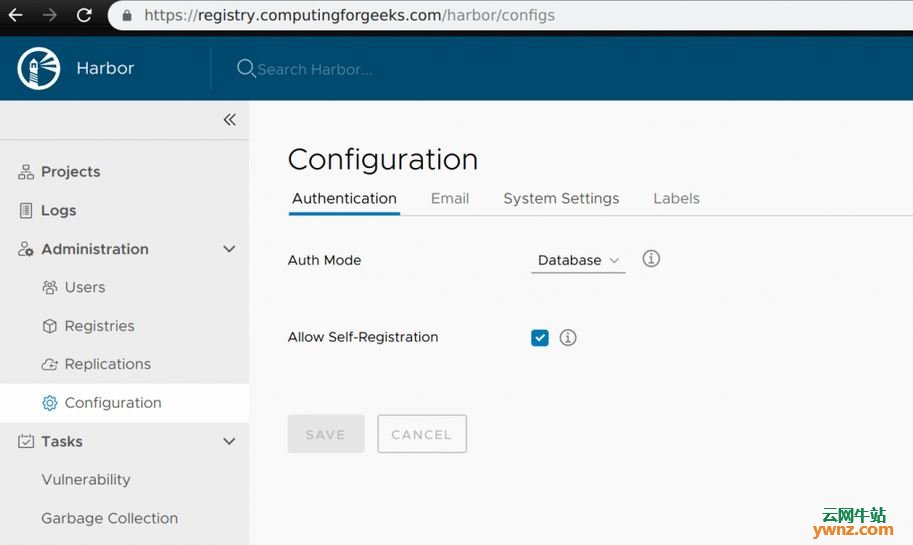
附:更新Harbour的配置 要更改Harbour的配置,首先,停止现有的Harbor实例并更新harbor.yml,然后运行prepare脚本来填充配置,然后重新创建并启动Harbor的实例: $ sudo docker-compose down -v $ nano harbor.yml $ sudo prepare $ sudo docker-compose up -d 当Harbor与Notary、Clair和图表存储库服务一起安装时: $ sudo docker-compose down -v $ nano harbor.yml $ sudo ./prepare --with-notary --with-clair --with-chartmuseum $ sudo docker-compose up -d 要进行故障排除,请在目录/var/log/harbor中检查有问题的容器服务的日志文件: $ tail -n 100 /var/log/harbor/clair.log 至此,操作完成。
相关主题 |