|
本文介绍使用Ansible执行一些简单的重复性任务,例如创建新的Linux用户和复制文件。安装请参考在Ubuntu 18.04系统中安装Ansible 2.7.5的方法。
示例1、使用Ansible在远程系统上安装/删除软件包 要在远程系统上安装软件包,请使用适用于Ansible支持的所有系统的软件包模块,该模块实际上为每个系统调用相关的包模块(apt、yum等),也可以使用像yum、apt这样的OS的特定模块: --- - hosts: all remote_user: tech become: true become_method: sudo tasks: - name: Install Single Package using package module package: name: vim state: present - name: Install Multiple packages using package module package: name: ['vim','wget','bash-completion','curl'] state: present - name: Install package for Specific distro - apache on Debian or Ubuntu package: name: apache2 state: present when: ansible_os_family == "Debian" - name: Install package for Specific distro - apache on CentOS / RHEL / Fedora package: name: httpd state: present when: ansible_os_family == "RedHat" 要删除包,应将状态值设置为absent。
示例2、使用Ansible在远程系统上启动/停止服务 对于服务管理,我们将使用服务模块,我们安装了Apache Web服务器(参考:在Debian 10 Linux上安装Apache Web Server的方法),在这里我们将启动该服务并将其设置为在启动时启动。 由于Debian和RedHat系列的服务名称不同,我们必须遵守Ansible条件: --- - hosts: all remote_user: tech become: true become_method: sudo tasks: - name: Install Single Package using package module package: name: vim state: present - name: Start apache service on Debian or Ubuntu service: name: apache2 state: started enabled: yes when: ansible_os_family == "Debian" - name: Start apache service on CentOS / RHEL / Fedora service: name: httpd state: started enabled: yes when: ansible_os_family == "RedHat"
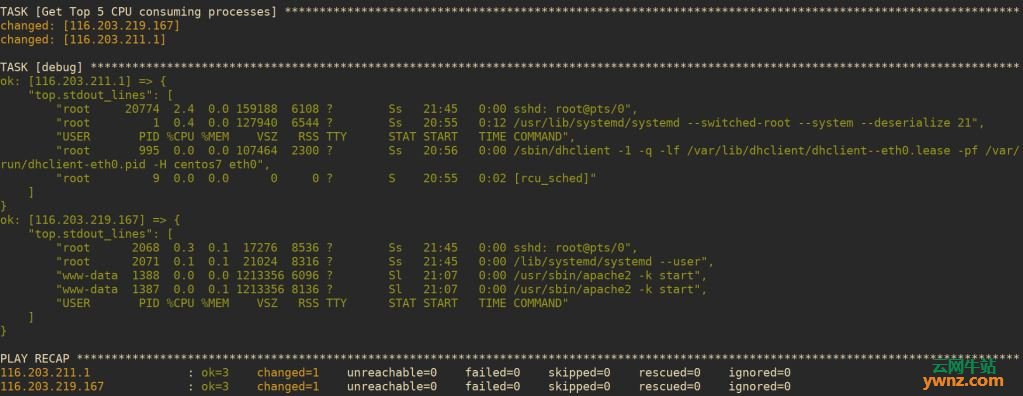
示例3、使用Ansible执行shell命令/脚本 此示例将演示如何在远程系统上执行shell命令和shell脚本: --- - hosts: all remote_user: tech become: true become_method: sudo tasks: - name: Get Top 5 CPU consuming processes shell: ps aux | sort -nrk 3,3 | head -n 5 register: top - name: Get Disk partitioning shell: df -hT register: df - debug: var=top.stdout_lines - debug: var=df.stdout_lines 你还可以将本地脚本复制到服务器并执行它: --- - name: Copy and execute a script. hosts: web-servers remote_user: user1 become: yes become_method: sudo tasks: - name: Copy local script to remote systems copy: src: myscript.sh dest: /home/user1/myscript.sh mode: 0777 - name: Execute a script on remote server command: sh /home/user1/myscript.sh 请参阅下面的输出:
示例4、将多个目录从远程Linux系统同步到本地计算机 为此,请在远程服务器中安装rsync,因为Ansible模块同步使用它,你会发现我们正在使用同步模块的“pull”模式来实现这一点: --- - hosts: portal remote_user: tech become: true become_method: sudo tasks: - name: Fetch Log Files from portal server and save them to local synchronize: src: "{{ item.source }}" dest: "{{ item.dest }}" mode: pull with_items: - { source: '/var/log/apps/Database/2019-08-07', dest: '/home/jtech/Documents/test3/Database' } - { source: '/var/log/apps/Exceptions/2019-08-07', dest: '/home/jtech/Documentss/test3/Exceptions' } 1]、hosts:portal是你希望从中提取文件的远程服务器。 2]、source是你打算提取的远程服务器目录。 3]、dest是你将从远程服务器接收资源的本地目录。
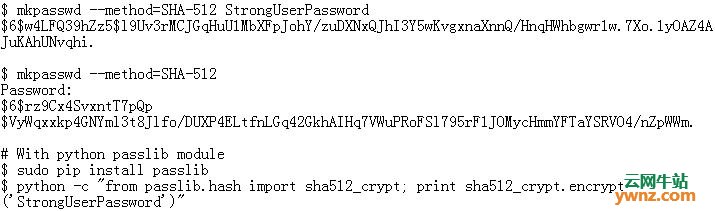
示例5、使用Ansible将用户添加到远程服务器 以下是一个yaml playbook,它将用户添加到许多远程系统,将用户添加到相应的sudoers文件,并将用户的公钥复制到远程服务器,在过去,如果你想为一些服务器添加一个新用户,所有这些都会涉及到很多痛苦的键盘冲压以完成工作,要使用此剧本,我们假设如下: 1]、Ansible安装在客户端机器上。 2]、远程系统中的另一个用户(本例中的技术人员)已经存在。 3]、Ansible能够有效地与远程服务器通信。 打开/etc/ansible/hosts文件,并在文件末尾添加远程服务器列表,一个例子如下所示,如果远程系统上的ssh端口默认不是22,请使用完整冒号和ssh端口号,如下所示。 生成加密的用户密码: $ mkpasswd --method=SHA-512 StrongUserPassword $ mkpasswd --method=SHA-512 # With python passlib module $ sudo pip install passlib $ python -c "from passlib.hash import sha512_crypt; print sha512_crypt.encrypt('StrongUserPassword')"
Playbook:users.yml: vim /etc/ansible/hosts [web-servers] 192.168.10.20 192.168.10.31:2023 192.168.10.50 创建playbook: --- - hosts: "web-servers" remote_user: tech become: true become_method: sudo vars: users: - "harry" tasks: - name: "Create user Harry in the remote web-servers" user: name: "{{ item }}" password: <encrypted-password> groups: "wheel" update_password: always register: user_created with_items: "{{ users }}" - name: "Add authorized keys" authorized_key: user: "{{ item }}" key: "{{ lookup('file', '/home/harry/.ssh/id_rsa.pub') }}" # key: "{{ lookup('file', 'files/'+ item + '.key.pub') }}" with_items: "{{ users }}" - name: Add user "harry" to sudo lineinfile: path: /etc/sudoers.d/harry line: 'harry ALL=(ALL) NOPASSWD: ALL' state: present mode: 0440 create: yes validate: 'visudo -cf %s' - name: Force user to change password shell: chage -d 0 {{ item }} when: user_created.changed 将此文件保存在你选择的目录中,然后运行: # ansible-playbook users.yml -u tech -K 它会要求你成为密码,输入系统中远程用户的密码。
示例6、在本地计算机上自动创建目录,并从远程服务器复制其中的文件 假设你经常需要将文件从远程服务器复制到本地计算机,并且你最终厌倦了手动复制它们,现在你希望使用Ansible的效率,远程服务器中的文件可能位于: /var/log/applications/web/20-08-08/, /var/log/applications/frontend/20-08-08/, /var/log/applications/backend/20-08-08/, /var/log/applications/frontend1/20-08-08/ and /var/log/applications/sockets/20-08-08/ /var/log/applications/others/20-08-08/ 要将本地计算机上相应目录中的20-08-08子目录中的文件整齐地复制,你需要创建相应的目录以匹配远程服务器上存在的目录,一个例子是创建文件,例如: /home/tech/logs/web/20-08-08/, /home/tech/logs/frontend/20-08-08/, /home/tech/logs/backend/20-08-08/, /home/tech/logs/frontend1/20-08-08/ and /home/tech/logs/sockets/20-08-08/ /home/tech/logs/others/20-08-08/ Ansible可以按照本指南中的说明为你完成,而不是手动创建这些dierctories。 首先,Ansible将自动创建/home/tech/logs/parent目录,然后自动创建其中的各个子目录(web,frontend,backend,frontend1,socket),最后,20-08-08子目录将与远程服务器的子目录同步,你将在本地计算机上找到20-08-08目录及其中的所有文件,让我们创建剧本来完成这项工作。 第一步:在任何目录中创建变量文件并输入所有变量: vim vars.yml --- LOCAL_PROJECT_DIRECTORY: "/home/tech/logs" REMOTE_PROJECT_DIRECTORY: "/var/log/applications" 第二步:将远程服务器添加到hosts文件,这可以在你的默认文件中,也可以在你创建的任何主机文件中: vim /etc/ansible/hosts #Add your host [remoteserver] 192.168.20.23 第三步:创建你的playbook,为你复制目录和文件: vim playbook.yml --- - hosts: 127.0.0.1 # Create directories and sub-directories in local machine in this play vars_files: ./variables1/vars.yaml tasks: - name: Auto-Create Local parent project directory {{ LOCAL_PROJECT_DIRECTORY }} and sub-directories file: path={{ LOCAL_PROJECT_DIRECTORY }}/{{ item }} state=directory with_items: - web - frontend - backend - Database - frontend1 - sockets - others - hosts: remoteserver # Copy directories and files in local machine from remoteserver in this play vars_files: ./variables1/vars.yaml become: true tasks: - name: Fetch stuff from your remote server and save to locally autocreated directorie become: yes synchronize: src: "{{ REMOTE_PROJECT_DIRECTORY }}/{{ item }}/20-08-08" dest: "{{ LOCAL_PROJECT_DIRECTORY }}/{{ item }}/" mode: pull with_items: web - frontend - backend - Database - frontend1 - sockets - others 完成后,是时候运行你的playbook了: # ansible-playbook playbook.yaml -u tech -K 在远程服务器上输入你的sudo密码,然后按Enter键。
示例7、删除系统中的旧用户 --- - hosts: servers remote_user: tech become: true become_method: sudo vars: users: - "jack" - "tom" - "sharon" - "tech" - "pench" tasks: name: "Remove old users out of the system" user: name: "{{ item }}" state: "absent" with_items: "{{ users }}"
示例8、从SVN服务器签出文件并将其复制到远程服务器 如果你希望从subversion服务器中提取文件,并使用一个Ansible命令将它们复制到远程服务器上的另一个位置,那么本指南将说明如何完成,请继续。 第一步:在任何目录中创建变量文件并输入所有变量: $ vim vars.yml --- LOCAL_PROJECT: "/home/tech/svn" REMOTE_PROJECT: "/var/log/applications" 第二步:将远程服务器添加到hosts文件,这可以在你的默认文件中,也可以在你创建的任何主机文件中: vim /etc/ansible/hosts [remoteserver] 192.168.20.27 第三步:创建一个playbook来检出从subversion服务器到本地机器的文件,并自动将它们复制到远程服务器: $ vim playbook.yml --- - hosts: 127.0.0.1 vars_files: - ./variables1/vars.yaml tasks: - name: Auto-Create Local project directory file: path={{ LOCAL_PROJECT }}/{{ item }} state=directory with_items: - App - name: Checkout subversion repository to the created directory/folder subversion: repo: https://path/to/your/subversion/ username: user1 password: strongpassword checkout: yes update: yes in_place: yes dest: "{{ LOCAL_PROJECT }}/{{ item }}" with_items: - App - hosts: worker1 vars_files: - ./variables1/vars.yaml tasks: - name: Auto-Create Remote project directory become: yes file: path={{ REMOTE_PROJECT }}/{{ item }} state=directory with_items: - Application - name: Copy the checked-out files to remote server via Synchronize become: yes synchronize: src: "{{ LOCAL_PROJECT }}/{{ item.local }}/" dest: "{{ REMOTE_PROJECT }}/{{ item.remote }}" with_items: - { local: 'App', remote: 'Application' } 第四步:由于playbook有相关重要数据,即用户名和密码,让我们用ansible-vault加密它,这样任何人都无法查看你的东西。 加密你的Playbook文件,如下所示,输入密码,你就可以了: $ ansible-vault encrypt playbook.yml New Vault password: Confirm New Vault password: Encryption successful 完成后,继续使用显示的选项运行你的playbook,它将提示用户1的sudo密码和你刚刚输入的ansible-vault密码: $ ansible-playbook playbook.yml --ask-vault-pass -u user1 -K BECOME password: Vault password: PLAY [127.0.0.1] ********************************** TASK [Gathering Facts] ********************************** ok: [127.0.0.1]
结论 Ansible可以做更复杂的事情来减轻你作为管理员的工作,该指南只是表明它可以处理即使是最简单的任务,掌握这些,对提高应用Ansible相当有帮助。
相关主题 |