|
本文说明了如何在运行Apache作为网络服务器的CentOS 8上安装免费的Let's Encrypt SSL证书,我们将使用certbot工具获取并更新证书。Let’s Encrypt是由Internet Security Research Group(ISRG)开发的免费、自动化和开放的证书颁发机构,提供免费的SSL证书,所有主流浏览器都信任由Let's Encrypt颁发的证书,自颁发之日起有效期为90天。
先决条件 在继续之前,请确保满足以下先决条件: 1、有一个指向你的公共服务器IP的域名,比如云网牛站的ywnz.xom,本文我们将使用example.com示例。 2、Apache已安装并在服务器上运行,并为你的域配置了虚拟主机。 3、80和443端口在防火墙中打开。 安装以下SSL加密的Web服务器所需的软件包: sudo dnf install mod_ssl openssl 参考:在RHEL 8上安装配置Apache、mod_ssl、mod_http2的方法。 安装mod_ssl软件包后,应为本地主机创建一个自签名密钥和证书文件,如果未自动创建文件,则可以使用openssl命令创建它们: sudo openssl req -newkey rsa:4096 -x509 -sha256 -days 3650 -nodes \ -out /etc/pki/tls/certs/localhost.crt \ -keyout /etc/pki/tls/private/localhost.key
安装Certbot Certbot是一个免费的命令行工具,可简化从服务器获取和续订Let’s Encrypt SSL证书并自动启用HTTPS的过程。 certbot软件包未包含在标准CentOS 8存储库中,但可以从供应商的网站上下载。 以root或sudo用户身份运行以下wget命令,将certbot脚本下载到/usr/local/bin目录: sudo wget -P /usr/local/bin https://dl.eff.org/certbot-auto 下载完成后,使文件可执行: sudo chmod +x /usr/local/bin/certbot-auto 参考:使用Certbot:在Linux上安装letsencrypt的最简单方法。
产生强Dh(Diffie-Hellman)组 Diffie-Hellman密钥交换(DH)是一种在不安全的通信通道上安全地交换加密密钥的方法,生成一组新的2048位DH参数以增强安全性: sudo openssl dhparam -out /etc/ssl/certs/dhparam.pem 2048 最多可以将大小更改为4096位,但是生成时间可能会超过30分钟,具体取决于system entropy。
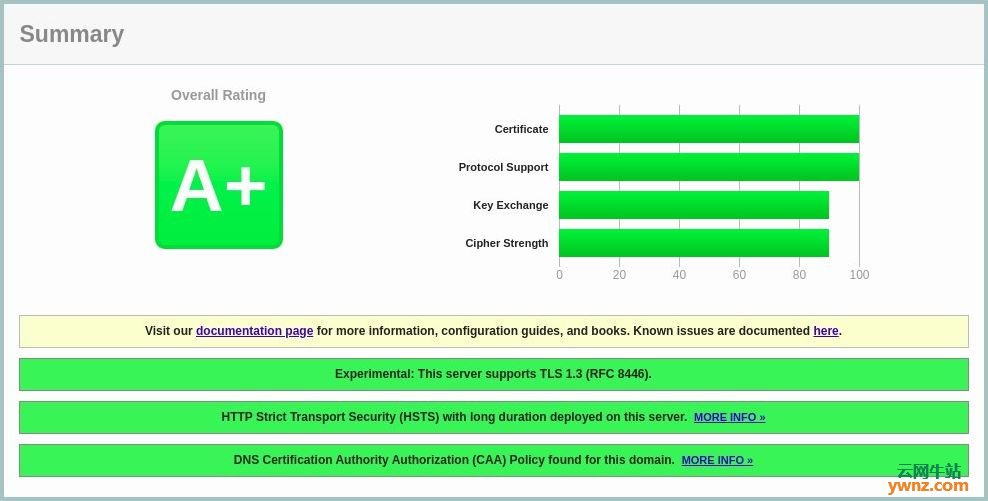
获取加密的SSL证书 为了获得该域的SSL证书,我们将使用Webroot插件,该插件的工作原理是在${webroot-path}/.well-known/acme-challenge目录中创建一个用于验证请求的域的临时文件,Let’s Encrypt服务器向临时文件发出HTTP请求,以验证请求的域是否解析为运行certbot的服务器。 为了简化设置,我们将所有针对.well-known/acme-challenge的HTTP请求映射到一个目录/var/lib/letsencrypt。 运行以下命令以创建目录并使该目录可用于Apache服务器: sudo mkdir -p /var/lib/letsencrypt/.well-known sudo chgrp apache /var/lib/letsencrypt sudo chmod g+s /var/lib/letsencrypt 为避免重复代码并使配置更易于维护,请创建以下两个配置片段,在/etc/httpd/conf.d/letsencrypt.conf文件中: Alias /.well-known/acme-challenge/ "/var/lib/letsencrypt/.well-known/acme-challenge/" <Directory "/var/lib/letsencrypt/"> AllowOverride None Options MultiViews Indexes SymLinksIfOwnerMatch IncludesNoExec Require method GET POST OPTIONS </Directory> 在/etc/httpd/conf.d/ssl-params.conf文件中: SSLCipherSuite EECDH+AESGCM:EDH+AESGCM # Requires Apache 2.4.36 & OpenSSL 1.1.1 SSLProtocol -all +TLSv1.3 +TLSv1.2 SSLOpenSSLConfCmd Curves X25519:secp521r1:secp384r1:prime256v1 # Older versions # SSLProtocol All -SSLv2 -SSLv3 -TLSv1 -TLSv1.1 SSLHonorCipherOrder On Header always set Strict-Transport-Security "max-age=63072000; includeSubDomains; preload" Header always set X-Frame-Options DENY Header always set X-Content-Type-Options nosniff # Requires Apache >= 2.4 SSLCompression off SSLUseStapling on SSLStaplingCache "shmcb:logs/stapling-cache(150000)" # Requires Apache >= 2.4.11 SSLSessionTickets Off SSLOpenSSLConfCmd DHParameters "/etc/ssl/certs/dhparam.pem" 上面的代码段使用的是Cipherli.st建议的削片机,它启用OCSP Stapling,HTTP严格传输安全性(HSTS),Dh密钥,并强制执行少量以安全性为重点的HTTP标头。 重新加载Apache配置以使更改生效: sudo systemctl reload httpd 现在,你可以使用webroot插件运行certbot脚本并获取SSL证书文件: sudo /usr/local/bin/certbot-auto certonly --agree-tos --email admin@example.com --webroot -w /var/lib/letsencrypt/ -d example.com -d www.example.com 成功后,certbot将打印以下消息: IMPORTANT NOTES: - Congratulations! Your certificate and chain have been saved at: /etc/letsencrypt/live/example.com/fullchain.pem Your key file has been saved at: /etc/letsencrypt/live/example.com/privkey.pem Your cert will expire on 2020-01-26. To obtain a new or tweaked version of this certificate in the future, simply run certbot-auto again. To non-interactively renew *all* of your certificates, run "certbot-auto renew" - Your account credentials have been saved in your Certbot configuration directory at /etc/letsencrypt. You should make a secure backup of this folder now. This configuration directory will also contain certificates and private keys obtained by Certbot so making regular backups of this folder is ideal. - If you like Certbot, please consider supporting our work by: Donating to ISRG / Let's Encrypt: https://letsencrypt.org/donate Donating to EFF: https://eff.org/donate-le 现在已完成所有设置,按如下所示编辑域虚拟主机配置,在/etc/httpd/conf.d/example.com.conf文件中: <VirtualHost *:80> ServerName example.com ServerAlias www.example.com Redirect permanent / https://example.com/ </VirtualHost> <VirtualHost *:443> ServerName example.com ServerAlias www.example.com Protocols h2 http:/1.1 <If "%{HTTP_HOST} == 'www.example.com'"> Redirect permanent / https://example.com/ </If> DocumentRoot /var/www/example.com/public_html ErrorLog /var/log/httpd/example.com-error.log CustomLog /var/log/httpd/example.com-access.log combined SSLEngine On SSLCertificateFile /etc/letsencrypt/live/example.com/fullchain.pem SSLCertificateKeyFile /etc/letsencrypt/live/example.com/privkey.pem # Other Apache Configuration </VirtualHost> 上面的配置是强制HTTPS并从www重定向到非www版本,它还启用HTTP/2,这将使你的网站更快,更稳定,请根据你的需要调整配置。 重新启动Apache服务: sudo systemctl restart httpd 现在,可以使用https://打开网站,并且会看到一个绿色的锁定图标。 如果你使用SSL Labs服务器测试来测试你的域,则将获得A+等级,如下所示:
自动更新,让我们加密SSL证书 让我们的加密证书有效期为90天,要在证书过期之前自动更新证书,请创建一个每天运行两次的cronjob,并在证书过期前30天自动更新证书。 运行以下命令以创建一个新的cronjob,它将更新证书并重新启动Apache: echo "0 0,12 * * * root python3 -c 'import random; import time; time.sleep(random.random() * 3600)' && /usr/local/bin/certbot-auto -q renew --renew-hook \"systemctl reload httpd\"" | sudo tee -a /etc/crontab > /dev/null 要测试续订过程,请使用certbot命令,然后使用--dry-run选项: sudo /usr/local/bin/certbot-auto renew --dry-run 如果没有错误,则表示更新过程成功。
结论 在本文中,我们讨论了如何使用CentOS 8上的Let's Encrypt客户端certbot获得你域的SSL证书,还展示了如何配置Apache以使用证书,以及如何设置cronjob来自动更新证书。
相关主题 |