|
本指南将引导您完成使用RKE安装生产级Kubernetes集群的简单步骤,我们将使用Rancher Kubernetes Engine(RKE)设置一个5节点集群,并使用Helm软件包管理器安装Rancher图表。
准备工作站机 在完成部署的工作站上,需要许多CLI工具,这也可以是能够访问群集节点的虚拟机。 1、kubectl: 1]、Linux: curl -LO https://storage.googleapis.com/kubernetes-release/release/`curl -s https://storage.googleapis.com/kubernetes-release/release/stable.txt`/bin/linux/amd64/kubectl chmod +x ./kubectl sudo mv ./kubectl /usr/local/bin/kubectl kubectl version --client 2]、macOS: curl -LO "https://storage.googleapis.com/kubernetes-release/release/$(curl -s https://storage.googleapis.com/kubernetes-release/release/stable.txt)/bin/darwin/amd64/kubectl" chmod +x ./kubectl sudo mv ./kubectl /usr/local/bin/kubectl kubectl version --client 2、rke 1]、Linux: curl -s https://api.github.com/repos/rancher/rke/releases/latest | grep download_url | grep amd64 | cut -d '"' -f 4 | wget -qi - chmod +x rke_linux-amd64 sudo mv rke_linux-amd64 /usr/local/bin/rke rke --version 2]、macOS: curl -s https://api.github.com/repos/rancher/rke/releases/latest | grep download_url | grep darwin-amd64 | cut -d '"' -f 4 | wget -qi - chmod +x rke_darwin-amd64 sudo mv rke_darwin-amd64 /usr/local/bin/rke rke --version 3、Helm 3 curl -fsSL -o get_helm.sh https://raw.githubusercontent.com/helm/helm/master/scripts/get-helm-3 chmod 700 get_helm.sh ./get_helm.sh 参考:在Kubernetes Cluster中安装Helm 3和使用Helm 3的方法。
使用RKE安装Kubernetes 我将在5个节点上工作: 3个主节点–etcd和控制平面(3个用于HA)。 2个工作节点–可扩展以满足您的工作量需求。 这些是我的设置的规格: 主节点–8GB RAM和4个vcpus。 工作者机器–16GB RAM和8 vpcus。 RKE支持的操作系统: RKE几乎可以在安装了Docker的任何Linux操作系统上运行,Rancher已通过测试,并受以下支持: Red Hat Enterprise Linux Oracle Enterprise Linux CentOS Linux Ubuntu RancherOS 步骤1:更新您的Linux系统 第一步是更新将用于构建集群的Linux计算机。 1、CentOS: $ sudo yum -y update $ sudo reboot 2、Ubuntu/Debian: $ sudo apt-get update $ sudo apt-get upgrade $ sudo reboot 步骤2:建立rke使用者 如果使用Red Hat Enterprise Linux,Oracle Enterprise Linux或CentOS,由于Bugzilla 1527565,您不能将root用户用作SSH用户,因此,我们将创建一个名为rke的用户帐户以进行部署。 1、使用Ansible Playbook: --- - name: Create rke user with passwordless sudo hosts: rke-hosts remote_user: root tasks: - name: Add RKE admin user user: name: rke shell: /bin/bash - name: Create sudo file file: path: /etc/sudoers.d/rke state: touch - name: Give rke user passwordless sudo lineinfile: path: /etc/sudoers.d/rke state: present line: 'rke ALL=(ALL:ALL) NOPASSWD: ALL' - name: Set authorized key taken from file authorized_key: user: rke state: present key: "{{ lookup('file', '~/.ssh/id_rsa.pub') }}" 2、在所有主机上手动创建用户 登录到每个群集节点并创建rke用户: sudo useradd rke sudo passwd rke 为用户启用无密码sudo: $ sudo vim /etc/sudoers.d/rke rke ALL=(ALL:ALL) NOPASSWD: ALL 将您的ssh公钥复制到用户的~/.ssh/authorized_keys文件中: for i in rke-master-01 rke-master-02 rke-master-03 rke-worker-01 rke-worker-02; do ssh-copy-id rke@$i done 确认您可以从工作站登录: $ ssh rke@rke-master-01 Warning: Permanently added 'rke-master-01,x.x.x.x' (ECDSA) to the list of known hosts. [rke@rke-master-01 ~]$ sudo su - # No password prompt Last login: Mon Jan 27 21:28:53 CET 2020 from y.y.y.y on pts/0 [root@rke-master-01 ~]# exit [rke@rke-master-01 ~]$ exit logout Connection to rke-master-01 closed. 步骤3:启用所需的内核模块 1、使用Ansible: 创建一个包含以下内容的playbook,并针对您的RKE服务器清单运行它: --- - name: Load RKE kernel modules hosts: rke-hosts remote_user: root vars: kernel_modules: - br_netfilter - ip6_udp_tunnel - ip_set - ip_set_hash_ip - ip_set_hash_net - iptable_filter - iptable_nat - iptable_mangle - iptable_raw - nf_conntrack_netlink - nf_conntrack - nf_conntrack_ipv4 - nf_defrag_ipv4 - nf_nat - nf_nat_ipv4 - nf_nat_masquerade_ipv4 - nfnetlink - udp_tunnel - veth - vxlan - x_tables - xt_addrtype - xt_conntrack - xt_comment - xt_mark - xt_multiport - xt_nat - xt_recent - xt_set - xt_statistic - xt_tcpudp tasks: - name: Load kernel modules for RKE modprobe: name: "{{ item }}" state: present with_items: "{{ kernel_modules }}" 2、手动方式 登录到每个主机并启用运行Kubernetes所需的内核模块: for module in br_netfilter ip6_udp_tunnel ip_set ip_set_hash_ip ip_set_hash_net iptable_filter iptable_nat iptable_mangle iptable_raw nf_conntrack_netlink nf_conntrack nf_conntrack_ipv4 nf_defrag_ipv4 nf_nat nf_nat_ipv4 nf_nat_masquerade_ipv4 nfnetlink udp_tunnel veth vxlan x_tables xt_addrtype xt_conntrack xt_comment xt_mark xt_multiport xt_nat xt_recent xt_set xt_statistic xt_tcpudp; do if ! lsmod | grep -q $module; then echo "module $module is not present"; fi; 步骤4:禁用交换和修改sysctl条目 Kubernetes的建议是禁用交换并添加一些sysctl值。 1、与Ansible: --- - name: Disable swap and load kernel modules hosts: rke-hosts remote_user: root tasks: - name: Disable SWAP since kubernetes can't work with swap enabled (1/2) shell: | swapoff -a - name: Disable SWAP in fstab since kubernetes can't work with swap enabled (2/2) replace: path: /etc/fstab regexp: '^([^#].*?\sswap\s+.*)$' replace: '# \1' - name: Modify sysctl entries sysctl: name: '{{ item.key }}' value: '{{ item.value }}' sysctl_set: yes state: present reload: yes with_items: - {key: net.bridge.bridge-nf-call-ip6tables, value: 1} - {key: net.bridge.bridge-nf-call-iptables, value: 1} - {key: net.ipv4.ip_forward, value: 1} 2、Manually 交换: $ sudo vim /etc/fstab # Add comment to swap line $ sudo swapoff -a Sysctl: $ sudo tee -a /etc/sysctl.d/99-kubernetes.conf <<EOF net.bridge.bridge-nf-call-iptables = 1 net.ipv4.ip_forward = 1 net.bridge.bridge-nf-call-ip6tables = 1 EOF $ sysctl --system 确认已禁用: $ free -h
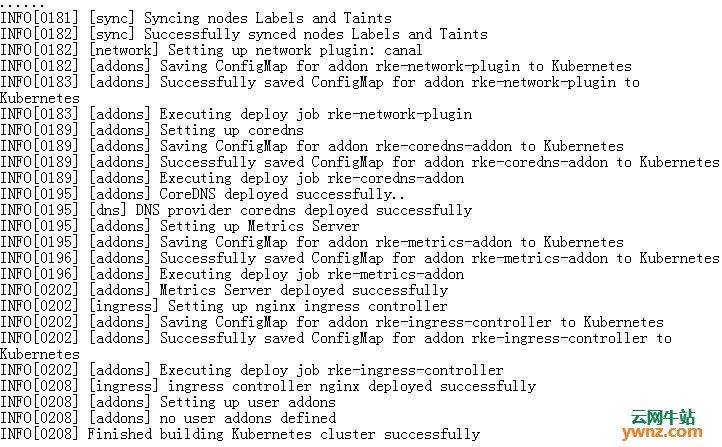
步骤5:安装受支持的Docker版本 每个Kubernetes版本都支持不同的Docker版本。 截至本文为止,受支持的版本为,以下是Docker版本及安装脚本: 18.09.2 curl https://releases.rancher.com/install-docker/18.09.2.sh | sh 18.06.2 curl https://releases.rancher.com/install-docker/18.06.2.sh | sh 17.03.2 curl https://releases.rancher.com/install-docker/17.03.2.sh | sh 您可以按照Docker安装说明进行操作,也可以使用Rancher的安装脚本之一来安装Docker,我将安装支持的最新版本: curl https://releases.rancher.com/install-docker/18.09.2.sh | sudo bash - 启动并启用docker服务: sudo systemctl enable --now docker 确认您的机器上已经安装了Kubernetes支持的Docker版本: $ sudo docker version --format '{{.Server.Version}}' 18.09.2 将rke用户添加到docker组: $ sudo usermod -aG docker rke $ id rke uid=1000(rke) gid=1000(rke) groups=1000(rke),994(docker) 步骤6:在防火墙上打开端口 对于单节点安装,您只需要打开使Rancher与下游用户群集进行通信所需的端口即可。 对于高可用性安装,需要打开相同的端口,以及建立Rancher所安装的Kubernetes集群所需的其他端口。 防火墙TCP端口: for i in 22 80 443 179 5473 6443 8472 2376 8472 2379-2380 9099 10250 10251 10252 10254 30000-32767; do sudo firewall-cmd --add-port=${i}/tcp --permanent done sudo firewall-cmd --reload 防火墙UDP端口: for i in 8285 8472 4789 30000-32767; do sudo firewall-cmd --add-port=${i}/udp --permanent done 步骤6:允许SSH TCP转发 您需要启用SSH服务器系统范围的TCP转发。 打开位于/etc/ssh/sshd_config的ssh配置文件: $ sudo vi /etc/ssh/sshd_config AllowTcpForwarding yes 进行更改后,重新启动ssh服务。 1、CentOS: $ sudo systemctl restart sshd 2、Ubuntu: $ sudo systemctl restart ssh 步骤7:生成RKE群集配置文件 RKE使用称为cluster.yml的群集配置文件来确定群集中将包含哪些节点以及如何部署Kubernetes。 在cluster.yml中可以设置许多配置选项(https://rancher.com/docs/rke/latest/en/config-options/),该文件可以从最少的示例模板创建(https://rancher.com/docs/rke/latest/en/example-yamls/#minimal-cluster-yml-example),也可以使用rke config命令生成。 运行rke config命令在当前目录中创建一个新的cluster.yml: rke config --name cluster.yml 该命令将提示您输入构建集群所需的所有信息。 如果要创建一个空模板cluster.yml文件,请指定--empty选项: rke config --empty --name cluster.yml 这就是我的群集配置文件的样子,不要复制粘贴,只需将其用作创建自己的配置的参考即可。 # https://rancher.com/docs/rke/latest/en/config-options/ nodes: - address: 10.10.1.10 internal_address: hostname_override: rke-master-01 role: [controlplane, etcd] user: rke - address: 10.10.1.11 internal_address: hostname_override: rke-master-02 role: [controlplane, etcd] user: rke - address: 10.10.1.12 internal_address: hostname_override: rke-master-03 role: [controlplane, etcd] user: rke - address: 10.10.1.13 internal_address: hostname_override: rke-worker-01 role: [worker] user: rke - address: 10.10.1.114 internal_address: hostname_override: rke-worker-02 role: [worker] user: rke # using a local ssh agent # Using SSH private key with a passphrase - eval `ssh-agent -s` && ssh-add ssh_agent_auth: true # SSH key that access all hosts in your cluster ssh_key_path: ~/.ssh/id_rsa # By default, the name of your cluster will be local # Set different Cluster name cluster_name: rke # Fail for Docker version not supported by Kubernetes ignore_docker_version: false # prefix_path: /opt/custom_path # Set kubernetes version to install: https://rancher.com/docs/rke/latest/en/upgrades/#listing-supported-kubernetes-versions # Check with -> rke config --list-version --all kubernetes_version: # Etcd snapshots services: etcd: backup_config: interval_hours: 12 retention: 6 snapshot: true creation: 6h retention: 24h kube-api: # IP range for any services created on Kubernetes # This must match the service_cluster_ip_range in kube-controller service_cluster_ip_range: 10.43.0.0/16 # Expose a different port range for NodePort services service_node_port_range: 30000-32767 pod_security_policy: false kube-controller: # CIDR pool used to assign IP addresses to pods in the cluster cluster_cidr: 10.42.0.0/16 # IP range for any services created on Kubernetes # # This must match the service_cluster_ip_range in kube-api service_cluster_ip_range: 10.43.0.0/16 kubelet: # Base domain for the cluster cluster_domain: cluster.local # IP address for the DNS service endpoint cluster_dns_server: 10.43.0.10 # Fail if swap is on fail_swap_on: false # Set max pods to 150 instead of default 110 extra_args: max-pods: 150 # Configure network plug-ins # KE provides the following network plug-ins that are deployed as add-ons: flannel, calico, weave, and canal # After you launch the cluster, you cannot change your network provider. # Setting the network plug-in network: plugin: canal options: canal_flannel_backend_type: vxlan # Specify DNS provider (coredns or kube-dns) dns: provider: coredns # Currently, only authentication strategy supported is x509. # You can optionally create additional SANs (hostnames or IPs) to # add to the API server PKI certificate. # This is useful if you want to use a load balancer for the # control plane servers. authentication: strategy: x509 sans: - "k8s.computingforgeeks.com" # Set Authorization mechanism authorization: # Use `mode: none` to disable authorization mode: rbac # Currently only nginx ingress provider is supported. # To disable ingress controller, set `provider: none` # `node_selector` controls ingress placement and is optional ingress: provider: nginx options: use-forwarded-headers: "true" 在我的配置中,主节点仅具有etcd和controlplane角色,但是,通过添加辅助角色,可以将它们用于调度pod: role: [controlplane, etcd, worker] 步骤7:使用RKE部署Kubernetes集群 创建cluster.yml文件后,您可以使用简单的命令部署集群: rke up 该命令假定cluster.yml文件与运行命令的目录位于同一目录中,如果使用其他文件名,请按如下所示进行指定: $ rke up --config ./rancher_cluster.yml 结合使用SSH私钥和密码–eval ssh-agent -s && ssh-add 确保设置在输出中未显示任何故障:
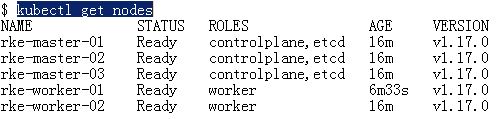
步骤8:访问您的Kubernetes集群 作为Kubernetes创建过程的一部分,已经创建了kubeconfig文件并将其写入kube_config_cluster.yml。 将KUBECONFIG变量设置为生成的文件: export KUBECONFIG=./kube_config_cluster.yml 检查集群中的节点列表: $ kubectl get nodes
如果没有其他Kubernetes集群,则可以将此文件复制到$HOME/.kube/config: mkdir ~/.kube cp kube_config_rancher-cluster.yml ~/.kube/config 至此,操作完成。
相关主题 |