|
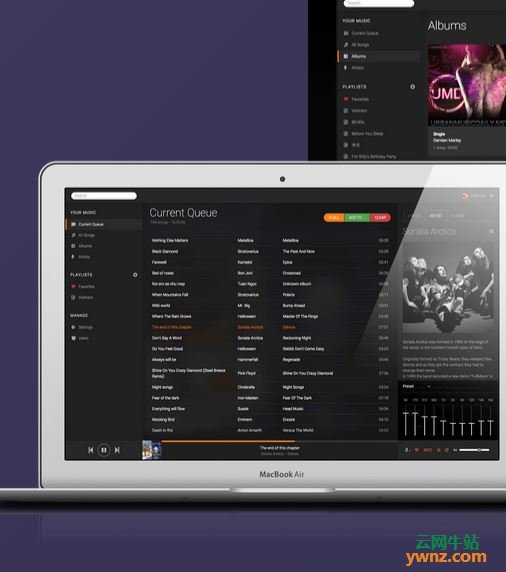
本文介绍安装和使用Koel在Ubuntu/Debian/CentOS/Fedora上配置个人音乐流媒体服务器。Koel是使用Vue和Laravel PHP Framework编写的开源、基于Web的简单个人音频流服务,面向Web开发人员,它采用了现代Web技术,例如CSS网格、音频和拖放API等等。
步骤1:安装数据库服务器 我们将专注于使用MariaDB数据库服务器,参考: 在Ubuntu 20.04(Focal Fossa)上安装MariaDB Server的方法。 在Debian 10(Buster)上安装MariaDB 10.4的方法。 在CentOS 8/RHEL 8服务器上安装MariaDB 10.4版本的具体步骤。 运行数据库服务后,请创建数据库,该服务的用户,然后为该用户授予权限: $ mysql -u root -p CREATE DATABASE koel DEFAULT CHARACTER SET utf8 DEFAULT COLLATE utf8_general_ci; CREATE USER 'koel'@'localhost' IDENTIFIED BY 'k03lDBP@s3'; GRANT ALL PRIVILEGES ON koel.* TO 'koel'@'localhost' WITH GRANT OPTION; EXIT;
步骤2:安装PHP服务器组件 在此步骤中,我们将安装PHP、Composer和Nginx httpd服务器。 针对Debian/Ubuntu服务器: sudo apt -y install git curl g++ nginx sudo apt -y install php php-cli php-fpm php-json php-pdo php-mysql php-zip php-gd php-mbstring php-curl php-xml php-pear php-bcmath 针对CentOS 7服务器: sudo yum -y install http://rpms.remirepo.net/enterprise/remi-release-7.rpm sudo yum -y install git wget curl epel-release yum-utils libpng-devel sudo yum-config-manager --disable remi-php54 sudo yum-config-manager --enable remi-php73 sudo yum -y install php php-cli php-fpm php-mysqlnd php-zip php-devel php-gd php-mcrypt php-mbstring php-curl php-xml php-pear php-bcmath php-json 针对CentOS 8服务器: sudo dnf -y install git wget curl yum-utils sudo dnf -y install https://dl.fedoraproject.org/pub/epel/epel-release-latest-8.noarch.rpm sudo dnf -y install https://rpms.remirepo.net/enterprise/remi-release-8.rpm dnf module reset php sudo dnf module install php:remi-7.3 sudo yum -y install wget php php-{pear,cgi,common,curl,mbstring,gd,mysqlnd,gettext,bcmath,json,xml,fpm,intl,zip,imap}
步骤3:安装Node.js、yarn、Composer 1、安装Nodejs 针对Ubuntu/Debian服务器: sudo curl -sL https://deb.nodesource.com/setup_10.x | sudo bash - sudo apt update sudo apt -y install nodejs 针对CentOS服务器: sudo curl -sL https://rpm.nodesource.com/setup_10.x | sudo bash - sudo yum -y install nodejs 2、安装yarn 针对Ubuntu/Debian服务器: curl -sL https://dl.yarnpkg.com/debian/pubkey.gpg | sudo apt-key add - echo "deb https://dl.yarnpkg.com/debian/ stable main" | sudo tee /etc/apt/sources.list.d/yarn.list sudo apt-get update && sudo apt-get install yarn 针对CentOS服务器: curl -sL https://dl.yarnpkg.com/rpm/yarn.repo | sudo tee /etc/yum.repos.d/yarn.repo sudo yum -y install yarn 3、安装Composer sudo su - curl -sS https://getcomposer.org/installer | php -- --install-dir=/usr/bin --filename=composer exit 通过查询版本来验证安装: $ composer --version Composer version 1.9.3
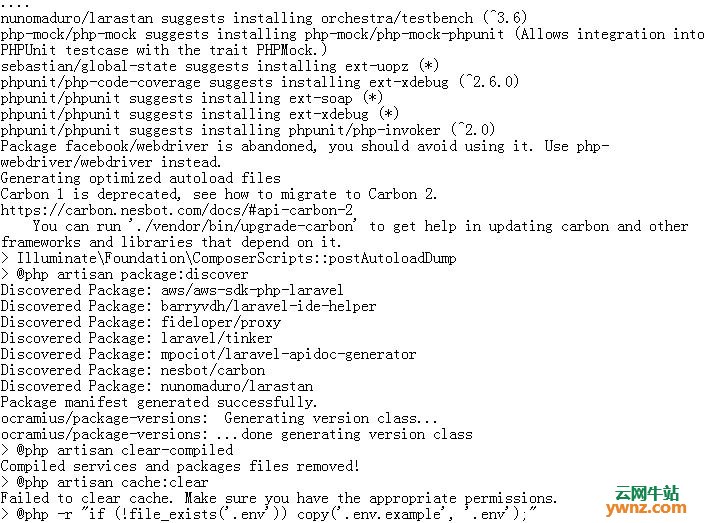
步骤4:安装Koel个人音乐流媒体服务器 安装构建依赖项: 针对Ubuntu/Debian服务器: $ sudo apt install -y build-essential libpng-dev gcc make ffmpeg 针对CentOS服务器: $ sudo yum -y install epel-release $ sudo yum group install "Development Tools" $ sudo yum -y install libpng-devel 要在CentOS上安装ffmpeg,请参考在CentOS 8/RHEL 8发行版上安装FFmpeg的方法。 克隆koel项目: git clone https://github.com/phanan/koel.git cd koel npm install npm audit fix composer install 安装输出信息如下:
编辑.env文件,进行必要的配置更改,设置数据库,请根据自身的数据进行更改: $ vim .envvim .env .... # Database connection name, which corresponds to the database driver. DB_CONNECTION=mysql DB_DATABASE=koel DB_USERNAME=koel DB_PASSWORD='k03lDBP@s3' # Credentials and other info to be used when Koel is installed in non-interactive mode # (php artisan koel:init --no-interaction) # By default (interactive mode), Koel will still prompt for these information during installation, # but provide the values here as the defaults (except ADMIN_PASSWORD, for security reason). ADMIN_NAME="Koel Admin" ADMIN_EMAIL=249562751@qq.com ADMIN_PASSWORD=Str0ngPassw0rd # The memory limit, in MB, used by the scanning process. # For example, if you want to set a memory limit of 2048MB, enter "2048" (without # quotes) here. MEMORY_LIMIT=512 The full path of ffmpeg binary. FFMPEG_PATH=/usr/bin/ffmpeg 然后初始化数据库,然后开始为站点提供服务: $ php artisan koel:init --no-interaction $ php artisan serve Laravel development server started: <http://127.0.0.1:8000> 这将仅允许来自本地主机的连接,如果想接受来自其他主机的连接,请通过提供‘host’选项来启动服务器: $ php artisan serve --host 0.0.0.0
步骤5:配置Nginx 为了获得最佳性能,需要使用Apache或Nginx网络服务器设置生产版本,使用以下命令安装nginx。 针对Debian/Ubuntu服务器: $ sudo apt -y install nginx php-fpm $ sudo systemctl enable --now nginx 针对CentOS/Debian服务器: $ sudo yum -y install nginx $ sudo systemctl enable --now nginx $ sudo firewall-cmd --add-service={http,https} --permanent $ sudo firewall-cmd --reload 将koel专案资料夹移至/var/www/html目录: sudo mv koel /var/www/html 然后设置权限。 针对Debian/Ubuntu服务器: $ sudo chown -R www-data:www-data /var/www/html/koel 针对CentOS服务器: $ sudo chown -R apache:apache /var/www/html/koel 配置Nginx: $ sudo vim /etc/nginx/conf.d/koel.conf 在下面粘贴并修改: server { listen *:80; server_name koel.example.com; root /var/www/html/koel; index index.php; gzip on; gzip_types text/plain text/css application/x-javascript text/xml application/xml application/xml+rss text/javascript application/json; gzip_comp_level 9; # Whitelist only index.php, robots.txt, and some special routes if ($request_uri !~ ^/$|index\.php|robots\.txt|(public|api)/|remote|api-docs|sw\.js) { return 404; } location /media/ { internal; alias $upstream_http_x_media_root; access_log /var/log/nginx/koel.access.log; error_log /var/log/nginx/koel.error.log; } location / { try_files $uri $uri/ /index.php?$args; } location ~ \.php$ { try_files $uri $uri/ /index.php?$args; fastcgi_param PATH_INFO $fastcgi_path_info; fastcgi_param PATH_TRANSLATED $document_root$fastcgi_path_info; fastcgi_param SCRIPT_FILENAME $document_root$fastcgi_script_name; #fastcgi_pass 127.0.0.1:9000; fastcgi_pass unix:/run/php/php7.2-fpm.sock; fastcgi_index index.php; fastcgi_split_path_info ^(.+\.php)(/.+)$; fastcgi_intercept_errors on; include fastcgi_params; } } 检查nginx配置是否存在语法错误: $ sudo nginx -t nginx: the configuration file /etc/nginx/nginx.conf syntax is ok nginx: configuration file /etc/nginx/nginx.conf test is successful 重新启动nginx: sudo systemctl restart nginx 配置到这里,就可以使用koel.example.com来访问Koel控制中心了,至此,配置Koel个人音乐流媒体服务器完成。
相关主题 |