|
本文介绍在CentOS 8/RHEL 8操作系统上安装和配置Puppet Master/Server的步骤。有很多方法可以在Linux系统上安装Puppet Master,常见且最简单的方法是从Puppet提供和维护的YUM存储库中提取所需的软件包。
步骤1:更新CentOS 8/RHEL 8机器 确保您的CentOS 8/RHEL 8机器已更新: sudo dnf -y update sudo dnf -y install wget curl vim bash-completion 由于更新包括最新的Linux内核软件包,因此如果其中没有关键的应用程序运行,请考虑重新引导计算机: sudo systemctl reboot
步骤2:设定系统主机名称并设定时间 为您的机器设置一个正确的主机名,比如: sudo hostnamectl set-hostname puppetmaster.example.com 确保主机名具有正确的DNS记录,并更新/etc/hosts文件: echo "192.168.122.12 puppetmaster.example.com puppetmaster" | sudo tee -a /etc/hosts 注: 192.168.122.12是Puppet服务器的IP地址。 puppetmaster.example.com是Puppet服务器的FQDN。 重新启动以主机命名的服务: sudo systemctl restart systemd-hostnamed 注销然后再次登录以确认主机名: $ exit $ hostname puppetmaster.example.com 配置计时NTP: $ sudo dnf -y install chrony $ sudo systemctl enable --now chronyd $ sudo timedatectl set-timezone Asia/Shanghai --adjust-system-clock $ sudo timedatectl set-ntp yes 注:请注意设置自己所在的时区,上面的配置以Asia/Shanghai为例。 确认日期和时间配置正确,运行以下命令查看: $ timedatectl
步骤3:添加Puppet Yum存储库 通过在终端中运行以下命令来添加所需的存储库: sudo dnf -y install https://yum.puppet.com/puppet-release-el-8.noarch.rpm 还可以考虑添加EPEL存储库: sudo dnf -y install https://dl.fedoraproject.org/pub/epel/epel-release-latest-8.noarch.rpm
步骤4:在CentOS 8/RHEL 8上安装Puppet Master/Server 配置了所有先决条件后,您可以开始在CentOS 8/RHEL 8 Linux上安装Puppet Master了。 更新软件包列表缓存: $ sudo dnf makecache
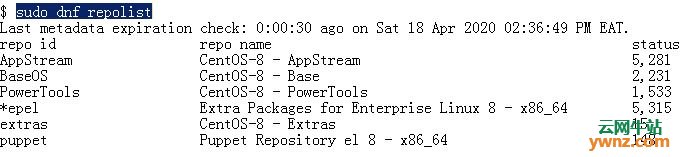
Puppet存储库应位于系统中可用存储库的列表中,运行以下命令: $ sudo dnf repolist
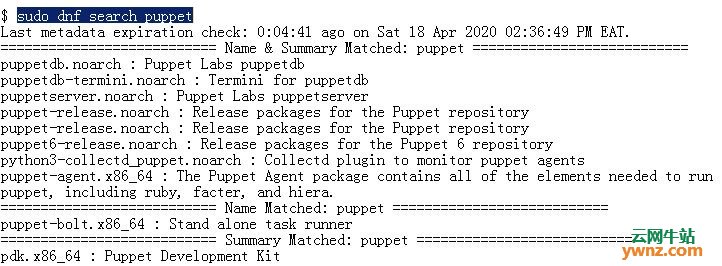
您可以查询存储库中可用的Puppet软件包列表: $ sudo dnf search puppet
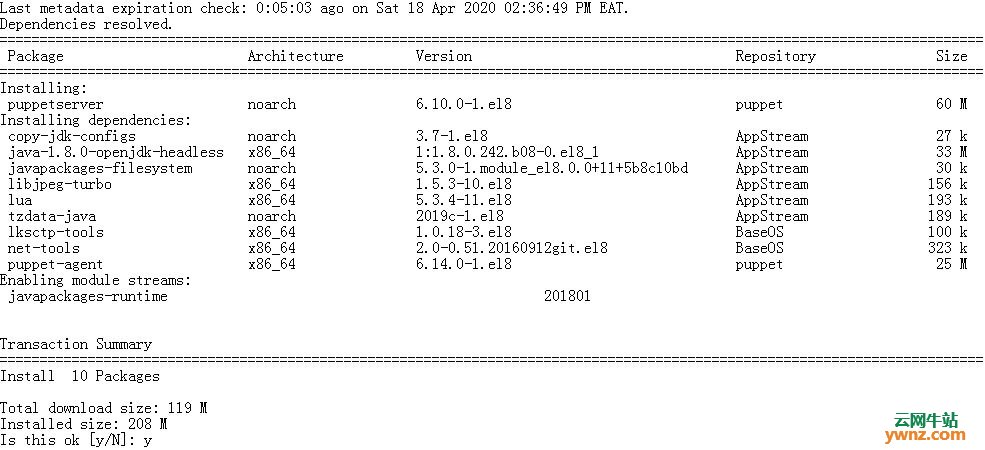
在CentOS 8 Linux上安装Puppet Master软件包: sudo dnf install puppetserver Puppet Agent将作为依赖项安装:
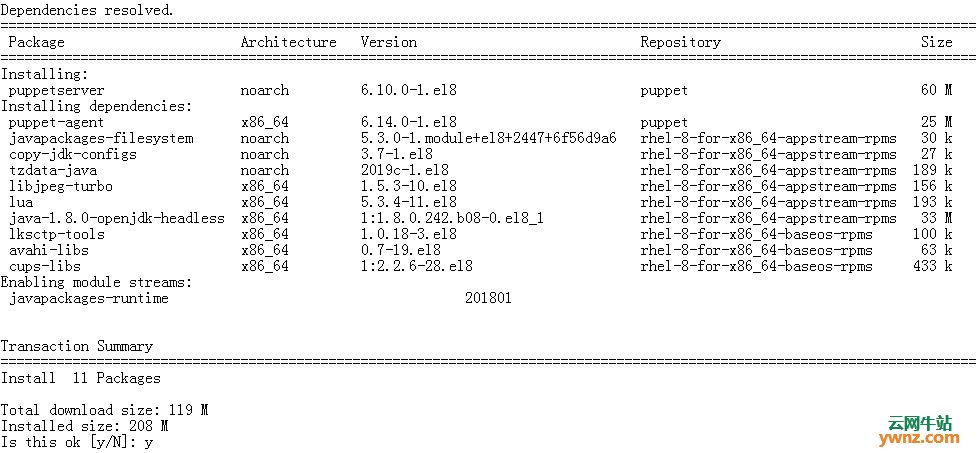
在RHEL 8上:
出现提示时,同意导入GPG密钥:
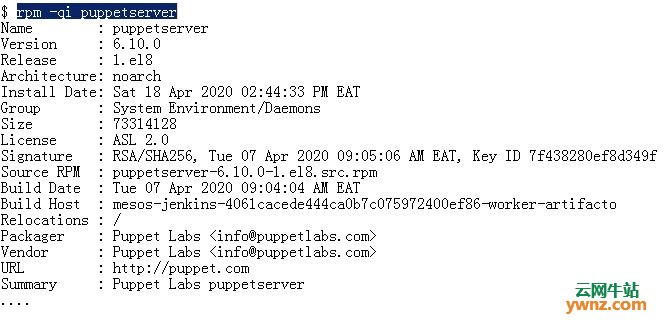
确认软件包安装,运行以下命令: $ rpm -qi puppetserver
根据上图的输出信息,可以得出安装的版本为6.10.0。
步骤5:在CentOS 8/RHEL 8上配置Puppet Master/Server 完成Puppet Master/Server的安装后,就该开始配置了。 定义Puppet Master FQDN和DNS备用名称: $ sudo vim /etc/puppetlabs/puppet/puppet.conf 在[master]部分下添加DNS设置: dns_alt_names=puppetmaster.example.com,puppetmaster,puppetserver [main] certname = puppetmaster.example.com server = puppetmaster.example.com environment = production runinterval = 1h 注: puppetmaster.example.com是您的Puppet服务器的FQDN。 更新后,我的配置如下所示: [master] vardir = /opt/puppetlabs/server/data/puppetserver logdir = /var/log/puppetlabs/puppetserver rundir = /var/run/puppetlabs/puppetserver pidfile = /var/run/puppetlabs/puppetserver/puppetserver.pid codedir = /etc/puppetlabs/code dns_alt_names=puppetmaster.example.com,puppetmaster,puppetserver [main] certname = puppetmaster.example.com server = puppetmaster.example.com environment = production runinterval = 1h 1、配置JVM内存分配 您可以在其中设置JVM的最小和最大内存的文件是: $ sudo vim /etc/sysconfig/puppetserver 默认情况下,它设置为2GB,根据计算机上可用的资源进行调整: JAVA_ARGS="-Xms1g -Xmx1g -Djruby.logger.class=com.puppetlabs.jruby_utils.jruby.Slf4jLogger" 2、在CentOS 8/RHEL 8上启动Puppet Server 完成基本的Puppet Server配置后,启动服务并将其设置为在系统启动时启动: sudo systemctl enable --now puppetserver 如果您之前已启动过,请在修改后重新启动: sudo systemctl restart puppetserver 检查服务状态以确认其正在运行: $ systemctl status puppetserver 3、在防火墙上打开服务端口 服务启动后,打开防火墙上的端口,以便可以从网络访问服务器: sudo firewall-cmd --add-service=puppetmaster --permanent sudo firewall-cmd --reload 确认Puppet服务器在CentOS 8上使用Puppet Client运行正常: $ sudo /opt/puppetlabs/bin/puppet agent --test --ca_server=puppetmaster.example.com Info: Using configured environment 'production' Info: Retrieving pluginfacts Info: Retrieving plugin Info: Retrieving locales Info: Caching catalog for puppetmaster.example.com Info: Applying configuration version '1587211455' Info: Creating state file /opt/puppetlabs/puppet/cache/state/state.yaml Notice: Applied catalog in 0.01 seconds 4、将Puppet Binary文件夹添加到$PATH Puppet二进制文件位于/opt/puppetlabs/bin中,默认情况下,该目录不在您的$PATH中,可以通过以下方式确认: $ ls /opt/puppetlabs/bin/ $ which puppet
将其添加到PATH: $ vim ~/.bashrc export PATH=$PATH:/opt/puppetlabs/bin $ source ~/.bashrc $ which puppet /opt/puppetlabs/bin/puppet 至此,配置Puppet Master/Server完成。
相关主题 |