|
本次使用的操作系统环境是centos 7,一共有3台服务器,基础配置采用4核4G内存200G机械硬盘,目前安装的xl兼容版本为postgresql10版本。在初装系统机器中开始进行以下操作及使用root账号开始进行以下操作。
第一步、所有集群中的服务器均进行初始修改/etc/hosts,增加内容如下: 10.228.0.45 gtm 10.228.0.46 datanode1 10.228.0.47 datanode2
第二步、关闭防火墙 systemctl stop firewalld.service systemctl disable firewalld.service
第三步、关闭selinux 运行:vim /etc/selinux/config SELINUX=disabled
第四步、基础依赖包安装 yum install -y flex bison readline-devel zlib-devel openjade docbook-style-dsssl git gcc
第五步、重启使其之前配置生效 reboot
第六步、创建postgres用户 useradd postgres passwd postgres
第七步、设置ssh免密,这里注意要每个节点均创建.ssh目录和其权限设置,免密的公钥私钥可以不进行创建 su - postgres mkdir ~/.ssh chmod 700 ~/.ssh ssh-keygen -t rsa cat ~/.ssh/id_rsa.pub >> ~/.ssh/authorized_keys
第八步、将gtm节点的ssh免密文件复制到datanode存储节点 scp ~/.ssh/authorized_keys postgres@datanode1:~/.ssh/ scp ~/.ssh/authorized_keys postgres@datanode2:~/.ssh/
第九步、开始安装postgresql-xl su root cd /opt git clone git://git.postgresql.org/git/postgres-xl.git cd postgres-xl/ ./configure --prefix=/home/postgres/pgxl/ make make install cd contrib make make install
第十步、配置基础环境变量 su - postgres vim .bashrc 文件最后增加以下内容: export PGHOME=/home/postgres/pgxl export LD_LIBRARY_PATH=$PGHOME/lib:$LD_LIBRARY_PATH export PATH=$PGHOME/bin:$PATH
第十一步、使环境变量生效并测试是否配置成功 source .bashrc echo $PGHOME mkdir pgxc mkdir pgxc_bak
基础环境安装完成,以下步骤为集群配置,集群发起从GTM所在服务器进行执行即可。
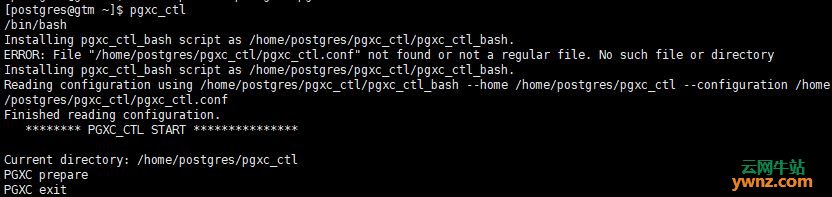
第一步、在postgres用户根目录下生成pgxc_ctl配置文件,创建集群文件存放目录和备份目录 pgxc_ctl PGXC prepare PGXG exit
第二步、修改pgxc_ctl.conf文件配置 cd pgxc_ctl/ vim pgxc_ctl.conf ======================================== #!/usr/bin/env bash # # Postgres-XC Configuration file for pgxc_ctl utility. # # Configuration file can be specified as -c option from pgxc_ctl command. Default is # $PGXC_CTL_HOME/pgxc_ctl.org. # # This is bash script so you can make any addition for your convenience to configure # your Postgres-XC cluster. # # Please understand that pgxc_ctl provides only a subset of configuration which pgxc_ctl # provide. Here's several several assumptions/restrictions pgxc_ctl depends on. # # 1) All the resources of pgxc nodes has to be owned by the same user. Same user means # user with the same user name. User ID may be different from server to server. # This must be specified as a variable $pgxcOwner. # # 2) All the servers must be reacheable via ssh without password. It is highly recommended # to setup key-based authentication among all the servers. # # 3) All the databases in coordinator/datanode has at least one same superuser. Pgxc_ctl # uses this user to connect to coordinators and datanodes. Again, no password should # be used to connect. You have many options to do this, pg_hba.conf, pg_ident.conf and # others. Pgxc_ctl provides a way to configure pg_hba.conf but not pg_ident.conf. This # will be implemented in the later releases. # # 4) Gtm master and slave can have different port to listen, while coordinator and datanode # slave should be assigned the same port number as master. # # 5) Port nuber of a coordinator slave must be the same as its master. # # 6) Master and slave are connected using synchronous replication. Asynchronous replication # have slight (almost none) chance to bring total cluster into inconsistent state. # This chance is very low and may be negligible. Support of asynchronous replication # may be supported in the later release. # # 7) Each coordinator and datanode can have only one slave each. Cascaded replication and # multiple slave are not supported in the current pgxc_ctl. # # 8) Killing nodes may end up with IPC resource leak, such as semafor and shared memory. # Only listening port (socket) will be cleaned with clean command. # # 9) Backup and restore are not supported in pgxc_ctl at present. This is a big task and # may need considerable resource. # #======================================== # # #使用pgxc_ctl部署时创建的基础目录,这里采用的是当前postgres用户根目录下的pgxc文件夹。 pgxcInstallDir=$HOME/pgxc #---- OVERALL ---- # pgxcOwner=$USER # 用来操作Postgres-XC集群的服务器账号和数据库账号,数据库账号需要具有超级管理员权限,同时该用户还应是coordinator节点和datanode节点的超级管理员。这里我们直接采用的是postgres用户。 pgxcUser=$pgxcOwner # 设置Postgres-XC 集群的超级管理员,直接使用刚预设的用户就行。 tmpDir=/tmp # xc集群使用的临时文件存放目录 localTmpDir=$tmpDir # 本地使用的临时目录 configBackup=y # 是否开启文件备份策略,n为关闭,y为开启 configBackupHost=pgxc-linker #主备份配置文件 host to backup config file configBackupDir=$HOME/pgxc_bak # 备份目录 configBackupFile=pgxc_ctl.bak # 备份文件名称 #---- #---- GTM配置 ---- # GTM 配置是不可以缺少的,Postgres-XC集群中GTM至少具有一个,通常结构是一个GTM和一个备份GTM,如果GTM崩溃了,可以使用pgxc_update_gtm命令更新,同时也可以使用pgxc_remove_gtm进行删除它,删除命令不会直接停止当前的GTM,需要管理员先预先断开其与GTM的连接。 #---- GTM master 主节点配置---- #---- Overall ---- gtmName=gtm #gtm的名字 gtmMasterServer=gtm #gtm所属服务器,之前已经配置了/etc/hosts中的主机名与IP的关系了,所以这里可以直接使用gtm,也可以使用IP 10.228.0.45 gtmMasterPort=20001 #gtm交互使用的端口号 gtmMasterDir=$HOME/pgxc/nodes/gtm #gtm所在目录 #---- Configuration --- gtmExtraConfig=none # master节点和slave节点使用的gtm.conf文件,只做初始化使用。默认设置为无 gtmMasterSpecificExtraConfig=none # 主GTM的初始化配置文件,默认设置为无,上面已经配置了基础参数了,如果有自定义配置GTM,可以创建gtm.conf文件并配置到此处即可。 #---- GTM Slave ---- # GTM的从节点,用于GTM备份,在GTM主节点出现问题时,可以由该从节点进行支撑处理。生产中配置该节点可以有效避免单点故障。 #---- Overall ------ gtmSlave=n # 开启GTM从节点配置,y开启,n关闭 #gtmSlaveName=gtmSlave #GTM从节点名称 #gtmSlaveServer=node12 #GTM从节点部署服务器IP地址,如果在服务端已经配置了hosts的映射关系,则可以直接使用名称,否则需要配置为IP地址。 #gtmSlavePort=20001 # GTM从节点交互端口号 #gtmSlaveDir=$HOME/pgxc/nodes/gtm # GTM从节点部署目录。 # 如果不配置GTM从节点,则GTM主节点发生故障时无法有效进行切换。管理员可以通过pgxc_add_gtm_slave进行添加处理。 #---- Configuration ---- #gtmSlaveSpecificExtraConfig=none #GTM从节点初始化安装时使用的配置文件,gtm.conf文件。 #---- GTM Proxy ---- # GTM Proxy将根据每个组件在哪个服务器上运行来选择 # 当GTM从节点接替主节点时,主节点的 gtm proxy需要指向到GTM从节点。因此GTM proxy应该配置到一个新的位置,从而防止因为主节点出现问题时,proxy也同时出现问题无法指向到GTM从节点。 # # GTM从节点重启时,更改pg_ctl的基础文件,postgresql.conf和recovery.conf配置文件,再进行执行pg_ctl restart进行重启服务 # # 如果不使用GTM slave,或者由GTM主节点直接管理各个节点,则不需要进行配置Proxy节点,但配置了GTM slave,则必须配置Proxy节点。Proxy节点可以分担GTM主节点的工作量,因此我们通常在配置时都将该Proxy节点进行配置。 #---- Shortcuts ------ gtmProxyDir=$HOME/pgxc/nodes/gtm_pxy #Proxy的存放路径。 #---- Overall ------- gtmProxy=y # 是否开启proxy节点配置,y开启,n关闭,关闭时相关的配置信息将被设置为空值。 gtmProxyNames=(gtm_pxy1 gtm_pxy2) # proxy节点名称 gtmProxyServers=(datanode1 datanode2) # 存放的服务器,可以配置多个,这里配置在各个存储节点服务器上,因其已经在/etc/hosts中配置了映射关系,因此这里直接写的主机名,如果没有配置,则需要写IP地址。 gtmProxyPorts=(20001 20001) # 交互使用的端口号,上面配置了几台服务器,这里就需要配置几个端口号,每个端口号的所在位置和上面的服务器所在位置对应。 gtmProxyDirs=($gtmProxyDir $gtmProxyDir) # 各服务器中proxy的存放路径,这里直接统一使用一样的,方便各个存储节点中查找。 #---- Configuration ---- gtmPxyExtraConfig=none # proxy节点使用的 gtm_proxy配置文件 gtmPxySpecificExtraConfig=(none none) #各节点服务器中的具体配置文件 #---- #---- #---- #---- Coordinators 配置---- #---- shortcuts ---------- coordMasterDir=$HOME/pgxc/nodes/coord coordSlaveDir=$HOME/pgxc/nodes/coord_slave coordArchLogDir=$HOME/pgxc/nodes/coord_archlog #---- Overall ------------ coordNames=(coord1) # master和slave节点使用相同的名称 coordPorts=(20004) # 主节点端口号 poolerPorts=(20010) # Master pooler ports coordPgHbaEntries=(10.228.0.0/25) # 所有的coordinator (master/slave) 节点均接受的服务端IP段,该配置只接受 $pgxcOwner连接。如果不想放开指定段,可以使用coordExtraPgHba或 coordSpecificExtraPgHba参数进行设置,只需要在()中填写指定的IP即可。 #coordPgHbaEntries=(::1/128) # IPv6地址段。 #---- Master ------------- coordMasterServers=(gtm) # 主节点所在服务器,同样的使用的是主机名映射,可以设置IP coordMasterDirs=($coordMasterDir) #Coordinators 主节点存放地址 coordMaxWALsernder=5 # 配置从节点最大数量,如果配置0,则按照下面配置的外部文件进行查找该参数,如果不配置从节点,可以将该值设置为0. coordMaxWALSenders=($coordMaxWALsernder) # 每个 coordinator节点的最大协调数量,即从节点在交互时需要和各个节点进行交互,因此这里直接配置和上面从节点最大数量一致即可。 #---- Slave ------------- coordSlave=n # 凡是具有 coordiantor slave节点,则该配置必须设置为y,否则设置为n,当设置为n时,以下关于slave节点的配置将被设置为none. coordSlaveSync=y # 开启同步模式连接。 coordSlaveServers=(datanode1 datanode2) #从节点所在服务器,同上设置一样,使用主机名或者IP的方式进行设置。 coordSlavePorts=(20004 20005 20004 20005) # 各节点主要交互端口 coordSlavePoolerPorts=(20010 20011 20010 20011) #主交互池端口 pooler ports coordSlaveDirs=($coordSlaveDir $coordSlaveDir) coordArchLogDirs=($coordArchLogDir $coordArchLogDir) #---- Configuration files--- # 设置特定的非默认配置,可以通过bash脚本或者额外的pg_hba.conf提供。 coordExtraConfig=coordExtraConfig #coordinators的额外配置文件,即上面提到的外部配置文件,额外的配置将应用到所有的coordinators节点的postgresql.conf配置文件中。以下为设置的最小参数,这里可以将自己的postgresql.conf配置增加到下面。 cat > $coordExtraConfig <<EOF #================================================ # Added to all the coordinator postgresql.conf # Original: $coordExtraConfig log_destination = 'stderr' logging_collector = on log_directory = 'pg_log' listen_addresses = '*' max_connections = 100 EOF #针对coordinator master节点附加的配置文件。 # You can define each setting by similar means as above. coordSpecificExtraConfig=(none none) coordExtraPgHba=none # 设置 pg_hba.conf文件,该配置将应用到所有的coordinator节点的 pg_hba.conf文件中。 coordSpecificExtraPgHba=(none none) #----- Additional Slaves ----- # # 以下配置为额外的多重级联复制配置,该配置不在当前使用的版本中使用。 # coordAdditionalSlaves=n # Additional slave can be specified as follows: where you coordAdditionalSlaveSet=(cad1) # Each specifies set of slaves. This case, two set of slaves are # configured cad1_Sync=n # All the slaves at "cad1" are connected with asynchronous mode. # If not, specify "y" # The following lines specifies detailed configuration for each # slave tag, cad1. You can define cad2 similarly. cad1_Servers=(datanode1 datanode2) # Hosts cad1_dir=$HOME/pgxc/nodes/coord_slave_cad1 cad1_Dirs=($cad1_dir $cad1_dir) cad1_ArchLogDir=$HOME/pgxc/nodes/coord_archlog_cad1 cad1_ArchLogDirs=($cad1_ArchLogDir $cad1_ArchLogDir) #---- #---- #---- #---- Datanodes 配置---- #---- Shortcuts -------------- datanodeMasterDir=$HOME/pgxc/nodes/dn_master datanodeSlaveDir=$HOME/pgxc/nodes/dn_slave datanodeArchLogDir=$HOME/pgxc/nodes/datanode_archlog #---- Overall --------------- #primaryDatanode=datanode1 # At present, xc has a priblem to issue ALTER NODE against the primay node. Until it is fixed, the test will be done # without this feature. primaryDatanode=datanode1 # 主节点 datanodeNames=(datanode1 datanode2) #所有节点名称 datanodePorts=(20008 20008) #主交互端口 datanodePoolerPorts=(20012 20012) # 主交互池端口 datanodePgHbaEntries=(10.228.0.0/25) # 所有 coordinator (master/slave) 节点可接受的连接IP段,该通讯只允许pg_hba.conf中的$pgxcOwner 用户通过。如果要设置其他的策略,需通过下面配置的额外配置文件进行制定。如果要设置指定的IP通过,可以通过datanodeExtraPgHba 和 datanodeSpecificExtraPgHba 参数进行设置。 #datanodePgHbaEntries=(::1/128) # 和上面一样的策略,但过滤的IP为IPv6协议。 #---- Master ---------------- datanodeMasterServers=(datanode1 datanode2) # 所有节点的服务器IP地址,可以设置hosts中映射的值或IP地址。不可设置为无,否则集群将不能运行。 datanodeMasterDirs=($datanodeMasterDir $datanodeMasterDir) datanodeMaxWalSender=5 # 最大配置从节点,如果为0则需要在外部配置文件中进行设置,如果不配置从节点,则此值可以设置为0。 datanodeMaxWALSenders=($datanodeMaxWalSender $datanodeMaxWalSender) # 每个节点发起数量。 #---- Slave ----------------- datanodeSlave=n # 存储从节点是否开启,设置y开启,则每个节点至少配置一个Coordinator从节点。如果没有有效的服务器名称,则以下相关参数值将采用none。 datanodeSlaveServers=(datanode1 datanode2) # 各存储从节点服务器地址,可用映射名或IP datanodeSlavePorts=(20008 20008) # 各存储从节点主交互端口 datanodeSlavePoolerPorts=(20012 20012) # 各存储从节点主交互池端口 datanodeSlaveSync=y # 是否开启存储从节点同步模式 datanodeSlaveDirs=($datanodeSlaveDir $datanodeSlaveDir) datanodeArchLogDirs=( $datanodeArchLogDir $datanodeArchLogDir) # ---- Configuration files --- # 以下设置为配置自定义外部bash脚本或外部pg_hba.conf文件 datanodeExtraConfig=none # 额外的datanodes配置文件. 该文件中的配置将添加到所有存储节点的postgresql.conf中。 datanodeSpecificExtraConfig=(none none) datanodeExtraPgHba=none # 额外的 pg_hba.conf。 datanodeSpecificExtraPgHba=(none none) #----- Additional Slaves ----- datanodeAdditionalSlaves=n # 是否开启额外的slave节点配置 # datanodeAdditionalSlaveSet=(dad1 dad2) # 各节点名称 # dad1_Sync=n # 所有节点都以异步的方式进行连接,如果不采用异步,则设置为y。 # dad1_Servers=(node08 node09 node06 node07) # 各节点所在服务器地址,映射名或IP地址 # dad1_dir=$HOME/pgxc/nodes/coord_slave_cad1 # dad1_Dirs=($cad1_dir $cad1_dir $cad1_dir $cad1_dir) # dad1_ArchLogDir=$HOME/pgxc/nodes/coord_archlog_cad1 # dad1_ArchLogDirs=($cad1_ArchLogDir $cad1_ArchLogDir $cad1_ArchLogDir $cad1_ArchLogDir) #---- WAL archives ---- walArchive=n # wal日志记录,开启则设置y # # 基础配置完成 # #======================================== #======================================== # The following is for extension. Just demonstrate how to write such extension. There's no code # which takes care of them so please ignore the following lines. They are simply ignored by pgxc_ctl. # No side effects. #===========<< Beginning of future extension demonistration >> =========== # You can setup more than one backup set for various purposes, such as disaster recovery. walArchiveSet=(war1 war2) war1_source=(master) # you can specify master, slave or ano other additional slaves as a source of WAL archive. # Default is the master wal1_source=(slave) wal1_source=(additiona_coordinator_slave_set additional_datanode_slave_set) war1_host=node10 # All the nodes are backed up at the same host for a given archive set war1_backupdir=$HOME/pgxc/backup_war1 wal2_source=(master) war2_host=node11 war2_backupdir=$HOME/pgxc/backup_war2 #===========<< End of future extension demonistration >> ===========
第三步、执行初始化 pgxc_ctl -c /home/postgres/pgxc_ctl/pgxc_ctl.conf init all
第四步、启动集群 默认初始化完成后已经启动了集群了,平常进行开启关闭使用以下语句: pgxc_ctl -c /home/postgres/pgxc_ctl/pgxc_ctl.conf start all pgxc_ctl -c /home/postgres/pgxc_ctl/pgxc_ctl.conf stop all
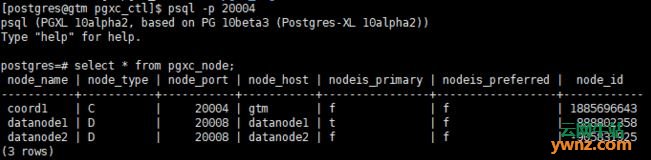
第五步、进入psql psql -p 20004 进入其他远程节点 psql -h datanode2 -p 20008 -U postgres 查询集群状态 select * from pgxc_node;
至此整个postgresql-xl集群环境搭建完成。
相关主题 |