|
本文介绍在Ubuntu 18.04系统上配置MySQL 8.0主从复制(MySQL 8.0 Master Slave Replication)的方法,MySQL replication过程允许你维护MySQL数据的多个副本,主服务器中的所有数据都在自动化过程中同步到Slave服务器。需要先安装MySQL,参考在Ubuntu 18.04/16.04命令行上安装MySQL 8.0.11的全过程,完成MySQL服务器的安装后,继续配置复制,本文设置将使用以下服务器: Master MySQL Server: 10.131.74.92 Slave MySQL Server: 10.131.35.167
一、配置主服务器 要进行的第一个配置更改是为master数据库设置服务器ID: $ sudo vim /etc/mysql/mysql.conf.d/mysqld.cnf 在[mysqld]部分下面添加以下行,请注意,数字集必须是唯一的,不能在群集中的任何节点上重复使用: server-id = 1 设置log_bin位置,这是所有复制信息所在的位置,在主服务器上进行的所有更改都将写入此文件,所有从站都将从中复制数据: log-bin = /var/log/mysql/mysql-bin.log tmpdir = /tmp binlog_format = ROW max_binlog_size = 500M sync_binlog = 1 expire-logs-days = 7 slow_query_log 完整的简单配置如下所示: [mysqld] pid-file = /var/run/mysqld/mysqld.pid socket = /var/run/mysqld/mysqld.sock datadir = /var/lib/mysql log-error = /var/log/mysql/error.log server-id = 1 log-bin = /var/log/mysql/mysql-bin.log tmpdir = /tmp binlog_format = ROW max_binlog_size = 500M sync_binlog = 1 expire-logs-days = 7 slow_query_log 重新启动mysql服务以使更改生效: $ sudo systemctl restart mysql
二、在Master数据库上创建Replication用户 我们现在需要创建一个数据库用户,以便在连接时由slave使用,以root用户身份登录MySQL数据库并创建用户: root@node-01:~# mysql -u root -p Enter password: Welcome to the MySQL monitor. Commands end with ; or \g. Your MySQL connection id is 9 Server version: 8.0.11 MySQL Community Server - GPL Copyright (c) 2000, 2018, Oracle and/or its affiliates. All rights reserved. Oracle is a registered trademark of Oracle Corporation and/or its affiliates. Other names may be trademarks of their respective owners. Type 'help;' or '\h' for help. Type '\c' to clear the current input statement. mysql> create user rpl_user@10.131.35.167 identified by 'password'; Query OK, 0 rows affected (0.08 sec) 授予用户REPLICATION SLAVE权限: mysql> grant replication slave on *.* to rpl_user@10.131.35.167; Query OK, 0 rows affected (0.09 sec) mysql> flush privileges; Query OK, 0 rows affected (0.00 sec) 确认已创建用户的授权: mysql> show grants for replica_user@10.131.35.167; Grants for replica_user@10.131.35.167 GRANT REPLICATION SLAVE ON *.* TO `replica_user`@`10.131.35.167` 1 row in set (0.00 sec)
三、安装和配置从属服务器 在Slave服务器上以与主服务器类似的过程安装MySQL Server 8.0,可以参考上面的安装方法。 完成安装后,通过编辑文件配置slave: $ sudo vim /etc/mysql/mysql.conf.d/mysqld.cnf log_bin = /var/log/mysql/mysql-bin.log server-id = 2 read_only = 1 tmpdir = /tmp binlog_format = ROW max_binlog_size = 500M sync_binlog = 1 expire-logs-days = 7 slow_query_log = 1 read_only = 1:这将从设备设置为只读模式,只有具有SUPER权限和复制从属线程的用户才能修改其上的数据,这可确保没有可能意外修改从站而非主站上数据的应用程序。 server-id = 2:这是唯一的服务器标识号。如果未设置“master-host”,它将默认为1。 log_bin = /var/log/mysql/mysql-bin.log:这启用了二进制日志记录,这是在复制配置中充当MASTER所必需的,如果需要从最新备份执行时间点恢复,则还需要二进制日志。 完成更改后重新启动mysql服务器: $ sudo systemctl restart mysql
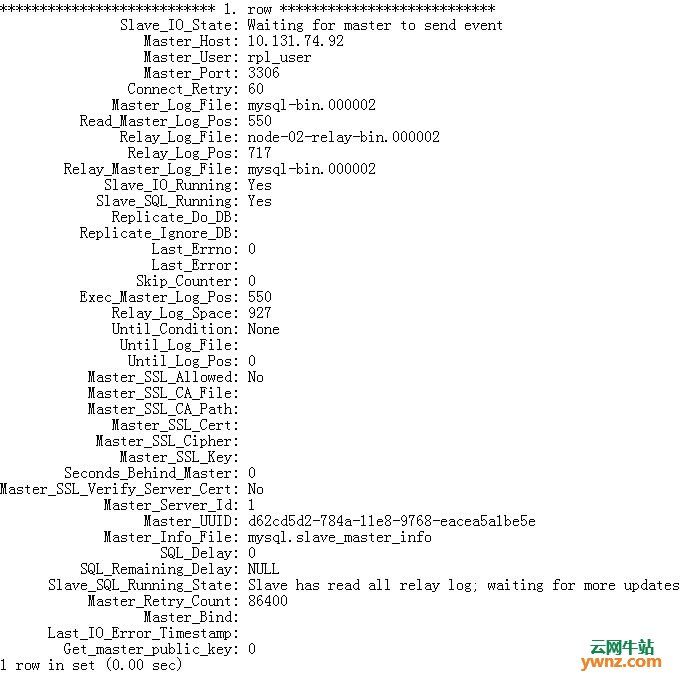
四、初始化Replication过程 我们应该准备好在从属服务器上启动复制过程,首先检查主服务器上的状态: mysql> show master status\G ************* 1. row ************* File: mysql-bin.000002 Position: 155 Binlog_Do_DB: Binlog_Ignore_DB: Executed_Gtid_Set: 1 row in set (0.00 sec) 记下当前的主日志文件和位置,然后使用从主状态命令获取的详细信息配置从服务器: root@node-02:~# mysql -u root -p Enter password: Welcome to the MySQL monitor. Commands end with ; or \g. Your MySQL connection id is 10 Server version: 8.0.11 MySQL Community Server - GPL Copyright (c) 2000, 2018, Oracle and/or its affiliates. All rights reserved. Oracle is a registered trademark of Oracle Corporation and/or its affiliates. Other names may be trademarks of their respective owners. Type 'help;' or '\h' for help. Type '\c' to clear the current input statement. mysql> CHANGE MASTER TO MASTER_HOST='10.131.74.92', -> MASTER_USER='rpl_user', -> MASTER_PASSWORD='password', -> MASTER_LOG_FILE='mysql-bin.000002', -> MASTER_LOG_POS=155; Query OK, 0 rows affected, 2 warnings (0.11 sec) 然后在slave上启动复制: mysql> start slave; Query OK, 0 rows affected (0.06 sec) 要检查从站状态,请使用: mysql> show slave status\G
Slave IO和SQL应指示运行状态: Slave_IO_Running: Yes Slave_SQL_Running: Yes 至此,初始化Replication过程完成。
相关主题 |