|
本文介绍使用Apache/Nginx在Ubuntu 18.04系统上安装Matomo的详细步骤,全称为Matomo Web Analytics(以前称为Piwik)。Matomo是用PHP编写的,使用MySQL/MariaDB数据库,具有512MB RAM的服务器足以运行Matomo,假设你已经在Ubuntu 18.04上设置了LAMP或LEMP,如果还没有请参考在Ubuntu 18.04系统中安装LAMP服务器全过程或如何在Ubuntu 18.04上安装Linux,Nginx,MySQL,PHP(LEMP堆栈)。
第1步:在Ubuntu 18.04上下载Matomo 通过SSH登录服务器,你始终可以使用以下命令在服务器上下载最新版本的Matomo,可上matomo.org网站下载,在写本文时,最新版本是Matomo 3.7,它附带了一个新功能-标签管理器,这是Matomo在过去几年中最重要的里程碑之一: wget https://builds.matomo.org/matomo-latest.zip 下载后,解压缩: sudo apt install unzip sudo unzip matomo-latest.zip -d /var/www/ -d选项指定目标目录,Matomo网络文件将被提取到/var/www/matomo/,然后我们需要将此目录的所有者更改为www-data,以便Web服务器(Nginx)可以写入此目录: sudo chown www-data:www-data /var/www/matomo/ -R
第2步:在MariaDB中创建数据库和用户 安装参考在Ubuntu 18.04系统上安装MariaDB 10.4的步骤。 使用以下命令登录MariaDB数据库,由于MariaDB现在使用unix_socket插件来验证用户登录,因此无需输入MariaDB root密码,我们只需要在mysql命令前加上sudo: sudo mysql 或者,你也可以使用此命令登录。 sudo mariadb 然后为Matomo创建一个数据库,本教程将数据库命名为matomo,你可以使用你喜欢的任何名字。 create database matomo; 创建数据库用户,同样,可以为此用户使用你的首选名称,请替换matomouser及your-password: create user matomouser@localhost identified by 'your-password'; 授予此用户matomo数据库的所有权限: grant all privileges on matomo.* to matomouser@localhost identified by 'your-password'; 刷新权限并退出: flush privileges; exit;
第3步:创建Apache或Nginx配置文件 1、Apache 如果你更喜欢使用Apache Web服务器,请在/etc/apache2/sites-available/目录中创建虚拟主机配置文件: sudo nano /etc/apache2/sites-available/matomo.conf 将以下文本放入文件中,将analytics.example.com替换为实际地址,不要忘记为域名设置A记录: <VirtualHost *:80> ServerAdmin webmaster@localhost ServerName analytics.example.com DocumentRoot /var/www/matomo/ <Directory /var/www/matomo> DirectoryIndex index.php Options FollowSymLinks AllowOverride All Require all granted </Directory> <Files "console"> Options None Require all denied </Files> <Directory /var/www/matomo/misc/user> Options None Require all granted </Directory> <Directory /var/www/matomo/misc> Options None Require all denied </Directory> <Directory /var/www/matomo/vendor> Options None Require all denied </Directory> ErrorLog ${APACHE_LOG_DIR}/matomo_error.log CustomLog ${APACHE_LOG_DIR}/matomo_access.log combined </VirtualHost> 保存并关闭文件,然后启用此虚拟主机: sudo a2ensite matomo.conf 重新加载Apache Web服务器以使更改生效: sudo systemctl reload apache2 2、Nginx 如果你更喜欢使用Nginx Web服务器,请在/etc/nginx/conf.d/目录中创建一个matomo.conf文件: sudo nano /etc/nginx/conf.d/matomo.conf 将以下文本放入文件中,将analytics.example.com替换为实际地址,不要忘记为域名设置A记录: server { listen [::]:80; # remove this if you don't want Matomo to be reachable from IPv6 listen 80; server_name analytics.example.com; access_log /var/log/nginx/matomo.access.log; error_log /var/log/nginx/matomo.error.log; root /var/www/matomo/; index index.php; ## only allow accessing the following php files location ~ ^/(index|matomo|piwik|js/index).php { include snippets/fastcgi-php.conf; fastcgi_param HTTP_PROXY ""; # prohibit httpoxy: https://httpoxy.org/ fastcgi_pass unix:/run/php/php7.2-fpm.sock; } ## needed for HeatmapSessionRecording plugin location = /plugins/HeatmapSessionRecording/configs.php { include snippets/fastcgi-php.conf; fastcgi_param HTTP_PROXY ""; fastcgi_pass unix:/run/php/php7.2-fpm.sock; } ## deny access to all other .php files location ~* ^.+.php$ { deny all; return 403; } ## serve all other files normally location / { try_files $uri $uri/ =404; } ## disable all access to the following directories location ~ /(config|tmp|core|lang) { deny all; return 403; # replace with 404 to not show these directories exist } location ~ /.ht { deny all; return 403; } location ~ .(gif|ico|jpg|png|svg|js|css|htm|html|mp3|mp4|wav|ogg|avi|ttf|eot|woff|woff2|json)$ { allow all; ## Cache images,CSS,JS and webfonts for an hour ## Increasing the duration may improve the load-time, but may cause old files to show after an Matomo upgrade expires 1h; add_header Pragma public; add_header Cache-Control "public"; } location ~ /(libs|vendor|plugins|misc/user) { deny all; return 403; } ## properly display textfiles in root directory location ~/(.*.md|LEGALNOTICE|LICENSE) { default_type text/plain; } } 保存并关闭文件,测试Nginx配置,然后重新加载Nginx以使更改生效: sudo nginx -t sudo systemctl reload nginx
第4步:安装并启用PHP模块 运行以下命令以安装Matomo所需或推荐的PHP模块: sudo apt install php-imagick php7.2-common php7.2-gd php7.2-json php7.2-curl php7.2-zip php7.2-xml php7.2-mbstring php7.2-bz2 php7.2-intl 如果使用的是Apache Web服务器,则需要重新加载它以使其与这些PHP模块一起运行: sudo systemctl reload apache2 Nginx用户无需重新加载。 现在,应该可以访问http://analytics.example.com上的Matomo基于Web的安装向导,但在输入任何信息之前,请启用HTTPS。
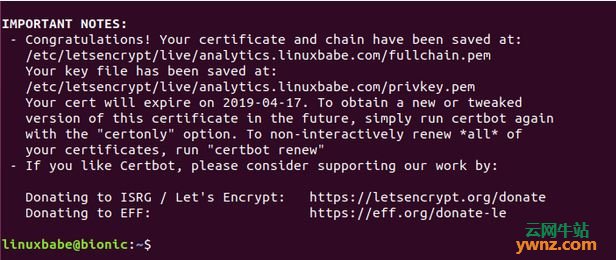
第5步:启用HTTPS 要在访问Matomo Web界面时使用加密处理,我们可以通过安装从Let's Encrypt发出的免费TLS证书来启用HTTPS,运行以下命令在Ubuntu 18.04上安装Let的加密客户端(certbot): sudo apt install software-properties-common sudo add-apt-repository ppa:certbot/certbot sudo apt update sudo apt install certbot 如果使用Nginx,还需要安装Certbot Nginx插件: sudo apt install python3-certbot-nginx 然后运行以下命令以获取并安装TLS证书(请修改为自己的数据): sudo certbot --nginx --agree-tos --redirect --hsts --staple-ocsp --email you@example.com -d analytics.example.com 如果使用Apache,则还需要安装Certbot Apache插件: sudo apt install python3-certbot-apache 然后运行此命令以获取并安装TLS证书(请修改为自己的数据): sudo certbot --apache --agree-tos --redirect --hsts --staple-ocsp --email you@example.com -d analytics.example.com 说明: --nginx:使用nginx插件。 --apache:使用Apache插件。 --agree-tos:同意服务条款。 --redirect:通过301重定向强制HTTPS。 --hsts:将Strict-Transport-Security标头添加到每个HTTP响应中,强制浏览器始终对域使用TLS,防御SSL/TLS剥离。 --staple-ocsp:启用OCSP Stapling,将有效的OCSP响应装订到服务器在TLS期间提供的证书。 现在应该获取并自动安装证书:
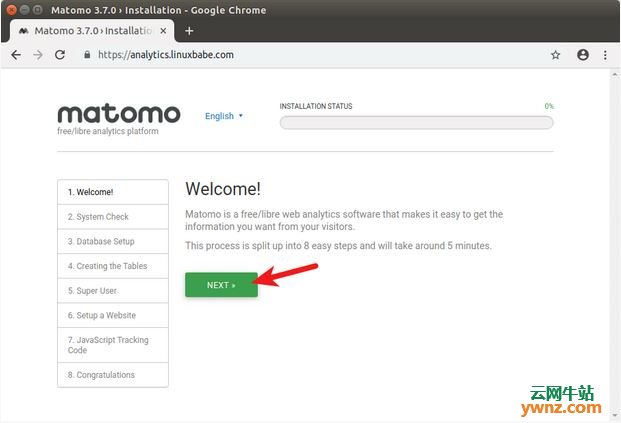
第6步:在Web浏览器中完成安装Matomo 转到https://analytics.example.com(要自己的地址)以启动基于Web的安装向导,然后单击下一步按钮:
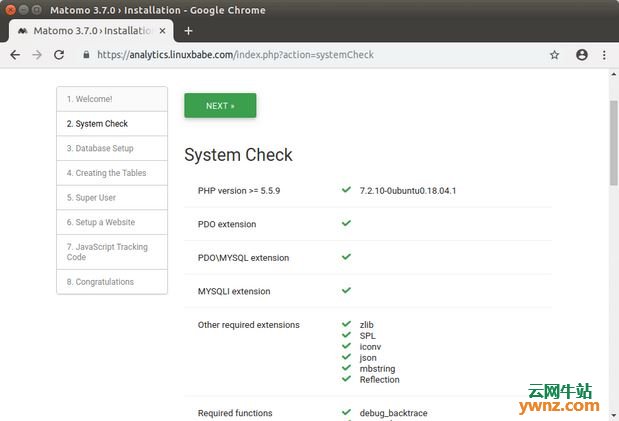
它将检查你的系统是否满足PHP扩展等要求,如果满足所有要求,请单击下一步:
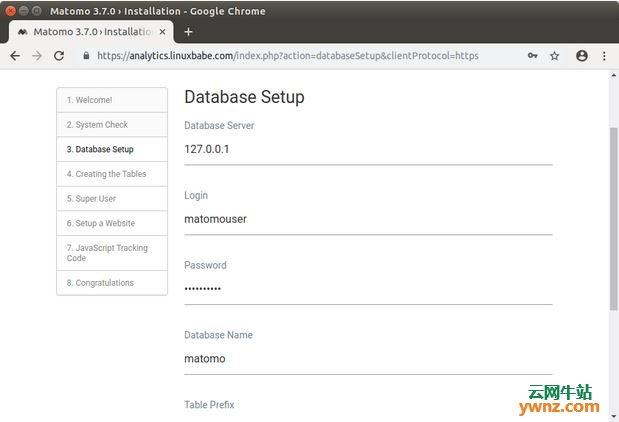
在下一步中,输入之前创建的MariaDB用户名,密码和数据库名称,可以在其他字段中使用默认值:
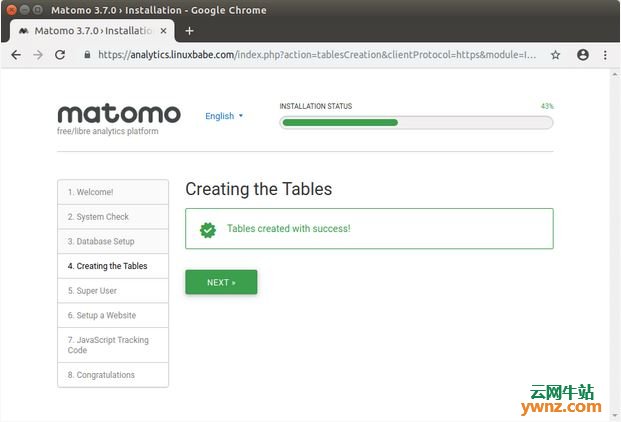
单击下一步后,安装向导将自动在数据库中创建一些表,单击下一步继续:
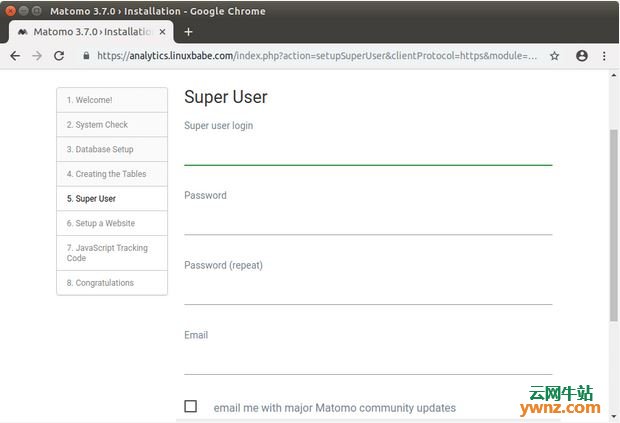
在下一个屏幕中,为Matomo Web界面创建管理员用户:
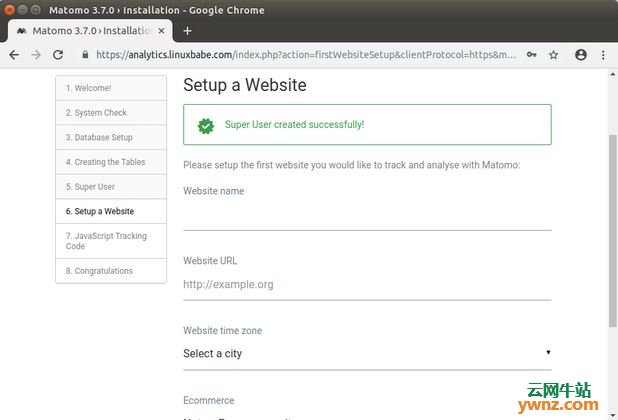
创建管理员用户后,需要添加网站以收集分析数据:
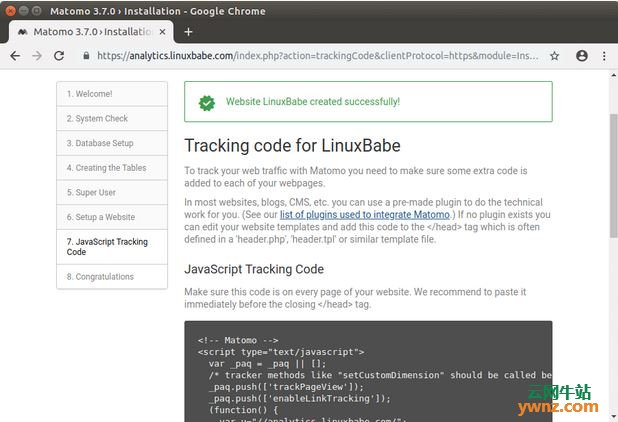
然后,需要将JavaScript跟踪代码添加到你的网站:
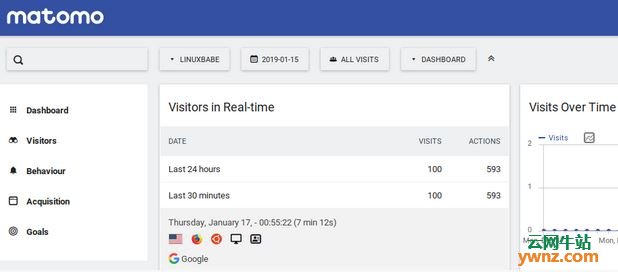
到了这里请单击下一步按钮,Matomo安装完成,你现在就可以登录Matomo仪表板并查看访客数据了:
附:为中高流量网站设置Cron Jobs 如果你的网站每天有数千页的浏览量,则需要设置一个cron作业来自动存档Matomo报告,使用以下命令创建Cron作业文件: sudo nano /etc/cron.d/matomo-archive 然后将以下行添加到该文件中(注意修改成你的数据): MAILTO="your@example.com" 5 * * * * www-data /usr/bin/php /var/www/matomo/console core:archive --url=https://analytics.example.com > /dev/null 标准输出将发送到/dev/null,标准错误将发送到你的电子邮件地址,保存并关闭文件,这个Cron工作将在5分钟后每小时运行一次。
相关主题 |