|
本文介绍使用Nginx与Letsencrypt SSL加密在Ubuntu 18.04操作系统上安装DokuWiki的方法,当然你也可以改成使用Apache Web服务器,经测试,都可以正常运行。
第1步:更新系统包 确保你的apt索引和所有软件包都已经更新了: $ sudo apt-get update $ sudo apt-get upgrade $ sudo apt-get dist-upgrade $ sudo reboot 重新启动系统后,设置系统主机名并继续安装php和所有必需的模块: $ sudo hostnamectl set-hostname wiki.computingforgeks.com 参考:如何更改Ubuntu 18.04 Hostname主机名。
第2步:安装php和所需的模块 我们现在需要安装php和DokuWiki所需的一些php模块,运行以下命令以安装: $ sudo apt-get -y install php php-curl php-apcu php-fpm php-bcmath \ php-gd php-intl php-pear php-imap php-memcache libapache2-mod-php \ php-pspell php-recode php-tidy php-xmlrpc \ php-mbstring php-gettext php-gmp php-json php-xml php-common 所安装的PHP版本是7.2,可以使用命令php -v来检查。 PHP socket位于/var/run/php/php7.2-fpm.sock,其配置为/etc/php/7.2/fpm/pool.d/www.conf。 php-fpm服务默认启动,名称为php7.2-fpm.service。 要获取系统上安装的php扩展列表,请使用php -m命令: root@wiki:~# php -m
第3步:安装Nginx和certbot-auto 让我们安装nginx webserver和certbot-auto,稍后我们将使用它来获取DokuWiki站点的证书: $ sudo apt-get update $ sudo apt-get install wget nginx $ wget https://dl.eff.org/certbot-auto $ chmod +x certbot-auto $ sudo mv certbot-auto /usr/local/bin/certbot-auto
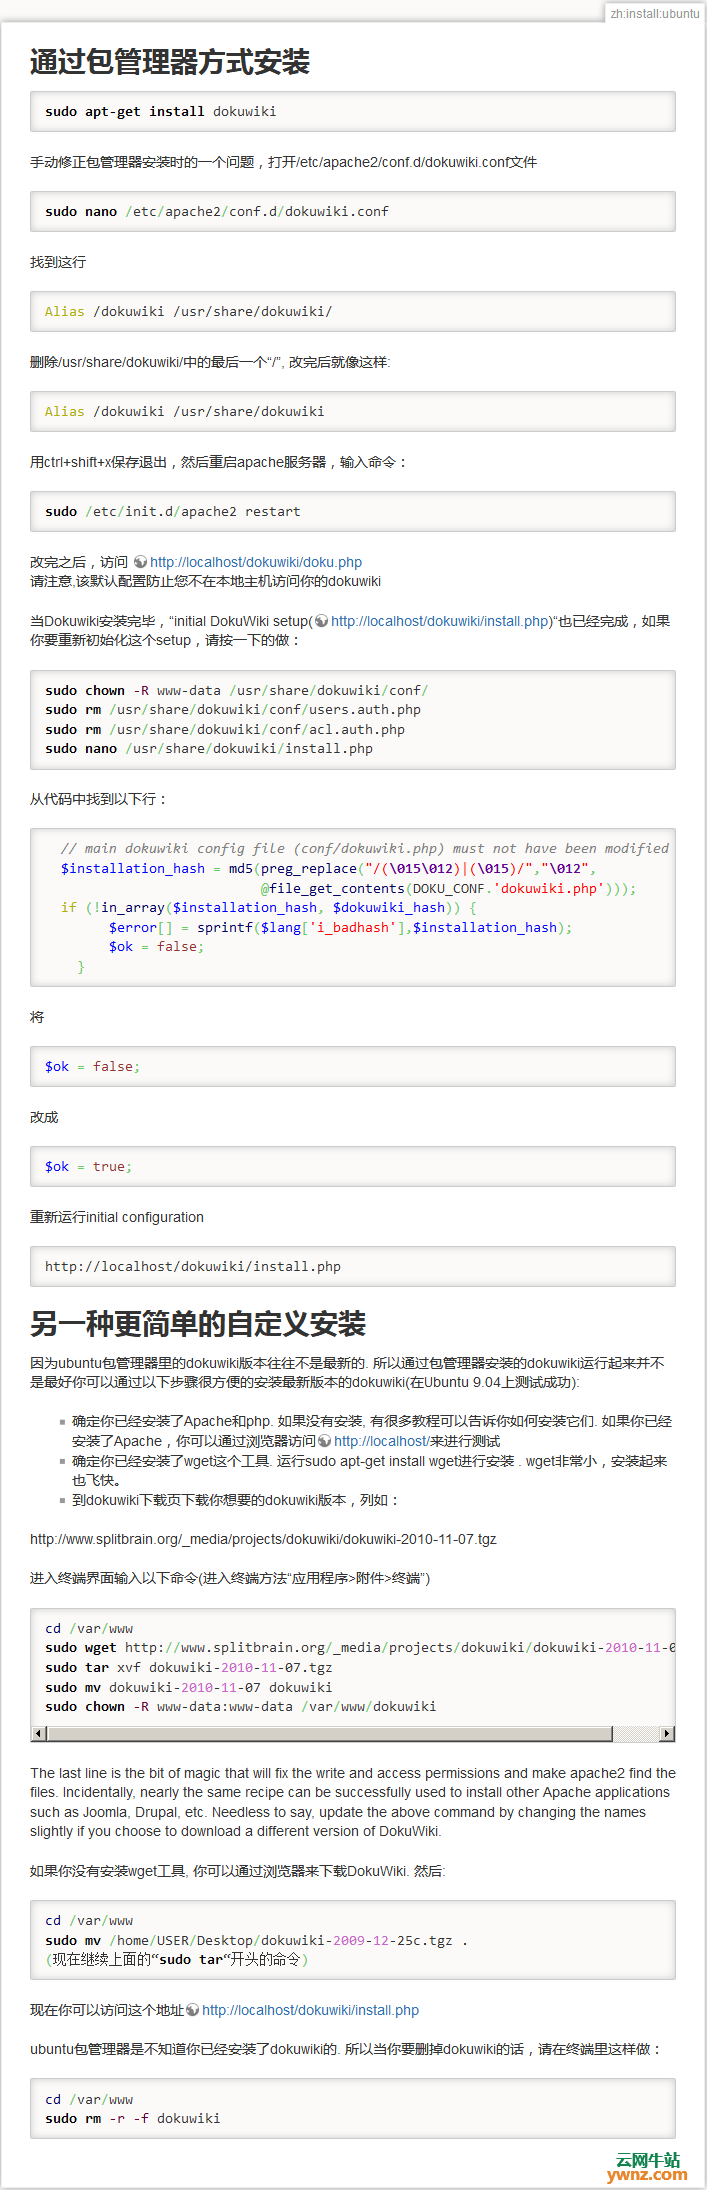
第4步:下载并安装DokuWiki 当前版本是release_stable_2018-04-22a,在dokuwiki下载页下载: wget https://github.com/splitbrain/dokuwiki/archive/release_stable_2018-04-22b.tar.gz 使用tar提取DokuWiki存档 $ tar xvf release_stable_2018-04-22a.tar.gz $ sudo mv dokuwiki-release_stable_2018-04-22a /var/www/html/dokuwiki 将/var/www/html/dokuwiki的所有权更改为www-data用户和组: $ sudo chown -R www-data:www-data /var/www/html/dokuwiki/ 附:通过包管理器方式安装(命令:sudo apt-get install dokuwiki)与另一种更简单的自定义安装,请看下面截图
第5步:申请Letsencrypt SSL证书 停止nginx,因为certbot-auto将绑定到端口80: $ sudo systemctl stop nginx 然后申请证书: # export DOMAIN='wiki.computingforgeeks.com' # export EMAIL="webmaster@computingforgeeks.com" # certbot-auto certonly --standalone -d $DOMAIN \ --preferred-challenges http --agree-tos -n -m $EMAIL \ --keep-until-expiring 如果成功,certbot会给你一个成功的消息: root@wiki:~# certbot-auto certonly --standalone -d $DOMAIN --preferred-challenges http --agree-tos -n -m $EMAIL --keep-until-expiring Saving debug log to /var/log/letsencrypt/letsencrypt.log Plugins selected: Authenticator standalone, Installer None Obtaining a new certificate Performing the following challenges: http-01 challenge for wiki.computingforgeeks.com Waiting for verification... Cleaning up challenges IMPORTANT NOTES: - Congratulations! Your certificate and chain have been saved at: /etc/letsencrypt/live/wiki.computingforgeeks.com/fullchain.pem Your key file has been saved at: /etc/letsencrypt/live/wiki.computingforgeeks.com/privkey.pem Your cert will expire on 2018-09-29. To obtain a new or tweaked version of this certificate in the future, simply run certbot-auto again. To non-interactively renew *all* of your certificates, run "certbot-auto renew"
第5步:使用SSL配置Nginx、配置DokuWiki及将用户添加到DokuWiki参考文章 接下来的使用SSL配置Nginx: systemctl enable nginx vim /etc/nginx/conf.d/dokuwiki.conf 检查nginx syntax: root@wiki:~# nginx -t nginx: the configuration file /etc/nginx/nginx.conf syntax is ok nginx: configuration file /etc/nginx/nginx.conf test is successful 如果没有错误,请重启nginx和php-fpm $ sudo systemctl restart php-fpm nginx $ sudo systemctl status php7.2-fpm.service nginx 更多内容请参考:https://ywnz.com/linuxyffq/4159.html,配置方法是一样的,包括配置DokuWiki及将用户添加到DokuWiki,即按照参数文章的第6步至第9步操作。
相关主题 |