|
如果你已在Linux系统中安装了Semaphore,那么可以为Semaphore Ansible Web UI配置Nginx反向代理,请按照以下方法操作。
一、安装Semaphore的参考文章 在Ubuntu/Debian上安装和设置Semaphore的方法。
二、安装Nginx Web服务器 在Semaphore服务器或实例上安装Nginx Web服务器,该实例将用作Semaphore的代理服务器: 1、在Ubuntu/Debian中安装Nginx $ sudo apt-get -y install nginx 2、在CentOS中安装Nginx $ sudo yum -y install nginx 安装服务后,启动它并设置为在系统引导时启动: sudo systemctl start nginx sudo systemctl enable nginx 验证nginx服务的状态是否“running”,运行systemctl status nginx命令,如下图所示:
三、配置Nginx 创建semaphore nginx配置文件: sudo vim /etc/nginx/conf.d/semaphore.conf 将以下内容粘贴到semaphore.conf文件中: upstream semaphore { server 127.0.0.1:3000; } server { listen 80; server_name ansible.example.com; client_max_body_size 0; chunked_transfer_encoding on; location / { proxy_pass http://semaphore/; proxy_set_header Host $http_host; proxy_set_header X-Real-IP $remote_addr; proxy_set_header X-Forwarded-For $proxy_add_x_forwarded_for; proxy_set_header X-Forwarded-Proto $scheme; proxy_buffering off; proxy_request_buffering off; } location /api/ws { proxy_pass http://semaphore/api/ws; proxy_http_version 1.1; proxy_set_header Upgrade $http_upgrade; proxy_set_header Connection "upgrade"; proxy_set_header Origin ""; } } 注:请自行更换ansible.example.com。 重启nginx: sudo systemctl restart nginx 如果没有DNS,请使用Nginx服务器IP和主机名在/etc/hosts文件中添加以下一行: 192.168.10.15 ansible.example.com 这个时候就可以使用http://ansible.example.com来配置semaphore web。
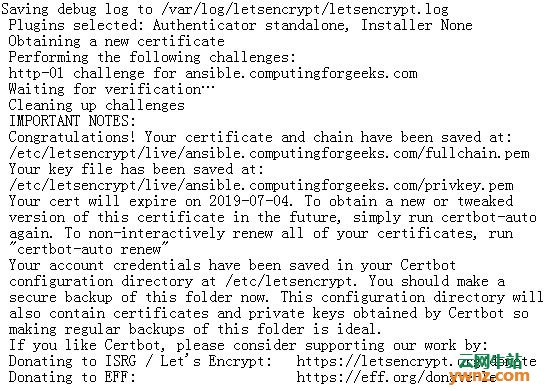
四、配置https 建议在Nginx配置中使用SSL证书来保护对semaphore的访问,让我们为此用途获取Let’s Encrypt SSL证书。 安装certbot-auto: sudo wget https://dl.eff.org/certbot-auto -P /usr/local/bin chmod a+x /usr/local/bin/certbot-auto 参考:使用Certbot:在Linux上安装letsencrypt的最简单方法。 停止nginx服务: sudo systemctl stop nginx 然后请求Let’s Encrypt SSL证书: export DOMAIN="ansible.example.com" export EMAIL="email@example.com" sudo certbot-auto certonly --standalone -d $DOMAIN --preferred-challenges http --agree-tos -n -m $EMAIL --keep-until-expiring 会有如下的输出信息:
使用SSL设置配置Nginx: upstream semaphore { server 127.0.0.1:3000; } server { listen 80; server_name ansible.example.com; return 301 https://$host$request_uri; } server { listen 443 ssl; server_name ansible.example.com; # add Strict-Transport-Security to prevent man in the middle attacks add_header Strict-Transport-Security "max-age=31536000" always; # SSL ssl_certificate /etc/letsencrypt/live/ansible.example.com/fullchain.pem; ssl_certificate_key /etc/letsencrypt/live/ansible.example.com/privkey.pem; # Recommendations from https://raymii.org/s/tutorials/Strong_SSL_Security_On_nginx.html ssl_protocols TLSv1.1 TLSv1.2; ssl_ciphers 'EECDH+AESGCM:EDH+AESGCM:AES256+EECDH:AES256+EDH'; ssl_prefer_server_ciphers on; ssl_session_cache shared:SSL:10m; # disable any limits to avoid HTTP 413 for large image uploads client_max_body_size 0; # required to avoid HTTP 411: see Issue #1486 (https://github.com/docker/docker/issues/1486) chunked_transfer_encoding on; location / { proxy_pass http://semaphore/; proxy_set_header Host $http_host; proxy_set_header X-Real-IP $remote_addr; proxy_set_header X-Forwarded-For $proxy_add_x_forwarded_for; proxy_set_header X-Forwarded-Proto $scheme; proxy_buffering off; proxy_request_buffering off; } location /api/ws { proxy_pass http://semaphore/api/ws; proxy_http_version 1.1; proxy_set_header Upgrade $http_upgrade; proxy_set_header Connection "upgrade"; proxy_set_header Origin ""; } } 注:请将example.com替换为你的域名。 验证Nginx配置: # nginx -t nginx: the configuration file /etc/nginx/nginx.conf syntax is ok nginx: configuration file /etc/nginx/nginx.conf test is successful 重启Nginx: sudo systemctl restart nginx 配置完后就可以在浏览器中输入https://example.com访问Semaphore控制台了,如下图所示:
注:以上使用的是域名访问Semaphore Ansible Web UI,而不是通过IP地址和3000端口进行访问。
相关主题 |