|
本文介绍的内容有:在Proxmox VE 6.x上安装Dnsmasq、使用Dnsmasq配置DHCP服务器及使用DHCP服务在网络上创建VM(虚拟机)。
简介 Dnsmasq是易于配置且轻量级的DHCP服务器和DNS转发器。Dnsmasq的主要目的是在小型网络设置中提供DNS服务以及DHCP(可选)。Dnsmasq中的DHCP服务器与DNS服务器无缝集成。由DHCP服务器分配IP地址的计算机以每个主机或中央配置文件中配置的名称出现在DNS中。 Dnsmasq支持动态和静态DHCP租约。除了声明的功能外,它还支持BOOTP/TFTP,可用于无盘计算机的网络启动。Dnsmasq可在Proxmox虚拟化平台中用于动态或静态分配IP地址,以及管理DNS。我们将在一个Proxmox虚拟机管理程序中运行Dnsmasq,并将服务绑定到特定的网络接口/网桥。
在Proxmox VE 6.x上安装Dnsmasq 我将从默认的上游存储库中的一个Proxmox虚拟机管理程序中安装dnsmasq: sudo apt update sudo apt install dnsmasq 继续在Proxmox VE 6.x上安装dnsmasq: Reading state information... Done The following additional packages will be installed: dns-root-data dnsmasq-base Suggested packages: resolvconf The following NEW packages will be installed: dns-root-data dnsmasq dnsmasq-base 0 upgraded, 3 newly installed, 0 to remove and 0 not upgraded. Need to get 463 kB of archives. After this operation, 1,027 kB of additional disk space will be used. Do you want to continue? [Y/n] y 还安装提供dig命令的dnsutils软件包: sudo apt install dnsutils -y 测试您的安装: dig computingforgeeks.com @localhost nslookup computingforgeeks.com localhost Dnsmasq中的DNS功能配置为将所有请求转发到系统的/etc/resolv.conf文件中配置的默认DNS设置。 参考:在Ubuntu 18.04 LTS系统上安装和配置Dnsmasq的步骤。
使用Dnsmasq配置DHCP服务器 在Proxmox服务器上成功安装Dnsmasq之后,您可以开始配置DHCP服务: sudo vim /etc/dnsmasq.conf 为dnsmasq设置域: domain=example.com 让dnsmasq知道它将用于侦听DHCP请求的以太网接口: #Around line 106 interface=vmbr1 # Or which to listen on by address (remember to include 127.0.0.1 if you use this.) #listen-address= 设置要分发的IP地址的DHCP服务器范围: #around line 159 dhcp-range=192.168.50.50,192.168.50.200,12h 设置dnsmasq提供的默认路由: #around line 337 dhcp-option=vmbr1,3,192.168.50.1 #dhcp-option=eth0,3,192.168.50.1 提供上游DNS服务器: #line 66 # You can use Google's open DNS servers server=8.8.8.8 server=8.8.4.4 设置DHCP租约数据库的文件路径: dhcp-leasefile=/var/lib/misc/dnsmasq.leases 测试您的配置: $ sudo dnsmasq --test dnsmasq: syntax check OK. 重新启动dnsmasq服务: sudo systemctl restart dnsmasq sudo systemctl enable dnsmasq
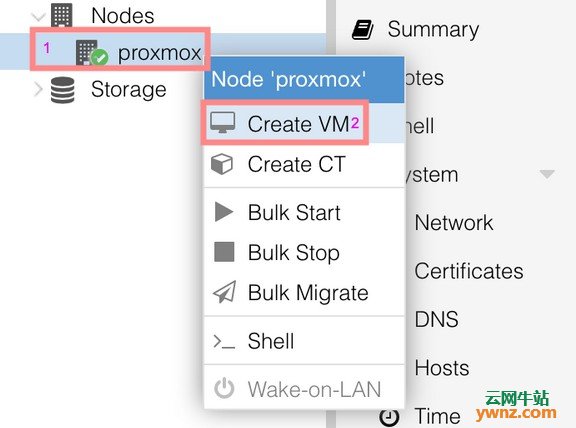
使用DHCP服务在网络上创建VM 从Proxmox Web控制台创建一个新的虚拟机:
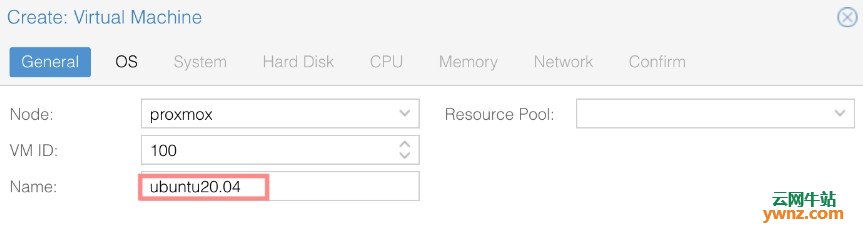
我们给它起个名字,然后选择运行它的节点:
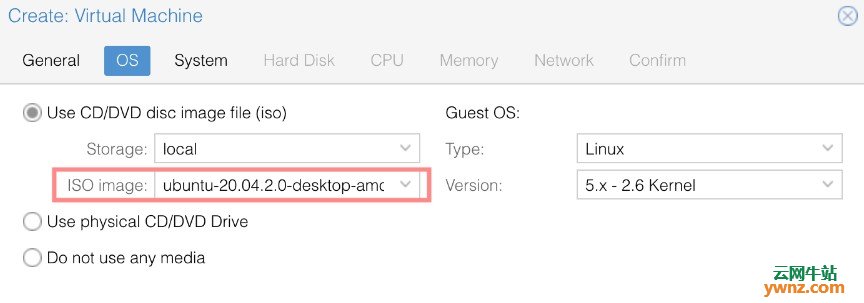
选择操作系统安装ISO:
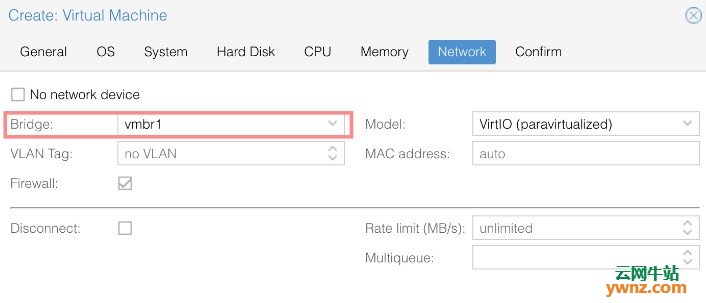
选择正确的网络(应该与dnsmasq DHCP配置中使用的网络相同):
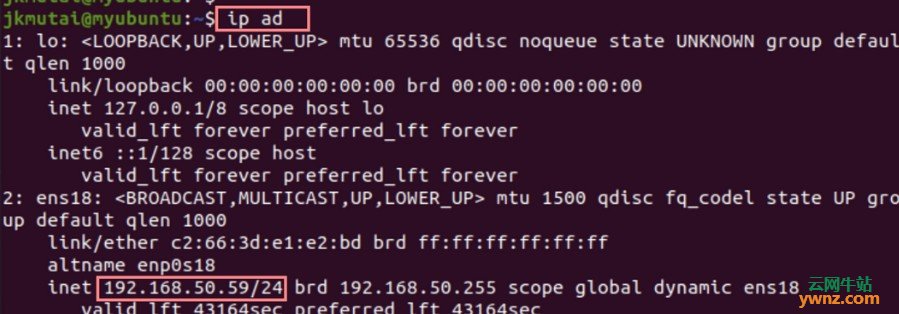
安装操作系统,完成重启后,检查IP地址是否来自DHCP:
如果接口没有自动获得DHCP服务器分配的IP地址,则可以尝试手动请求: sudo dhclient interface
相关主题 |